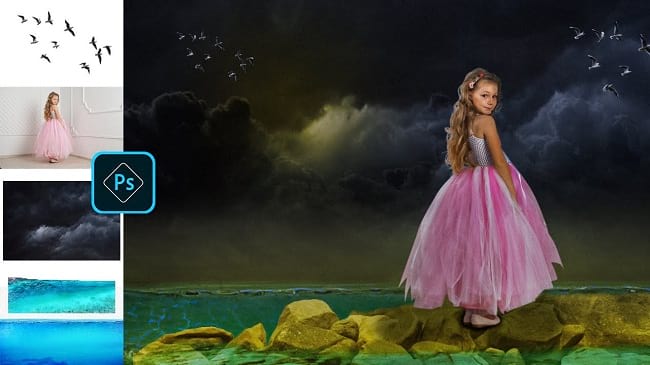
Stand alone photo manipulation is another technique of making fantasy images. Making fantasy images exhibits your creative mind and skills. If you want to learn more about how to create such photo editing, this article will help you. In this photo manipulation photoshop tutorial article, I am going to show you How to do stand alone photo manipulation. So, read this article till the end and follow the steps with care, you will find easy instructions from this article, and I hope you will be able to do it easily. Let’s see How to do stand alone photo manipulation:
Photos You will need to make stand alone photo
You have to make sure you have the following images for making stand alone photo effects:
- A photo of a rock.
- A photo of half underwater.
- A photo of a man. The full body of the man is required.
- A photo of the sky.
- A photo of a bird.
- A photo of a group of birds. Make sure the bird’s photo has a transparent background.
Let’s begin the stand alone photo effect making:
Step 1: Create a New Document
First of all, you have to create a new blank document. To do that, go to the “File” menu and then select the “New” option. You will see that a window has appeared where you can choose a preset canvas or create a custom canvas. If you want to create a custom one, give “Width” and “Height” size and click on the “Create” button. A new document will be created afterward. Here, I have made a custom document of 1000 pixels by 700 pixels, this is a random size, you can choose the document size as per your choice.
Step 2: Open a photo of rock and insert it in the blank document
- Go to the “File” menu and select the “Open” option. Then, go to your image location and select the image of rock and then click on the “Open” button. Your image will be opened in photoshop afterward.
- Now, separate the rock from the image. To do this, go to the left side’s tools panel and select the “Quick selection tool”. Now, brush over the background of the rock image. You will see that selection is selecting the area automatically. If you see that you have over-selected the area, press & hold the “ALT” button and then brush over the over-selected areas.
- Now, go to the “Select” menu and choose the “Inverse” option. You will see that the rock portion is selected. Then, press “CTRL+J” from the keyboard. You will see that the rock portion is copied in a new layer “Layer 1”.
- Now, press “CTRL+A” from the keyboard to select the image, then press “CTRL+C” from the keyboard to copy the image, then come to your blank document and press “CTRL+V” to paste the copied image. A new layer “Layer 1” will be added. Rename this rock image “Layer 1” layer as “Rock”.
- Increase or decrease the size of the rock photo. To do this, press “CTRL+T” to activate the free transform, then click & drag the corner’s handler and drag it outward to increase or drag inward to decrease the size. Make sure that the rock fits almost horizontally with the blank document, keep some space blank on the left side of the rock. Then press “Enter”.
Step 3: Split the rock
Now, we will divide the rock into two pieces. We will divide the rock horizontally.
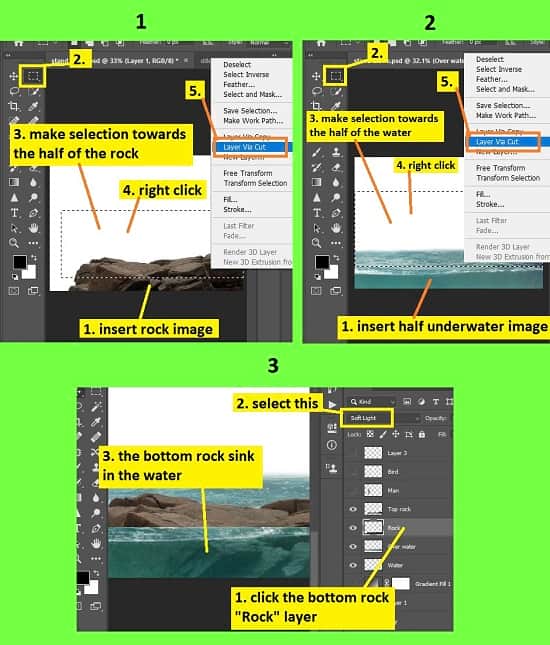
- To do this, go to the layer panel, select the “Rock” layer, then go to the left side’s tools panel and select the “Rectangular marquee tool”. Now, make a rectangular shape selection box which can cover the whole rock, the bottom selection line of the selection box must be on the half of the rock horizontally.
- After that, right click on the selection and select the “Layer via cut” option. The selected part will be separated in a new layer “Layer 1”. Rename the “Layer 1” as “Top rock”.
Step 4: Open a photo of half underwater and insert it in the blank document
- Go to the “File” menu and select the “Open” option. Then, go to your image location and select the image of half underwater and then click on the “Open” button. Your image will be opened in photoshop afterward.
- Now, separate the water portion from the image, we do not need the sky portion. To do this, go to the layer panel, click on the background layer and press “CTRL+J”. Background layer will be duplicated in a layer “Background copy”. Now, go to the left side’s tools panel and select the “Eraser tool”, then right click on the photo and decrease the hardness of the brush. Now, brush over the sky of the half underwater image. The brushed area will be removed.
- Now, press “CTRL+A” from the keyboard to select the image, then press “CTRL+C” from the keyboard to copy the image, then come to your blank document and press “CTRL+V” to paste the copied image. A new layer “Layer 1” will be added. Rename this half underwater image “Layer 1” layer as “Water”.
- Increase or decrease the size of the half underwater photo. To do this, press “CTRL+T” to activate the free transform, then click & drag the corner’s handler and drag it outward to increase or drag inward to decrease the size. Make sure that the water fits horizontally with the blank document. Then press “Enter”.
Step 5: Split the water
Now, we will divide the water into two pieces. We will divide the water horizontally. You will notice two parts of the water. One part is the underwater portion and the other part is the over-water portion. We will divide the water into the over-water portion and the underwater portion.
- To do this, go to the layer panel, select the “Water” layer, then go to the left side’s tools panel and select the “Rectangular marquee tool”. Now, make a rectangular shape selection box which can cover the whole water, the bottom selection line of the selection box must be on the little bit above the joining of the two water parts. That means, you must not select some part of the bottom portion of the over-water portion.
- After that, right click on the selection and select the “Layer via cut” option. The selected part will be separated in a new layer “Layer 1”. Rename the “Layer 1” as “Over water”.
Step 6: Sink the bottom half portion of the rock in the water
To get the rock sinking effect, we have to align the top edges of the both underwater layer “Water” and bottom half of the rock layer “Rock”.
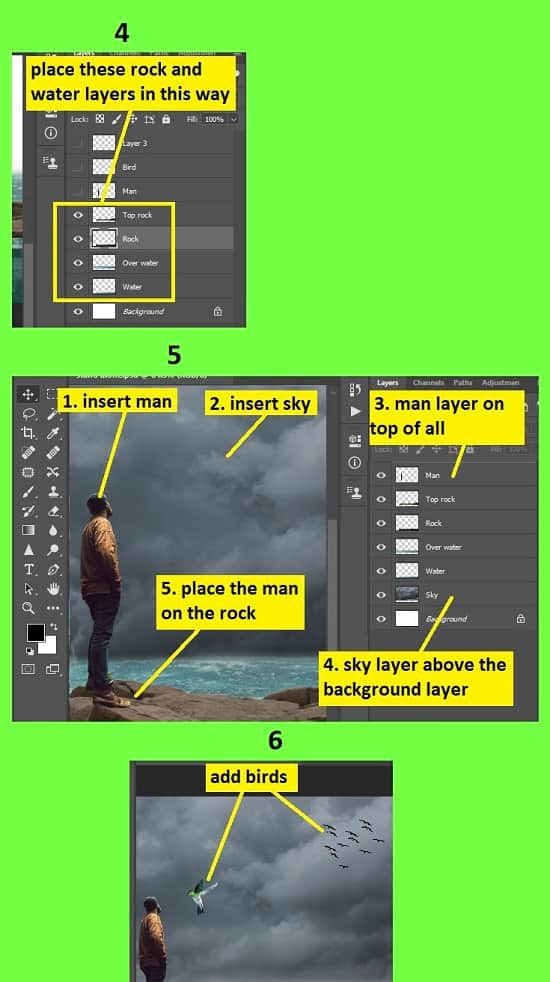
- Before alignment, drag the “Water” layer below the “Rock” layer in the layer panel.
- Then hide the “Top rock” layer and “Over water” layer for a few moments. To hide layers, just click on the eye icon of the layer from the layer panel.
- Now, align the top edge of the both underwater and bottom half of the rock. To do this, go to the layer panel, select the “Rock” layer, then press “CTRL+T” to activate the free transform. Now, use the “Up” key and “Down” key from the keyboard to align the bottom rock with the underwater. After the alignment, press the “Enter” button.
- Now, to get the sinking effect, go to the layer panel, select the “Rock” layer, then set the blend mode from “Normal” to “Soft light”. You will find the blend mode beside the “Opacity” option. You will see that the rock is sinking under the water.
- Now, make visible the hidden layers again. To make visible layers, just click on the eye icon of the layer from the layer panel.
- Now, if you see any gap between the top half of the rock and the bottom half of the rock, then drag down the top half of the rock towards the bottom half of the rock until both are joined. To drag down the top rock, go to the layer panel, select the “Top rock” layer, then press “CTRL+T” to activate the free transform. Now, use the “Up” key or “Down” key from the keyboard to join both parts of the rock. After that, press the “Enter” button.
- Now, drag the “Over water” layer between the “Rock” layer and “Water” layer in the layer panel. You will see that, over water is gone behind the top rock.
Step 7: Open a photo of a man and insert it in the blank document
- Go to the “File” menu and select the “Open” option. Then, go to your image location and select the image of a man and then click on the “Open” button. Your image will be opened in photoshop afterward.
- Now, separate the man from the image. To do this, go to the left side’s tools panel and select the “Quick selection tool”. Now, brush over the man. You will see that selection is selecting the area automatically. If you see that you have over-selected the area, press & hold the “ALT” button and then brush over the over-selected areas.
- After making the selection, press “CTRL+J” from the keyboard. You will see that the man’s portion is copied in a new layer “Layer 1”.
- Now, press “CTRL+A” from the keyboard to select the image, then press “CTRL+C” from the keyboard to copy the image, then come to your blank document and press “CTRL+V” to paste the copied image. A new layer “Layer 1” will be added. Rename this man image “Layer 1” layer as “Man”. Make sure that this layer is on top of all the layers.
- Increase or decrease the size of the man photo. To do this, press “CTRL+T” to activate the free transform, then click & drag the corner’s handler and drag it outward to increase or drag inward to decrease the size. Then press “Enter”.
- Now, place the man on the rock.
Step 8: Open a photo of sky and insert it in the blank document
- Go to the “File” menu and select the “Open” option. Then, go to your image location and select the image of sky and then click on the “Open” button. Your image will be opened in photoshop afterward.
- Now, press “CTRL+A” from the keyboard to select the image, then press “CTRL+C” from the keyboard to copy the image, then come to your blank document and press “CTRL+V” to paste the copied image. A new layer “Layer 1” will be added. Rename this sky image “Layer 1” layer as “Sky”.
- Make sure that this layer is on top of all the layers.
- Increase or decrease the size of the sky photo. To do this, press “CTRL+T” to activate the free transform, then click & drag the corner’s handler and drag it outward to increase or drag inward to decrease the size. Then press “Enter”.
- Now, drag the “Sky” layer above the background layer in the layer panel. You will see that, sky is gone behind the water, man and rock.
- Now, create a new layer above the sky layer. To do this, go to the layer panel, select the “Sky” layer, then click on the “Create a new layer” button from the bottom of the layer panel. A new layer “Layer 1” will be created afterward. Now, go to the left side’s tools panel and select the “Brush tool”, then set the foreground color white. Now, brush horizontally above the water level, brush around 1 or 1.5 cm in the photo. Then, come to the layer panel again and set the “Opacity” between 50% to 60%.
- Go to the layer panel, click on the “Layer 1” layer, then click on the “Create new fill or adjustment layer” and select the “Gradient” option. A window will appear. From there, click on the “Gradient”, another window (Gradient editor) will appear. From there, select the “Foreground to background” presets, then below you will see a color slider. From that color slider, from the left side’s slider switch, click on the down side switch, then click on the “Color” option, a color picker window will appear, select the red color from the color palette, and click on the “OK” button. Then click on the “OK” button of the “Gradient editor” window to close it.
- Now set the “Style” as “Radiul”, and then click on the “OK” button. A gradient layer “Gradient fill 1” will be added. Now, go to the layer panel, and click on the “Gradient fill 1” layer. Then, set the blend mode from “Normal” to “Overlay”. You will find the blend mode option beside the “Opacity” option in the layer panel.
Step 9: Add some birds
- Go to the “File” menu and select the “Open” option. Then, go to your image location and select the image of a bird and then click on the “Open” button. Your image will be opened in photoshop afterward. Make sure that the bird has a transparent background.
- Now, press “CTRL+A” from the keyboard to select the image, then press “CTRL+C” from the keyboard to copy the image, then come to your blank document and press “CTRL+V” to paste the copied image. A new layer “Layer 1” will be added. Rename this bird image “Layer 2” layer as “Bird”.
- Make sure that this layer is on top of all the layers.
- Increase or decrease the size of the bird photo. To do this, press “CTRL+T” to activate the free transform, then click & drag the corner’s handler and drag it outward to increase or drag inward to decrease the size. Then press “Enter”.
- Now, place this bird in front of the eyes of the man.
- The same way, import a photo of a group of birds and place the photo on the sky. Make sure that the group of birds has a transparent background.
- That’s it.
Video Tutorial about “Photoshop Manipulation Tutorial- Stand Alone” who really don’t want to read whole article just follow below video.
That’s how you can do a stand alone photo manipulation. In this tutorial I have shown you the process of making a stand alone photo in Photoshop. I have described many things for your convenience including how you can insert other photos in your photo, how to sink the rock into the water, how to make selections and separate selected areas, and many more. I have included a few useful keyboard shortcuts for your convenience so that you can do your work fast and easily. I hope you have understood How to do stand alone photo manipulation. This is a very easy way to do this, try this technique on your photoshop app now.