Sometimes we see some astonishing aesthetic photos in the social media or Google images which are color inverted. These photos are sometimes fully inverted or part of the image are inverted. Or, sometimes professionals are creating client projects or business graphics in Photoshop and they need to invert colors of part of an image or entire image. And we always think that color inverting is a very tough job. Did you ever ask yourself how they do that? Well, in this article we will explore the answer regarding how to invert colors in Photoshop.
What is color invert?
Generally invert color means to turn a color into an opposite color. This is basically done by the invert color feature of the Photoshop. By this feature we can easily turn a black into white or turn a dark color into a light color and so on.
Why do we need to invert the color?
There are various reasons to do that. Or, sometimes it is done for fun. However, the invert color tool makes a negative of an image. Invert color is useful to view hidden details of an image. Sometimes we did the color invert to reveal different colors for those who face the problem of identifying different colors. Sometimes people invert the color because it brings the aesthetic look of an image and it is a bit of fun.
how to invert colors in photoshop 2022
We can invert the color in many ways with photoshop. Let’s explore those methods of how to invert colors photoshop 2021.
Method 1: Simple color invert
This method is the basic level of color inversion. It is the easiest to learn for beginners. Let’s start the process.
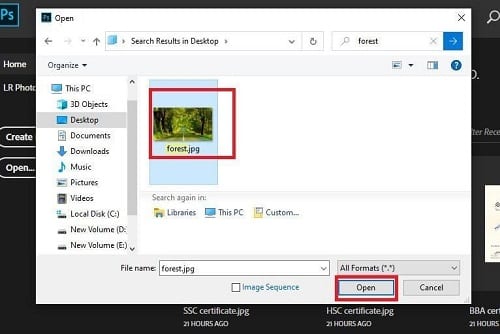
Step 1: Open your image
To open an image, go to the “File” menu and then click the “Open” option. Alternatively you can open by pressing “CTRL+O” from the keyboard. After that, go to your image location, select your image and then click the “Open” button.
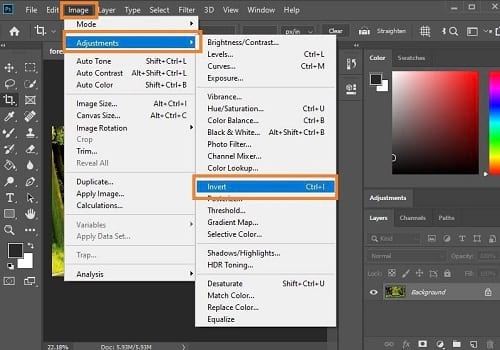
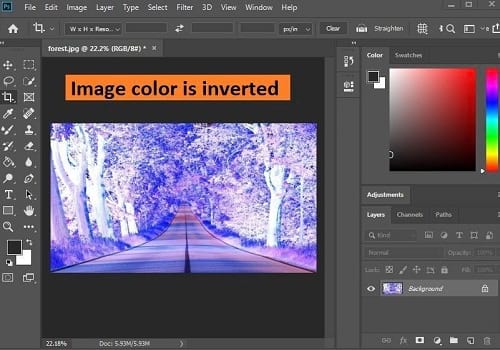
Step 2: Invert the color
To do this, go to the “Image” menu and then go to the “Adjustments” option. From the “Adjustments” option, select the “Invert” option. Alternatively, just press “CTRL+I” from the keyboard. That’s it, your image color is inverted.
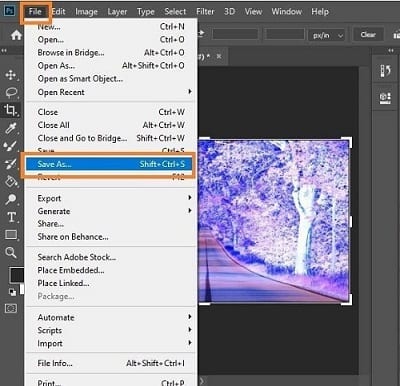
Step 3: Save your image
To save the image, go to the “File” menu and select the “Save as” option. A save as box will appear. From the box, rename your image and you can select either “JPEG” or “PNG” image format from the “Save as type” option. Then click the “Save” button.
Method 2: Invert Color with Inverted Layer
Step 1: Open your image
To open an image, go to the “File” menu and then click the “Open” option. Alternatively you can open by pressing “CTRL+O” from the keyboard. After that, go to your image location, select your image and then click the “Open” button.
Step 2: Create a Inverted layer
If the layer panel is not visible then go to the “Window” menu and select the “Layer” option. Your layer panel will appear.
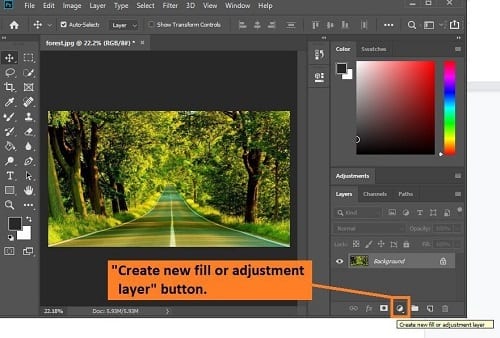
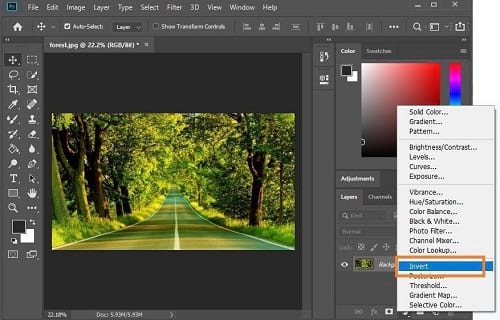
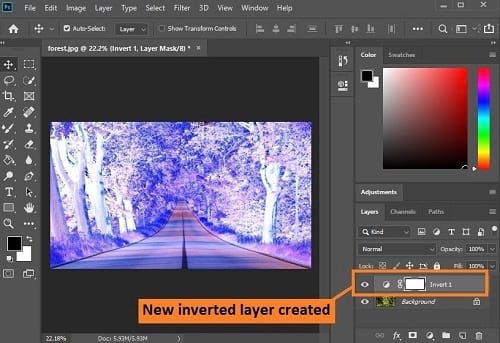
Now, creating an inverted layer, go to the layer panel and select “Create new fill or adjustment layer” button which is located on the bottom part of the layer panel. A drop down menu will appear. From the drop down menu, select the “Invert” option. After you will see a layer has been created above the original layer.
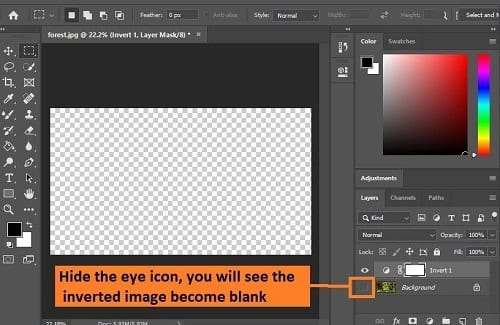
But the interesting fact is, this inverted layer is dependent on the original layer. If you hide the original layer, the inverted layer will become blank.

Step 3: Save your image
To save the image, go to the “File” menu and select the “Save as” option. A save as box will appear. From the box, rename your image and you can select either “JPEG” or “PNG” image format from the “Save as type” option. Then click the “Save” button.
Method 3: Invert color with photo effect
In this method we will invert the color of an image and will work with some photo effects. This method is little advanced. Let’s see how to do it.
Step 1: Open your image
To open an image, go to the “File” menu and then click the “Open” option. Alternatively you can open by pressing “CTRL+O” from the keyboard. After that, go to your image location, select your image and then click the “Open” button.
Step 2: Duplicate the layer
To do that, right click on the original background with the mouse and then select the “Duplicate Layer” option. After that a dialog box will appear. Now you can rename the layer. After that, click the “Ok” button. You will see a new layer has been created above of the original layer.
Step 3: Invert the new layer
To do that, go to the “Image” menu and then go to the “Adjustments” option. From the “Adjustments” option, select the “Invert” option. The new layer color has been inverted.
Step 4: Change the blend mode of inverted duplicate layer
Now we will change the blend mode.
To do it, go to the layer panel and click on the blend mode which is located beside the opacity option. A drop down menu will appear. Now, change the blend mode from “Normal” to “color”.
We changed the blend mode, because the “color” blend mode brings back the the original image’s brightness values except the inverted colors.
Step 5: Create a separate merged layer
We will create a separate merged layer because we want to keep the original image layer intact.
To do the merge, press “CTRL+SHIFT+ALT+E” from the keyboard. After that you will see a new merged layer has been created.
Step 6: Change the blend mode of merged layer
Now, we will change the blend mode again.
To do it, go to the layer panel and click on the blend mode which is located beside the opacity option. A drop down menu will appear. Now, change the blend mode from “Normal” to “Overlay”.
Step 7: Blur the merged layer
To do that, go to the ” Filter” menu and then go to the “Blur” option. From the blur option, select the “Gaussian Blur” option. After that a dialog box will appear. From the dialog box, set the radius around 8 pixels. If the image resolution is higher, set the higher value, it will give you a better result. Then click the “Ok” button. After that, set the opacity as per your choice. But we will select 100% opacity.
We changed the blend mode to overlay and selected the gaussian blur, because it will give the image a mystical and soft glow.
Step 8: Save your image
To save the image, go to the “File” menu and select the “Save as” option. A save as box will appear. From the box, rename your image and you can select either “JPEG” or “PNG” image format from the “Save as type” option. Then click the “Save” button.