Blending images and creating composition for images is a professional level editing. But, it does not mean you are not eligible for this. To make it easy for you, I am writing this article. Blending and compositing is a technique of combining two or more images in a way which looks like the combined images are real and are not taken from different images. That means, when you see the combined image, you will feel that all the elements are part of the same image. It may seem critical for you but actually it is not. It is very easy. Whatever you have to do is following the instructions.
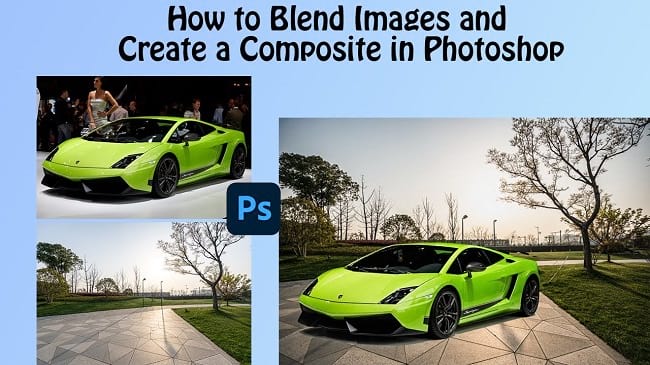
In this photo manipulation photoshop tutorial article, I am going to show you How to Blend Images and Create a Composite in Photoshop. So, read this article till the end and follow the steps with care, you will get easy instructions from this article, and I hope you will be able to do it easily. Let’s see How to Blend Images and Create a Composite in Photoshop:
Photos You will need to blend images and create a composite in photoshop
I have selected the following images for blending images and creating composition:
- A photo of a road. And,
- A photo of a car.
Tips for choosing images
The following things you should consider while choosing images for blending and creating a composite:
- The direction of light of all the images should be matching. That means, the light direction should be similar. For example, if the light direction of the road image is from the left side, then the light direction of the car image should be from the left side. If the light direction of the car image is from the right direction, flipping the car image can be a solution. But the light direction of the car image is from other than the left or right, this image you have to avoid, it won’t blend perfectly.
- The light quality should be common for all the images. For example, if the light of the road image is soft, then the light of the car image should be soft. In that case, hard light will not give you the perfect blend.
- The influence of the environment on the subject should be matching. For example, if the road image has trees, then the car image should have the shadow of the leaves of the tree, these will blend well. But, if the road has buildings rather than the trees and the car image has the shadow of the trees, it won’t match. So, you have to look at those details.
So, if you have chosen your images, let’s begin the blending and creating a composite for the images:
Step 1: Open a photo of a road in photoshop
To do that, go to the “File” menu and select the “Open” option. Then, go to your image location and select your road image and then click on the “Open” button. Your road image will be opened in photoshop afterward.
Step 2: Insert a car in the main image file
- First of all, open the car image. So, go to the “File” menu and select the “Open” option. Then, go to your image location and select your car image and then click on the “Open” button. Your car image will be opened in a new tab in photoshop afterward.
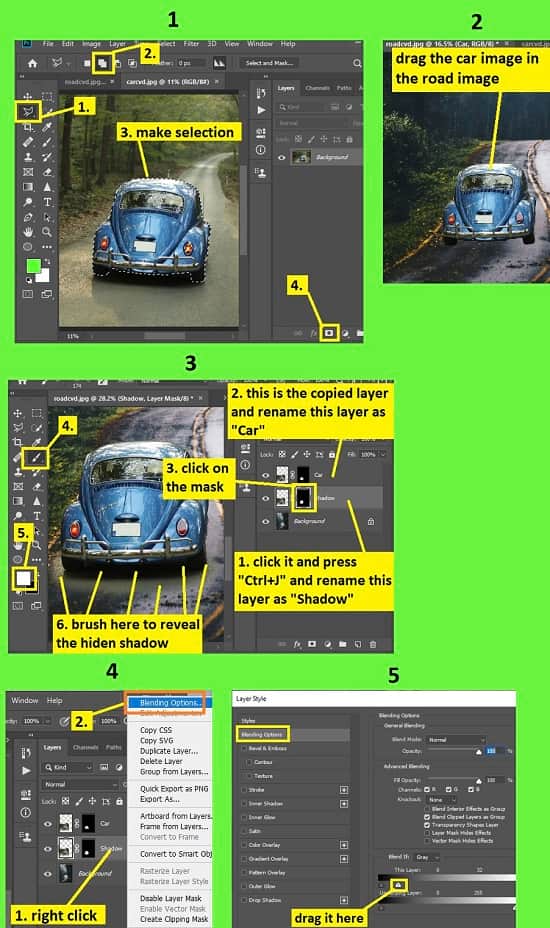
- Now, we will select the car portion. So, go to the left side’s tools panel and select the “Polygon lasso tool”. Now, make a selection path around the car and join with the starting point of the lasso tool. Now, go to the layer panel and click on the “Add layer mask” button from the bottom of the layer panel. You will see that only the car portion remains and the rest of the part is vanished. Now, go to the left side’s tools panel and select the “Move tool”. Now, click & drag the car photo and drag it in the road photo.
- A new layer “Layer 1” will be added in the road photo. Make sure that this layer is on top of all the layers.
- Now, we will adjust the size of the car image we have inserted. So, go to the layer panel, select the “Layer 1” layer, then press “CTRL+T” to activate the free transform. Now, drag the handler of the free transform outward to increase the size or drag inward to decrease the size. Now, place the car on the road. Press “Enter” after adjusting the size.
- Now, duplicate the car layer. To do this, go to the layer panel, select the “Layer 1” layer and press “CTRL+J”. A new layer “Layer 1 copy” will be created.
Step 3: Add shadow under the car
Before this, rename the layers for our convenience. So, rename the “Layer 1” as “Shadow” and rename the “Layer 1 copy” as “Car”. Now, we will add a shadow under the car.
Method 1: Custom
In this method, we will draw the shadow for the car. So, let’s see how to do this easily.
- First of all, create a new transparent layer below the car layer. So, go to the layer panel, select the “Car” layer and then click on the “Create a new layer” button from the bottom of the layer panel.
- You will see that a layer “Layer 1” is created above the car layer. But, we need that layer below the car layer. So, go to the layer panel and click & drag the “Layer 1” layer below the “Car” layer.
- Now, go to the left side’s tools panel, set the foreground color black, and select the “Brush tool”. Then, go to the top bar/ option bar, select the “Soft round” brush preset & decrease the hardness, then set the “Opacity” as “100%” and set the “Flow” as 100”.
- Now, go to the layer panel and click on the “Layer 1” layer, then come to the photo and brush under the car and car’s wheels.
- You will see that the shadow is too dark and does not look natural. So, go to the layer panel again, click on the “Layer 1” layer, then set the “Opacity” between 50% to 65% from the layer panel according to your need. You will see that the darkness becomes softer.
- Now, we will give a slight blur effect on the shadow. So, go to the layer panel again, click on the “Layer 1” layer, then go to the “Filter” menu, then go to the “Blur” option and select the “Gaussian blur” option. A window will appear. From there, set the “Radius” between 1 pixels to 4 pixels according to your need. Then, click on the “OK” button. Our shadow has been created.
Method 2: Blending options
In this method, we will use the blending option. For this method, we do not need to create a new layer for this. Our “Shadow” layer will work for this method. For the rest of the adjustments I will make in future, everything will be based on this method. So, anyone who is using the custom method, do the work accordingly. Anyway, let’s see how to do it.
- This car’s shadow is hidden, because we masked them earlier. So, make the shadow of the car reappear from the photo. To do this, go to the layer panel, click on the mask thumbnail of the “Shadow” layer. Then, go to the left side’s tools panel, set the foreground color white, then select the “Brush tool”. Now, brush under the car to make the shadow visible again.
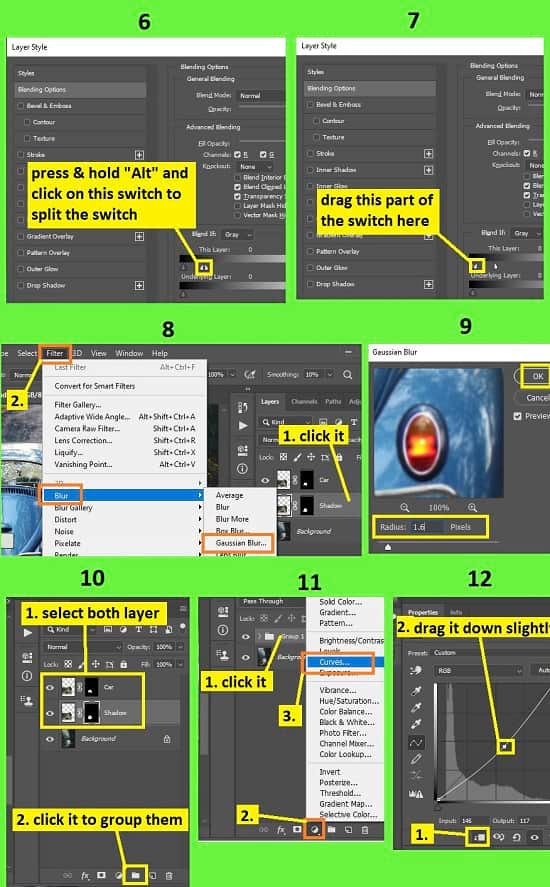
- Now, we have to blend the car shadow with the road. So, go to the layer panel, right-click on the “Shadow” layer and select the “Blending options” from the context menu.
- A blending options window will pop up. You will see that there are two color sliders at the bottom. One is the “This layer” slider and the other one is the “Underlying layer” slider. So, we will work with the “This layer” slider. So, drag the right-side’s slider (white slider) towards the left side until the unwanted parts around the shadow are dissolved. Now, split the right side’s slider switch, it will help us to blend the shadow with the road. So, press & hold the “ALT” button and at the same time click on the right side’s slider switch (white slider). You will see that the slider is splitted. Now, drag the left-half slider portion of the splitted slider switch (White slider) towards the left side. You will see that the shadow is blended with the road. Then click on the “OK” button.
- Now, go to the layer panel, select the “Shadow” layer, then go to the “Filter” menu, then go to the “Blur” option and select the “Gaussian blur” option. A window will pop up. From there, set the radius between 1.5 pixels to 3 pixels. Then click on the “OK” button.
Step 4: Do few color adjustments for composition
We have done everything correctly, but the atmosphere of the car and the road is not the same. So the car photo has to go through various color adjustments to match the car’s color complexion with the color complexion of the road. So, let’s begin.
Stage 1: Grouping the car layers
Here, we have two car layers. So, we will save them in a single group folder.
- To make the group, go to the layer panel, press & hold the “CTRL” button from the keyboard and at the same time click on the both “Car” and “Shadow” layers. Then press “CTRL+G” from the keyboard. Those layers will be accumulated in a new group folder “Group 1”.
Stage 2: Color retouching
Light adjustments
- Go to the layer panel again, select the “Group 1”, then click on the “Create new fill or adjustment layer” button from the bottom of the layer panel and then select the “Curves” option.
- A Curves panel will appear. From there, click on the “The adjustment affects to all layers below (Click to clip to layer)” button from the bottom of the panel. Now, if your road image is darker, then you have to make the car darker. But, if your road image is brighter, then you have to make the car brighter. Here, my road image is darker. So, from the curves panel, drag the middle point of the curves towards the bottom-right corner until it matches with the darkness of the road. If your road image is brighter, drag the middle point of the curves towards the top-left corner until it matches with the brightness of the road.
- A new curves layer “Curves 1” will be created. Rename the layer as “Lightness”.
Color matching
- Go to the layer panel again, select the “Lightness” curves layer, then click on the “Create new fill or adjustment layer” button from the bottom of the layer panel and then select the “Curves” option again.
- A Curves panel will appear. This time we will work with the color channel from the curves.
- So, from the curves panel, click on the “The adjustment affects to all layers below (Click to clip to layer)” button from the bottom of the panel.
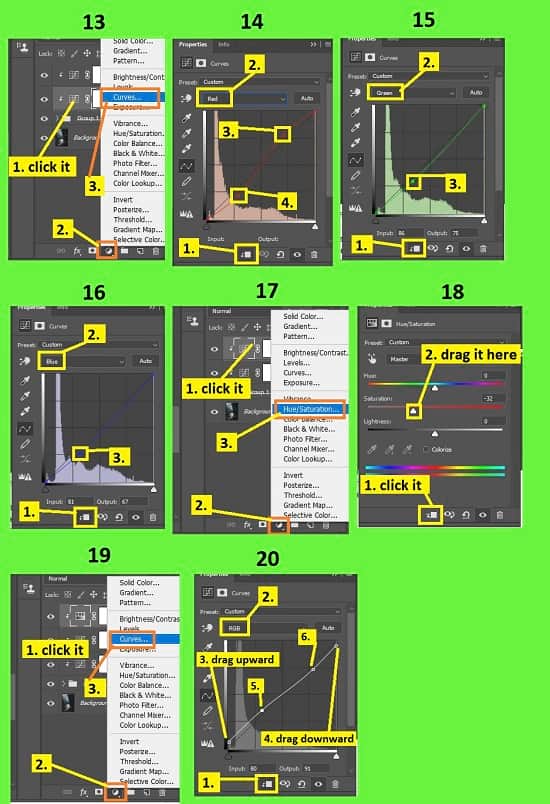
- Now, set the color channel as “Red”. Now, click & drag the right portion of the curve upward slightly and click & drag the left portion of the curve downward slightly. It will increase the redness in the highlights area and decrease the redness in the dark areas.
- Now, set the color channel as “Green”. Now, click & drag the left portion of the curve downward slightly.
- Now, set the color channel as “Blue”. Now, click & drag the left portion of the curve downward slightly.
- A new curves layer “Curves 1” will be created. Rename the layer as “Color”.
- These are all about color matching. This adjustment I have done with color channels is for my photos. But, your photos demand different curve adjustments, do adjustments according to the need.
Saturation adjustment
- Go to the layer panel again, select the “Color” curves layer, then click on the “Create new fill or adjustment layer” button from the bottom of the layer panel and then select the “Hue/Saturation” option.
- A Hue/Saturation panel will appear. We will work with the saturation only
- So, from the panel, click on the “The adjustment affects to all layers below (Click to clip to layer)” button from the bottom of the panel. Here, my photo needs to decrease the saturation. So, slide the saturation slider to the left side until you get the perfect saturation.
- A new Hue/Saturation layer “Hue/Saturation 1” will be created.
Contrast adjustment
- Go to the layer panel again, select the “Hue/Saturation 1” curves layer, then click on the “Create new fill or adjustment layer” button from the bottom of the layer panel and then select the “Curves” option.
- A Curves panel will appear.
- Here, my photo needs to decrease the contrast. So, click & drag the right-top corner of the curve downward slightly and click & drag the left-bottom corner of the curve upward slightly. Now, click & drag the right-middle portion of the curve downward slightly and click & drag the left-middle portion of the curve upward slightly
- A new Curves layer “Curves 1” will be created.
- The adjustment I have done with curves to adjust contrast is for my photos. But, your photos demand different contrast adjustments, do adjustments according to the need.
Stage 3: Noise retouching
In my photos, the road photo has noise and slight blur, but the car photo does not. So, I will bring noise and slight blur in the car photo so that it can match with the road.
For “Car” layer
- So, go to the layer panel, expand the “Group 1” folder.
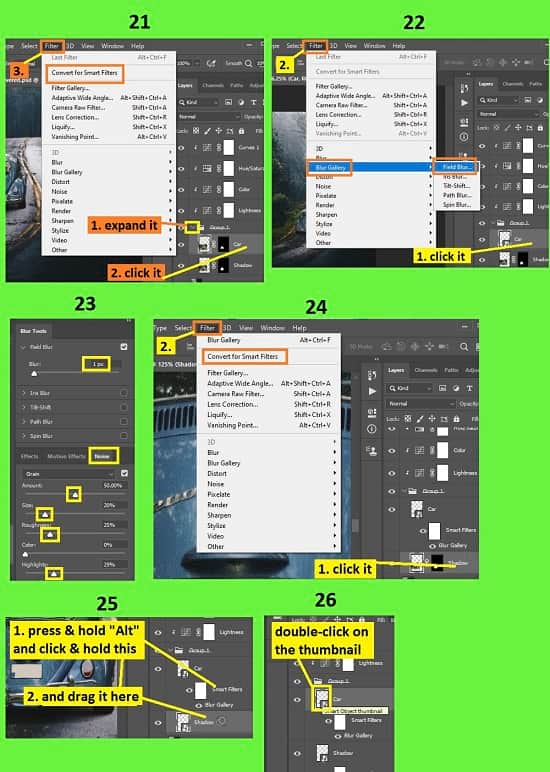
- Now, select the “Car” layer, then go to the “Filter” menu and select the “Convert for smart filters” option. A dialog box will appear, click “OK”.
- Now, go to the layer panel again, select the “Car” layer again, then go to the “Filter” menu, then go to the “Blur gallery” option and select the “Field blur” option.
- A window will appear. From there, from the right side, slide the blur slider to the left to decrease the blur. Now, close look at your both photos and decide how blur you need, use that blur slider to make the decision. Here, I have given “1px” blur for my car. If your photo requires more blur, increase the blur.
- Now, on the right side, below, you will see the “Noise” panel. From the noise panel, select the “Grain”, then increase the “Amount”, then increase or decrease the “Size”, and “Roughness” according to your need, and decrease the “Highlights” slightly. For my photo, I have set the “Amount” as “50%”, set the “Size” as “20%”, set the “Roughness” as “25%”, and set the “Highlights” as “29%”. And then click on the “OK” button from the top bar. The blurriness and noise of the car is matched with the road’s blurriness and noise.
For “Shadow” layer
Now, in the “Car” layer, we have done the noise retouching. So, we do not need to follow that same process. We can simply copy that filter from the “Car” layer and paste that in the “Shadow’ layer. So, how can we do that?
- So, go to the layer panel, expand the “Group 1” folder.
- Now, select the “Shadow” layer, then go to the “Filter” menu and select the “Convert for smart filters” option. A dialog box will appear, click “OK”.
- Now, press & hold the “ALT” button from the keyboard and at the same time click & drag the “Smart filter” filter from the “Car” layer and drop it on the “Shadow” layer. The same noise and blur will be applied in this “Shadow” layer as well.
Step 5: Sharp edge retouching
Here, I have done everything alright, but because of the sharp edge of the car image, it gives a feel that it is taken from another image. So, I will reduce the sharpness of the edge. Let’s see how to do it.
- So, go to the layer panel, expand the “Group 1” folder.
- Now, double-click on the thumbnail of the “Car” layer. You will see that the car image is opened in another tab.
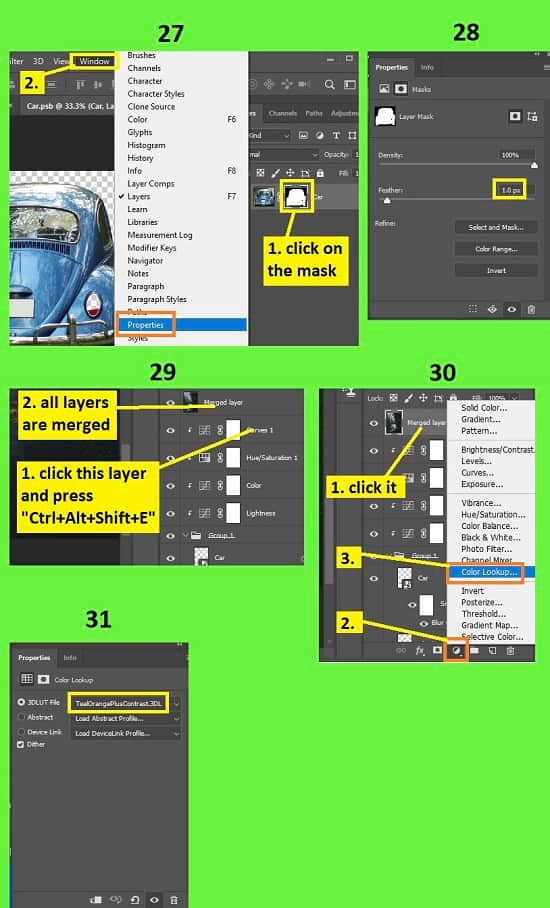
- Now, click on the mask thumbnail of the layer. Then, go to the “Window” menu and select the “Properties” option. A properties panel will appear. From there, set the “Feather” between 1px to 2px. I have set “1px” for the feather.
- After reducing the sharpness of the edge, we will save the changes. So, go to the “File” menu and select the “Save” option. Changes will be saved and the changes will be saved on your original image automatically. So, close this tab and go to your original image tab. If you zoom in, you will see that the sharpness of the edge of the car image is reduced.
Step 6: Merge all the layers
We are almost done. Now, merge all the layers in a new layer. To do this, go to the layer panel, click on the top layer and then press “CTRL+ALT+SHIFT+E” from the keyboard. All the layers merged in a new layer. Rename the layer as “Merged layer”.
Step 7: Apply an effect
Now, this is important. If you really want the composite to be matched perfectly, apply an effect. It can be anything. Let’s suppose,
- Go to the layer panel, select the “Merged layer”, then click on the “Create new fill or adjustment layer” button from the bottom of the layer panel and select the “Color lookup” option.
- Now, click on the drop-down menu of “3DLUT File” and select “TealOrangePlusContrast.3DL”. You can choose other options from here as well.
- If you do not want to use “Color Lookup”, you can choose curves, levels or other filters whichever you want.
- That’s it.
Video Tutorial about “How to Blend Images and Create a Composite in Photoshop” who really don’t want to read whole article just follow below video.
That’s how you can Blend Images and Create a Composite in Photoshop. In this tutorial I have shown you the process of blending two images and creating a composite for those images to give a perfect blend. I have described many things for your convenience including how to make selections, how to mask images & separate subjects from unwanted areas by masking, how you can insert other photos in your photo, how to make shadows, how to create a composite by doing color adjustments, how to blur and increase noise in the image and many more. I have included various useful keyboard shortcuts for your convenience so that you can do your work fast and easily. I hope you have understood How to Blend Images and Create a Composite in Photoshop. This is a very easy way to do this, try this blending and compositing technique on your photoshop app now.