Boat manipulation is a Photoshop editing technique that is used to insert a boat and water image in an open field. It is a way of making the boring images into a creative one. If you have such boring open field images, you can turn them into a beautiful one with this technique. In this photo manipulation photoshop tutorial article, I am going to show you How to do boat manipulation. So, read this article till the end and follow the steps with care, you will get easy instructions from this article, and you will be able to do it easily. Let’s see How to do this:
Photos You will need to make boat manipulation effect in photoshop
You have to make sure you have the following images for making boat manipulation effect:
- A photo of an open field.
- A photo of a boat. Water should be in the photo.
- A photo of a tree. Tree image must have a transparent background.
- A photo of a lamppost.
Let’s begin the boat manipulation effect making:
Step 1: Open a photo of a field in photoshop
To do that, go to the “File” menu and select the “Open” option. Then, go to your image location and select your field image and then click on the “Open” button. Your field image will be opened in photoshop afterward.
Step 2: Make a pond shape on the field
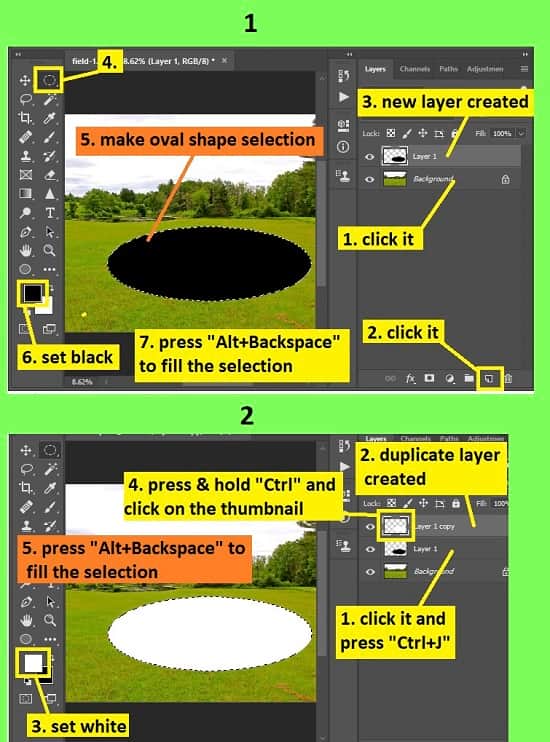
- First of all, create a new layer. To do this, go to the layer panel, click on the “Create a new layer” button from the bottom of the layer panel. A new transparent layer “Layer 1” will be created.
- Now, go to the left side’s tools panel and select the “Elliptical marquee tool”. You will find the “Elliptical marquee tool” under the “Rectangular marquee tool”. Now, make a large oval shape selection on the field.
- Now, go to the left side’s tools panel again and set the foreground color black. Now, press “ALT+Backspace”. You will see that the selected area is filled with black color. Then press “CTRL+D” to deselect the selection.
- Now, duplicate this layer. To do this, go to the layer panel, click on the “Layer 1” and press “CTRL+J”. A new layer “Layer 1 copy” will be created.
- Now, make the selection line appear on the “Layer 1 copy” layer. To do this, go to the layer panel, press & hold the “CTRL” button and at the same time click on the thumbnail of the “Layer 1 copy” layer. The selection line will appear.
- Now, go to the left side’s tools panel again and set the foreground color white. Now, press “ALT+Backspace”. You will see that the selected area is filled with white color. Then press “CTRL+D” to deselect the selection.
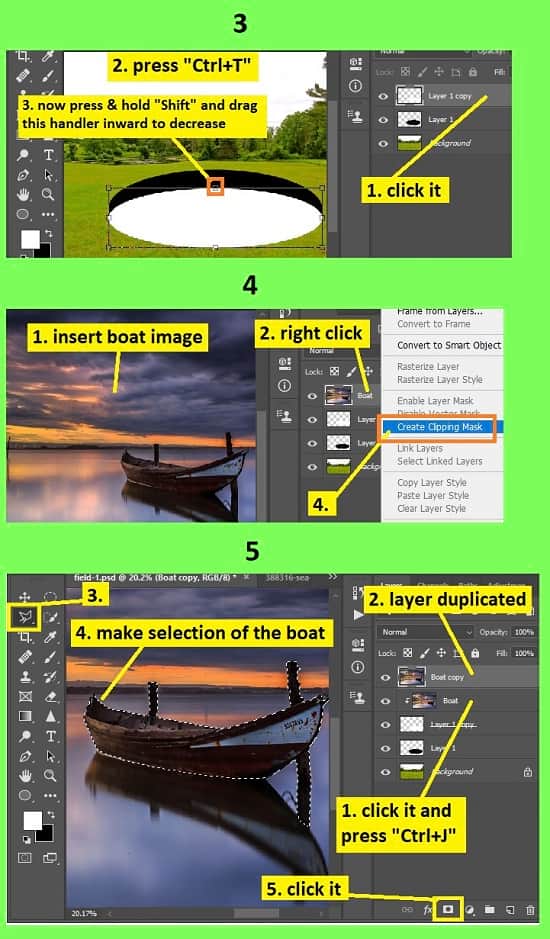
- Now, press “CTRL+T” to activate the free transform. Now, press & hold the “Shift” button and click & drag the top middle handler towards down a very little.
Step 3: Open a photo of a boat and insert it in the main image file
- Go to the “File” menu and select the “Open” option. Then, go to your image location and select your boat image and then click on the “Open” button. Your boat image will be opened in a new tab in photoshop afterward.
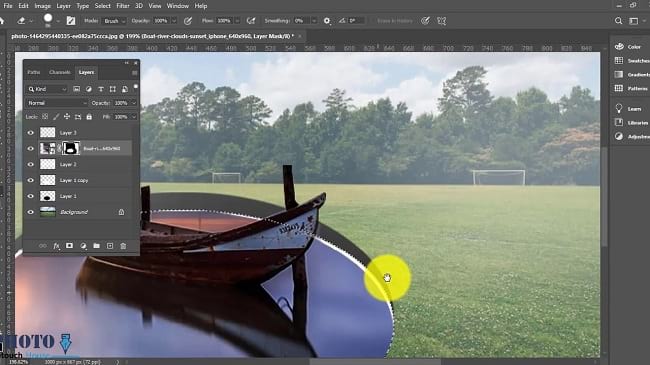
- Now, press “CTRL+A” from the keyboard to select the whole image, then press “CTRL+C” from the keyboard to copy the whole image, then come to the main image’s tab and press “CTRL+V” to paste the copied image. A new layer “Layer 2” will be added. Make sure that this layer is on top of all the layers. Rename this layer as “Boat”.
- Now, we will adjust the size of the boat image we have inserted. So, go to the layer panel, select the “Boat” layer, then press “CTRL+T” to activate the free transform. Now, drag the handler of the free transform outward to increase the size or drag inward to decrease the size and place the boat’s image inside the shape of the pond. Adjust the boat size in a way that the boat fits appropriately into the pond. If you are not able to figure out where you are putting the boat, decrease the opacity from the layer panel for a few moments, place the boat and after the placement has done increase the opacity again. Press “Enter” after adjusting the size.
- Now, go to the layer panel, right-click on the “Boat” layer and select the “Create clipping mask” option. You will see the image has been cropped.
- But, we need to make the boat visible again. To do this, we have to duplicate the boat image layer. So, go to the layer panel, select the “Boat” layer and press “CTRL+J” from the keyboard. Boat layer will be duplicated in a new layer “Boat copy”.
- Now, make a selection of the boat only. To do this, go to the layer panel, select the “Boat copy” layer, then go to the left side’s tools panel and select the “Quick selection tool”. Now, brush over the boat. You will see that selection is selecting the area automatically. If you see that you have over-selected the area, press & hold the “ALT” button and then brush over the over-selected areas.
- After making the selection, go to the layer panel and click on the “Add layer mask” button from the bottom of the layer panel. You will see that unselected parts are removed.
Step 4: Open a photo of a tree and insert it in the main image file
- Go to the “File” menu and select the “Open” option. Then, go to your image location and select your tree image and then click on the “Open” button. Your tree image will be opened in a new tab in photoshop afterward. Make sure that the tree image has a transparent background.
- Now, press “CTRL+A” from the keyboard to select the whole image, then press “CTRL+C” from the keyboard to copy the whole image, then come to the main image’s tab and press “CTRL+V” to paste the copied image. A new layer “Layer 2” will be added. Make sure that this layer is on top of all the layers. Rename this layer as “tree”.
- Now, we will adjust the size of the tree image we have inserted. So, go to the layer panel, select the “tree” layer, then press “CTRL+T” to activate the free transform. Now, drag the handler of the free transform outward to increase the size or drag inward to decrease the size and place the tree’s image beside the pond. Press “Enter” after adjusting the size.
- Now add a shadow under the tree. To do this, go to the layer panel, select the “tree” layer, then click on the “Create a new layer” button from the bottom of the layer panel. A new layer will be created. Then, go to the left side’s tools panel, select the “Brush tool” and then set the foreground color black. Then go to the top bar, select the “Soft round” brush, set the “Opacity” between 40% to 50%, and set the “Flow” between 30% to 40%. Now, brush on the ground under the tree to make the shadow.
Step 5: Open a photo of a lamppost and insert it in the main image file
- Go to the “File” menu and select the “Open” option. Then, go to your image location and select your lamppost image and then click on the “Open” button. Your lamppost image will be opened in a new tab in photoshop afterward. Make sure that the lamppost image has a transparent background.
- Now, press “CTRL+A” from the keyboard to select the whole image, then press “CTRL+C” from the keyboard to copy the whole image, then come to the main image’s tab and press “CTRL+V” to paste the copied image. A new layer “Layer 2” will be added. Make sure that this layer is on top of all the layers. Rename this layer as “lamppost”.
- Now, we will adjust the size of the lamppost image we have inserted. So, go to the layer panel, select the “lamppost” layer, then press “CTRL+T” to activate the free transform. Now, drag the handler of the free transform outward to increase the size or drag inward to decrease the size and place the lamppost’s image near the pond. Press “Enter” after adjusting the size.
- Now add a shadow under the lamppost. To do this, go to the layer panel, select the “Lamppost” layer, then click on the “Create a new layer” button from the bottom of the layer panel. A new layer will be created. Then, go to the left side’s tools panel, select the “Brush tool” and then set the foreground color black. Then go to the top bar, select the “Soft round” brush, set the “Opacity” between 40% to 50%, and set the “Flow” between 30% to 40%. Now, brush on the ground under the lamppost to make a small round shadow.
Step 6: Merge all layers in a new layer
Now, merge all the layers in a new layer. To do this, go to the layer panel, click on the top layer and then press “CTRL+ALT+SHIFT+E” from the keyboard. All the layers merged in a new layer. Rename the layer as “Merged layer”.
Step 7: Give the photo a night mode
- First of all, add a solid color above the merged layer. To do this, go to the layer panel, click on the “Merged layer” and then click on the “Create new fill or adjustment layer” button from the bottom of the layer panel and select the “Solid color” option. A color palette window will appear. From there select light red color, copy the color code for next use and click on the “OK” button. A new color fill “Color fill 1” layer will be created.
- Now, go to the layer panel, click on the “Color fill 1” layer and set the blend mode from “Normal” to “Linear dodge (Add)”. You will find the blend mode beside the “Opacity” option.
- Now, go to the layer panel again, click on the mask thumbnail of the “Color fill 1” layer and press “CTRL+I” from the keyboard. The mask thumbnail will become black. Now, click on the mask thumbnail of the “Color fill 1” layer again, then go to the left side’s tools panel, set the foreground color white, then select the “Brush tool”, then go to the top bar, select the “Soft round” brush, set the “Opacity” as 100 and set the “Flow” as 30%. Now, brush on the lamp of the lamppost. You will see that it looks like light is on.
- Now, go to the layer panel again, right-click on the “Color fill 1” layer and select the “Blending options” option. A window will pop up. From there, go to the “Outer glow” settings from the left side. Then, set the “Blend mode” as “Screen”, set the “Opacity” as “60%”, click on the color and paste the color code you have copied earlier & click “OK”, then set the “Size” as “120 px”. After that, click on the “OK” button.
- Now we will give the night mode. So, go to the layer panel again, click on the “Merged layer” and then click on the “Create new fill or adjustment layer” button from the bottom of the layer panel and select the “Color lookup” option. A color lookup panel will appear. From there set the “3DLUT File” as “Moonlight.3DL”. A new color fill “Color lookup 1” layer will be created. Night mode will appear.
- Now go to the layer panel again, click on the “Color lookup 1” layer and then set the “Opacity” between 75% to 100% (90% is preferable). Now, click on the mask thumbnail of the “Color lookup 1” layer. Now, go to the left side’s tools panel, set the foreground color black, then select the “Brush tool”, then go to the top bar, select the “Soft round” brush, set the “Opacity” between 75% to 100% and set the “Flow” as 30%. Now, brush around the lamp, lamp post, on the field, on the water, and on the tree to spread the light glow.
- That’s it.
Video Tutorial about “Photoshop Manipulation Tutorial – Boat Manipulation Tutorial” who really don’t want to read whole article just follow below video.
That’s how you can make boat manipulation effects. In this tutorial I have shown you the process of making a How to do boat manipulation effect in Photoshop. I have described many things for your convenience including how to make a pond shape, how you can insert other photos in your photo, how to make selections, how you can mask the photo, how to create a night mode of the photo, and many more. I have included some useful keyboard shortcuts for your convenience so that you can do your work fast and easily. I hope you have understood How to do boat manipulation in photoshop. This is a very easy way to do this, try this technique on your photoshop app now.