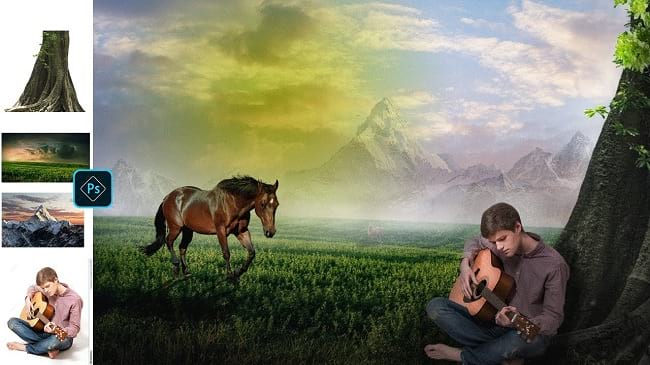
Horse and man manipulation is basically a way of combining horse photo, man’s photo, and other elements. If you want to show your imagination to the world, you can apply this man and horse manipulation idea. If you are a beginner, you can try this one. In this photo manipulation photoshop tutorial article, I am going to show you How to do Horse and man photo manipulation. So, go through this article till the end, read & follow the steps with care, you will find easy instructions from this article, and I hope you will be able to do it easily. Let’s see How to do Horse and man photo manipulation:
Photos You will need to do horse and man manipulation in photoshop
You have to make sure you have the following images for doing horse and man manipulation:
- A photo of an open field.
- A photo of a tree root.
- A photo of a man. Full body of the nan is required. Choose a photo where the man is sitting.
- A photo of mountains.
- One or two photos of horses.
Let’s begin the horse and man manipulation:
Step 1: Create a new blank document
First of all, you have to create a new blank document. To do that, go to the “File” menu and then select the “New” option. You will see that a window has appeared where you can choose a preset canvas or create a custom canvas. Here, I have made a custom document of 1000 pixels by 700 pixels, this is a random size, choose size as per your wish.
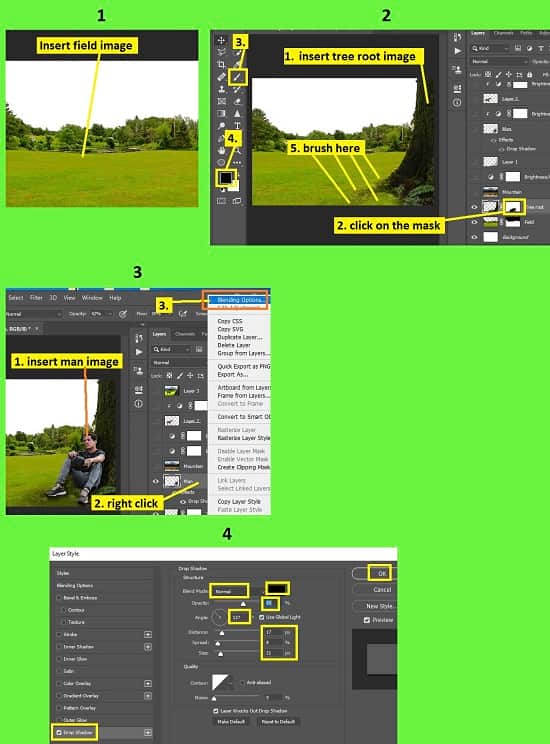
Step 2: Open a photo of a field and insert it in the main image file
- Go to the “File” menu and select the “Open” option. Then, go to your image location and select your field image and then click on the “Open” button. Your field image will be opened in a new tab in photoshop afterward.
- We do not need the sky portion of the field image. To remove sky, go to the left side’s tools panel and select the “Quick selection tool”. Now, brush over the sky portion. You will see that selection is selecting the area automatically. If you see that you have over-selected the area, press & hold the “ALT” button and then brush over the over-selected areas.
- After making the selection, go to the “Select” menu and choose the “Inverse” option. The field portion will be selected. Now, press “CTRL+J” from the keyboard. The selected field portion is copied in a new layer “Layer 1”.
- Now, press “CTRL+A” from the keyboard to select the image, then press “CTRL+C” from the keyboard to copy the image, then come to the main image’s tab and press “CTRL+V” to paste the copied image. A new layer “Layer 1” will be added. Rename this layer as “Field”.
- Now, we will adjust the size of the field image we have inserted. So, go to the layer panel, select the “Field” layer, then press “CTRL+T” to activate the free transform. Now, drag the handler of the free transform outward to increase the size or drag inward to decrease the size. Make sure that the field is fit with the blank document horizontally and leave some space for sky on the top side. Press “Enter” after adjusting the size.
Step 3: Open a photo of a tree root and insert it in the main image file
- Go to the “File” menu and select the “Open” option. Then, go to your image location and select your tree root image and then click on the “Open” button. Your tree root image will be opened in a new tab in photoshop afterward.
- We only need the tree portion and some ground associated with the tree root. To get this, go to the left side’s tools panel and select the “Quick selection tool”. Now, brush over the tree portion, tree root portion and root associated grounds portion. You will see that selection is selecting the area automatically. If you see that you have over-selected the area, press & hold the “ALT” button and then brush over the over-selected areas.
- After making the selection, press “CTRL+J” from the keyboard. The selected portion is copied in a new layer “Layer 1”.
- Now, press “CTRL+A” from the keyboard to select the image, then press “CTRL+C” from the keyboard to copy the image, then come to the main image’s tab and press “CTRL+V” to paste the copied image. A new layer “Layer 1” will be added. Rename this layer as “Tree root”.
- Now, we will adjust the size of the tree image we have inserted. So, go to the layer panel, select the “tree” layer, then press “CTRL+T” to activate the free transform. Now, drag the handler of the free transform outward to increase the size or drag inward to decrease the size. If you adjust the size of the tree to fit with the blank document vertically, it will be good. Now, place the tree’s image on the right side and vertical-half of the tree should be outside of the blank document. Press “Enter” after adjusting the size.
- Now, blend the root with the field. To do this, go to the layer panel, select the “Tree root” layer and then click on the “Add layer mask’ option. A mask thumbnail will be attached with the tree root layer. Now, click on the mask thumbnail of the “Tree root” layer, then go to the left side’s tools panel, set the foreground color black and select the “Brush tool”. Then, go to the top bar/option bar, select the “Soft round” brush preset, set the “Opacity” between 40% to 50% and set the “Flow” between 30% to 40%. Now, brush around the root, brush several times until your brushed area is blended or dissolved.
Step 4: Open a photo of a man and insert it in the main image file
- Go to the “File” menu and select the “Open” option. Then, go to your image location and select your man’s image and then click on the “Open” button. Your man image will be opened in a new tab in photoshop afterward.
- We only need the man portion. To get this, go to the left side’s tools panel and select the “Lasso tool”. Now, make a selection path around the edge of the man and join with the starting point. If you want to deselect some portions from the selected area, press & hold the “ALT” button and at the same time draw another selection path on those portions which you want to exclude from the selection.
- After making the selection, press “CTRL+J” from the keyboard. The selected portion is copied in a new layer “Layer 1”.
- Now, press “CTRL+A” from the keyboard to select the image, then press “CTRL+C” from the keyboard to copy the image, then come to the main image’s tab and press “CTRL+V” to paste the copied image. A new layer will be added. Rename this layer as “Man”.
- Now, we will adjust the size of the man’s image we have inserted. So, go to the layer panel, select the “Man” layer, then press “CTRL+T” to activate the free transform. Now, drag the handler of the free transform outward to increase the size or drag inward to decrease the size. Now, place the man under the tree. Press “Enter” after adjusting the size.
- If you see that the brightness of man’s image is unmatched with the other parts of the image, decrease or increase the brightness as per your requirement. To do this, go to the layer panel, select the “Man” layer, then click on the “Create new fill or adjustment layer” button from the bottom of the layer panel and select the “Brightness/Contrast” option. The brightness/contrast panel will appear. Now, click on the “The adjustment affects to all layers below (Click to clip to layer)” button from the bottom of the layer and then slide the slider of “Brightness” and “Contrast” to adjust color brightness.
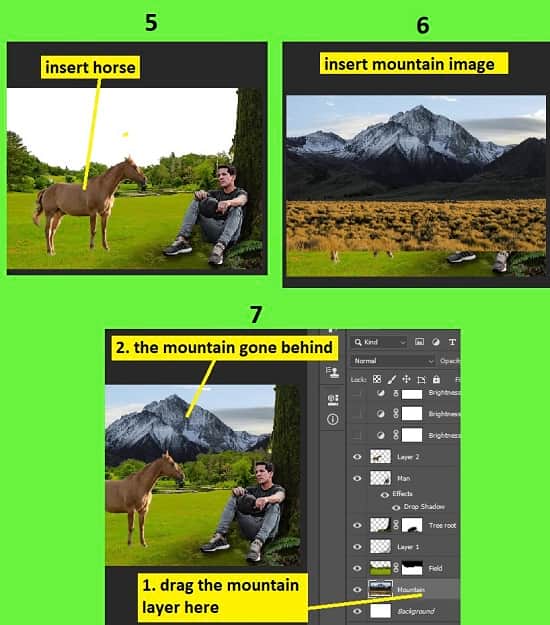
Step 5: Open a photo of mountains and insert it in the main image file
- Go to the “File” menu and select the “Open” option. Then, go to your image location and select your mountain image and then click on the “Open” button. Your mountain image will be opened in a new tab in photoshop afterward.
- Now, press “CTRL+A” from the keyboard to select the image, then press “CTRL+C” from the keyboard to copy the image, then come to the main image’s tab and press “CTRL+V” to paste the copied image. A new layer will be added. Rename this layer as “Mountain”.
- Now, we will adjust the size of the mountain image we have inserted. So, go to the layer panel, select the “Mountain” layer, then press “CTRL+T” to activate the free transform. Now, drag the handler of the free transform outward to increase the size or drag inward to decrease the size. Make sure that the mountain image fits with the blank document horizontally. Press “Enter” after adjusting the size.
- Now, drag the “Mountain” layer above the background layer. You will see that the mountain is gone behind the field.
Step 6: Add horse in the photo
- Go to the “File” menu and select the “Open” option. Then, go to your image location and select your horse’s image and then click on the “Open” button. The horse image will be opened in a new tab in photoshop afterward.
- We only need the horse portion. To get this, go to the left side’s tools panel and select the “Polygon Lasso tool”. Now, make a selection path around the edge of the horse and join with the starting point. If you want to deselect some portions from the selected area, press & hold the “ALT” button and at the same time draw another selection path on those portions which you want to exclude from the selection.
- After making the selection, press “CTRL+J” from the keyboard. The selected portion is copied in a new layer “Layer 1”.
- Now, press “CTRL+A” from the keyboard to select the image, then press “CTRL+C” from the keyboard to copy the image, then come to the main image’s tab and press “CTRL+V” to paste the copied image. A new layer will be added. Rename this layer as “Horse”.
- Now, we will adjust the size of the horse’s image we have inserted. So, go to the layer panel, select the “Horse” layer, then press “CTRL+T” to activate the free transform. Now, drag the handler of the free transform outward to increase the size or drag inward to decrease the size. Now, place the horse in the field near the man. Press “Enter” after adjusting the size.
- If you see that the brightness of the horse’s image is unmatched with the other parts of the image, decrease or increase the brightness as per your requirement. To do this, go to the layer panel, select the “Horse” layer, then click on the “Create new fill or adjustment layer” button from the bottom of the layer panel and select the “Brightness/Contrast” option. The brightness/contrast panel will appear. Now, click on the “The adjustment affects to all layers below (Click to clip to layer)” button from the bottom of the layer and then slide the slider of “Brightness” and “Contrast” to adjust color brightness.
Step 7: Merge all layers in a new layer
Now, merge all the layers in a new layer. To do this, go to the layer panel, click on the top layer and then press “CTRL+ALT+SHIFT+E” from the keyboard. All the layers merged in a new layer. Rename the layer as “Merged layer”.
Step 8: Color adjustment
- Go to the layer panel, select the “Merged layer”, then go to the “Filter” menu and select the “Camera raw filter” option.
- A window will pop up. From there, expand the “Basic” option, then increase the “Exposure”. “Contrast”, “Vibrance” and “Saturation”, then decrease the “Highlights”.
- After that, click on the “OK” button.
- That’s it.
Video Tutorial about “Photoshop Manipulation Tutorial – Horse and Man Photo Manipulation” who really don’t want to read whole article just follow below video.
That’s how you can do Horse and man photo manipulation. In this tutorial I have shown you the process of combining man’s image and horse image and manipulation technique in Photoshop. I have described many things for your convenience including how you can insert other photos in your photo, how to make selections, how you can separate selected portions of the photo, how to do color adjustments, and many more. I have included some useful keyboard shortcuts for your convenience so that you can do your work fast and easily. I hope you have understood How to do Horse and man photo manipulation. This is a very easy way to do this, try this technique on your photoshop app now.