Alpha channels are the most misunderstood concept in Photoshop. We basically use photoshop to compose the image file. It is a process to overlay one photo on top of another photo to create a new photo. So, sometimes we require an object from the source image. This is where the alpha channel works. For Clipping masking works it’s very useful for photo editors. Well, we will describe the alpha channel and how to remove the alpha channel in photoshop in this article.
what is an alpha channel?
An alpha channel is a channel that defines the pixel’s color values of a photo. Basically, we use an alpha channel to specify the areas of an image like defining the transparency of an image or preserving a selection of an image.
An RGB image has three channels that individually specify the values of red, green, and blue for pixels. So, the definition of each color value for pixels consists of luminance values or shades of gray.
An alpha channel is also used for defining the selection of an image. Here, the alpha channel’s white pixels represent the full selection and black pixels represent the full deselection. In the alpha channel, there are gray shades of pixels that represent the partial selection.
Also Read : How to Turn any Image into a Minecraft Skin
Quick mask and layer mask are also part of the alpha channel. A quick mask is used for refining the selections. Similarly, layer masks are used to create composite images. In a word, we can say that an alpha channel is a map that defines the particular areas of an image.
Why is Alpha Channel needed?
Alpha channels and layer masks work in similar ways. But the difference is the layer mask only influences the layer and on the other hand the alpha Channels are able to work in any layer.
How to create an alpha channel in Photoshop the step
Before we go to how to remove the alpha channel in photoshop, we should identify the alpha channel first. To know that, we will know how to create an alpha channel. Let’s see how to do:
Check This video and Follow article step
Step 1: open an image
To open an image, go to the “File” menu and then click the “Open” option. Alternatively, you can open it by pressing “CTRL+O” from the keyboard. After that, go to your image location, select your image and then click the “Open” button.
Step 2: Activate channel option
If you already have the channel option activated, you can skip this step. If you do not have one, then follow the instructions. To activate the channel option, go to the “Window” menu and then select the “Channels” option. Now you will see the channels option has appeared beside the layer panel.
Step 3: Make selection in the image
In this step, you have to select your desired object. You can do this by using any lasso tool or quick selection tool or magic wand tool. We will use the magic wand tool. If the background is solid color then the magic wand tool is effective and if the background is complicated then lasso tools are effective. If you are using a magic wand tool then you should select background first and then inverse the selection. If you are using lasso tools then only select the object and do not inverse the selection.
So, first, select the magic wand tool from the tool panel then click on the background of the image. Now you have to inverse the selection. To do that, go to the “Select” menu and then select the “Inverse” option. Now, you will see the object is selected.
Step 4: create alpha channel
If you have done the selection of the object of your image, you have to create the alpha channel now. To do that, go to the channel panel and click on the “Save selection as channel” icon which is located in the bottom of the channels panel. After that, you will see a black and white “Alpha 1” named channel has been created.
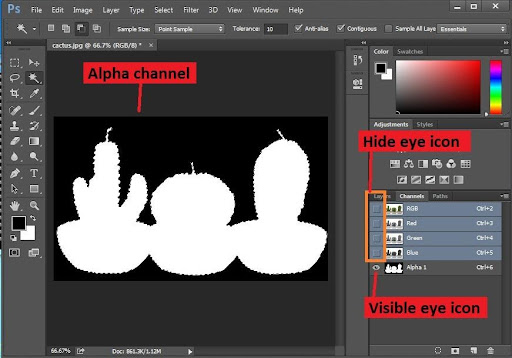
If you want to check it in the image, make visible the “Eye” icon of the alpha channel in the channels panel and hide all RGB channels’ “Eye” icon in the channels panel. You will see a black and white image has appeared. Black portion of the image is transparent and white portion of the image is the object.
Step 5: save the image
To save the image with the alpha channel, go to the “File” menu and select the “Save as” option. A save-as box will appear. From the box, rename your image and select “PSD” format from “Save as type” option. Then click the “Save” button. “PSD” file format is able to save all channels along with the original image intact.
How to remove alpha channel
Now we will show how Photoshop removes the alpha channel. Let’s see how to do it:
Step 1: Open PSD image
You have to load the PSD image which has an alpha channel as well. To load the image, go to the “File” menu and then click the “Open” option. Alternatively, you can open it by pressing “CTRL+O” from the keyboard. After that, go to your image location, select your image and then click the “Open” button.
Step 2: Activate channel option
If you already have the channel option activated, you can skip this step. If you do not have, then follow the instructions. To activate the channel option, go to the “Window” menu and then select the “Channels” option. Now you will see the channels option has appeared beside the layer panel.
Step 3: Delete alpha channel
You can delete alpha channel in four ways:
First, click on the alpha channel image from the channels panel and then right click with the mouse. After that, select the “Delete Channel” option. Your alpha channel is deleted.
Or, first click on the alpha channel image from the channels panel and then select the “Trash can” icon which is located in the bottom of the channels panel. Then click the “Yes” button. Your alpha channel is deleted.
Or, first, click on the alpha channel and then go to the “Hamburger” icon if you are using photoshop cc which is located in the upper right side of the channels panel, or go to the “Arrow” icon if you are using an older version of photoshop which is located in the upper right side of the channels panel. Then select the “Delete Channel” option. Your alpha channel is deleted
Or, hold the alpha channel and drag it to the “trash can” icon which is located in the bottom of the channels panel. Your alpha channel is deleted
Photoshop alpha channel transparency
Here, we will discuss image transparency by using the alpha channel in photoshop. Let’s see how to do that:
Step 1: Open PSD image
You have to load the PSD image which has an alpha channel as well. To load the image, go to the “File” menu and then click the “Open” option. Alternatively you can open by pressing “CTRL+O” from the keyboard. After that, go to your image location, select your image and then click the “Open” button.
Step 2: Activate channel option
If you already have the channel option activated, you can skip this step. If you do not have, then follow the instructions. To activate the channel option, go to the “Window” menu and then select the “Channels” option. Now you will see the channels option has appeared beside the layer panel.
Step 3: Load selection from the alpha channel
To do that, go to the “Select” menu and select the “Load Selection” option. A dialog box will appear. From the dialog box, make sure that the channel is rightly selected. Then press the “Ok” button.
Step 4: delete the alpha channel
Previously we have discussed how to delete the alpha channel and you can choose any option. However, first click on the alpha channel image from the channels panel and then right-click with the mouse. After that, select the “Delete Channel” option. Your alpha channel is deleted.
Step 5: Copy and paste the selection
To do that, go to the layer panel first. Layer panel is located beside the channel panel. Now, go to the “Edit” menu and select the “Copy” option or just press the “CTRL+C” from the keyboard. After that, go to the “Edit” menu again and select the “Paste” option or just press the “CTRL+V” from the keyboard. You will see a new layer has been created.
Step 6: Save image as transparent image
To do that, first hide the “eye” icon from the “background” image. After that, go to the “File” menu and then select the “Save as” option. A save as box will appear. From the save as box, rename your file and then select “PNG” format for the “Save as type” option. After that, click the “Save” button. Your transparent image has been created.
Conclusion
If you want to save the image selection for future use, no doubt alpha channel is the best in this case. If you are familiar with Photoshop use, then you are necessarily familiar with the use of alpha channels as well. If you are a beginner, this article is for you. In this article, we tried to show alpha channels and how to use and delete them. We hope that this article will help you to work with the alpha channel very easily.