If you have images which have rough edges and do not look good, smoothen the edges will make it look good. So, how can you smoothen the edges? In this tutorial article, I am going to show you How to smooth edges in Photoshop. So, read this article till the end and follow the steps with care, you will get easy instructions from this article, you will be able to do it easily. Let’s see How to smooth edges in Photoshop:
How to smooth edges in Photoshop after removing background
First: Create a New Document
First of all, you have to create a new blank document. To do that, go to the “File” menu and then select the “New” option. You will see that a window has appeared where you can choose a preset canvas or create a custom canvas. If you want to create a custom one, give “Width” and “Height” size and click on the “Create” button. A new document will be created afterward.
Second: Insert an Image In the New Document
You can insert image in the new document in various methods:
Method 1: Drag & Drop
Go to your image location where you have your saved image. Then, hold & drag the image towards the photoshop application in the taskbar, photoshop will pop up, then release the image there. A new layer will be created.
Method 2: Inserting Image From Other Image Tab in Photoshop
Go to the “File” menu and select the “Open” option. Then, go to your image location and select your image and then click on the “Open” button. Your image will be opened in a new tab in photoshop afterward. Then go to the left side’s tools panel & select the “Move tool”, then click & hold the image & drag it to your existing image’s tab, that tab will pop up and then release the mouse in the image. Your image will be imported in your existing image and a new layer will be created.
Method 3: Copying Image From Other Image Tab in Photoshop
Go to your new inserted image tab, press “CTRL+A” from the keyboard to select the whole image, then press “CTRL+C” from the keyboard to copy the whole image, then come to the existing image’s tab and press “CTRL+V” to paste the copied image. A new layer will be added.
Third: Smoothen The Edges
Now, you can smooth the edges:
Step 1: Remove the Background of the Inserted Image
- First of all, go to the layer panel and select the image layer you have inserted.
- Now, you have to make a selection of the background of the inserted image. To do that, you can use the lasso tool, or polygon lasso tool, or quick selection tool or magic wand tool. But, whichever tool you are going to use, make sure you have selected the “Add to selection” option from the top bar after selecting the tool, it will help you to make multiple selections. You will find all those tools in the left side’s tools panel. Here, I will use the “Magic wand tool”. After selecting the magic wand tool, I have selected the “Add to selection” option from the top bar.
- Now, press the “Delete” button from the keyboard. Background will be removed afterward.
- After that, press “CTRL+D” to deselect the selection.
Step 2: Add a Solid Color Background Behind the Image
- To do this, go to the layer panel, click on the background layer.
- Now, in the layer panel, click on the “Create new fill or adjustment layer” button from the bottom of the layer panel and select the “Solid color” option.
- Then select the color with the color picker.
- After that, click on the “OK” button.
- Background color will be added afterward.
Step 3: Duplicate the Inserted Image layer
You can do this in two ways,
Method 1:
- Right click on the image layer you have inserted and then select the “Duplicate layer” option.
- A dialog box will appear. From there, click on the “OK” button.
- A duplicate layer will be created.
Method 2:
- Click & hold the image layer you have inserted, then drag it to the “Create a new layer” button which is located on the bottom of the layer panel.
- That’s it. A duplicate layer will be created afterward.

Step 4: Separate the Duplicate Image
- Go to the left side’s tools panel and select the “Move tool”. Or alternatively press the “v” button from the keyboard to activate the move tool.
- Now, click & hold the photo and drag anywhere you want.
- Two same images will be separated.
Step 4: Create an Alpha Channel
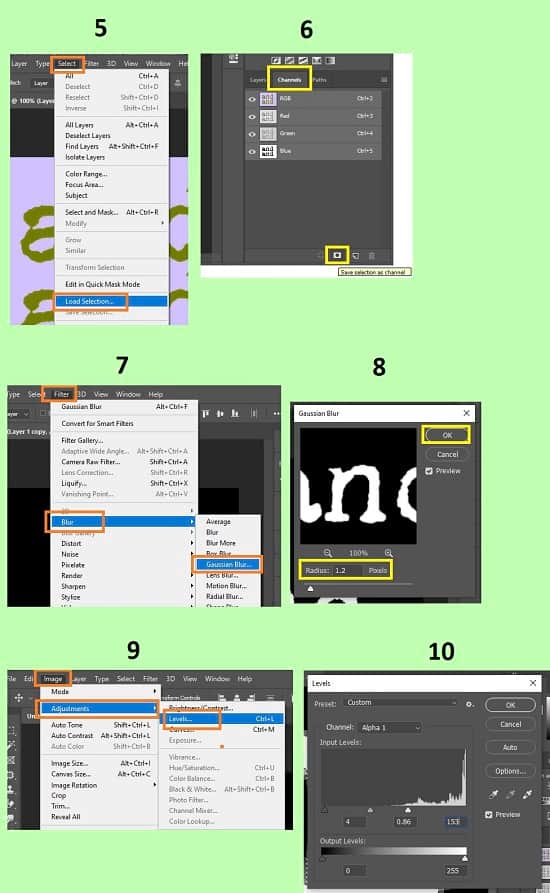
- First of all, you have to load the selection of the duplicate layer you have created. To do that, press & hold the “CTRL” button and click on the thumbnail of the duplicate layer, selection will be loaded. Or alternatively, click on the duplicate layer, then go to the “Select” menu and select the “Load selection” option.
- A window will pop up. Click on the “OK” button.
- Now, go to the channel panel. You will find it beside the layer panel. If you did not find the channel panel, go to the “Window” menu and select the “Channel” option.
- If you have found the channel panel, click on the “Save selection as channel” button from the bottom of the channel panel.
- Alpha channel will be created afterward.
- Now, select the alpha channel layer.
Step 5: Gaussian blur
- After selecting the alpha channel, go to the “Filter” menu, then go to the “Blur” option and then select the “Gaussian blur” option.
- A window will pop up. From there, set the radius “1.2”, you have to set the radius as per your preference. Click on the “OK” button.
- Select the alpha channel layer again.
Step 6: Adjust Color Levels
- Now, go to the “Image” menu, then go to the “Adjustment” option and then select the “Levels” option.
- Decrease the input levels as per your preference.
- Then click on the “OK” button.
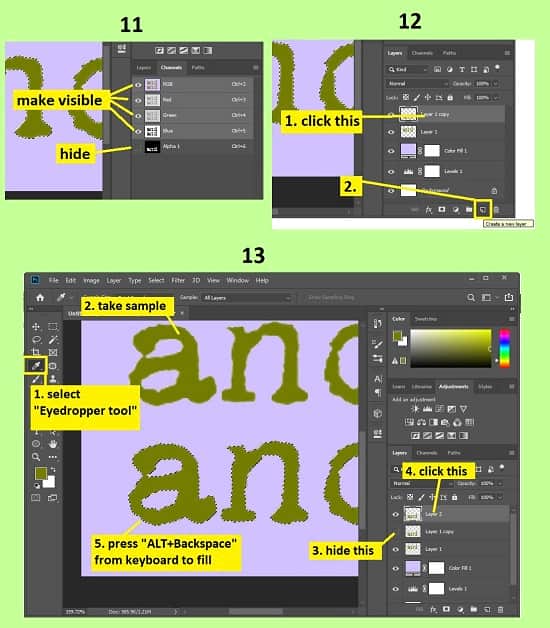
- Now, make visible all the channels. To do that, click on the eye icon of the channels. Then hide the alpha channel.
Step 7: Insert New Layer and Recolor the Selection
- Now, go to the layer panel, and create a new transparent layer above the top layer which is the duplicate layer. Click on the duplicate layer and then click on the “Create a new layer” button from the bottom of the layer panel.
- A new transparent layer will be created afterward.
- Now, take a color sample with an eyedropper tool. Go to the left side’s tools panel, click on the “Eyedropper tool”, and then click on the color of the photo to take the color sample.
- Now, hide the duplicate layer. To do that, click on the eye icon of the duplicate layer.
- Now, go to the new transparent layer you have created. At this stage, you have to fill the selection with the color you have taken the sample. To do that, press “ALT+Backspace” from the keyboard. Selection will be filled afterward.
- That’s it.
Video Tutorial about “How To Smooth Edges In Photoshop” who really don’t want to read whole article just follow below video.
That’s how you can smoothen the edges in photoshop. In this tutorial I have tried to show you the process of smoothing the edges. Here I have tried to show the process of removing the background, inserting new background, creating alpha channel, recoloring and many more. You will also find various important keyboard shortcuts which will benefit you to do it faster in the future. I hope you have understood How to smooth edges in Photoshop.