Nowadays silhouette images have become popular and the popularity is increasing day by day. It is because of its aesthetic effects. It is a reborn from the 18th-19th century’s poster effect. So, how can you make the silhouette image? In this tutorial article, I am going to show you How to make a silhouette in Photoshop. So, read this article till the end and follow the steps with care, you will get easy instructions from this article, you will be able to do it easily. Let’s see How to make a silhouette in Photoshop:
How to make a silhouette in photoshop
Step 1: Open Your Photo in Photoshop
To open your photo in photoshop, go to the “File” menu and select the “Open” option. Then, go to your image location and select your image and then click on the “Open” button. Your image will be opened in photoshop afterward.
Step 2: Make a Subject Selection
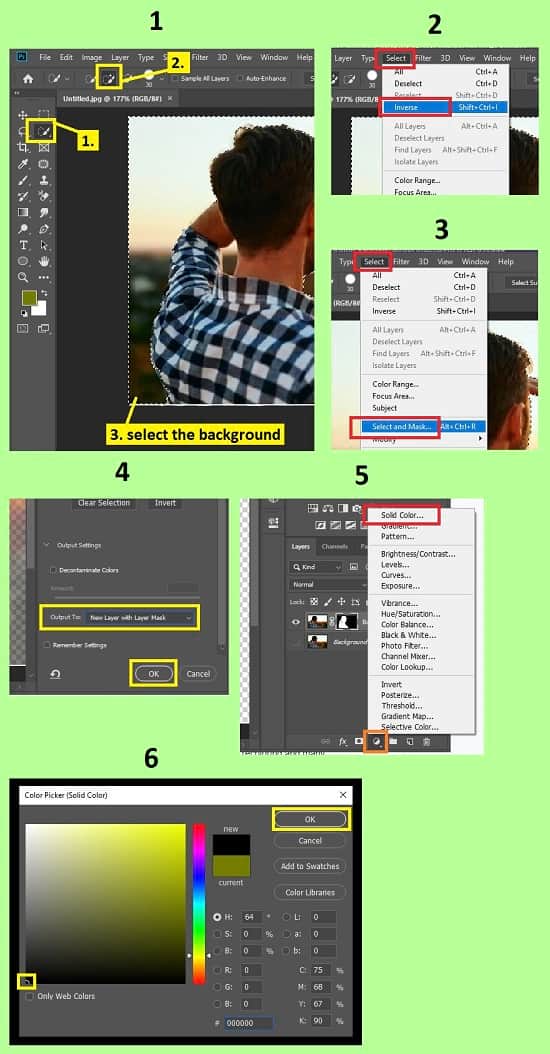
- First of all, go to the left side’s tools panel and select the “Quick selection tool”.
- Now, brush over the background. You will see that selection is selecting the area automatically.
- After selecting the background, inverse the selection. To do that, go to the “Select” menu and then choose the “Inverse” option.
- Your subject will be selected afterward.
- Now, go to the “Select” menu again and then choose the “Select and mask” option. This option is creating the mask upon selection. So, if you see that any part of the image is not selected or over selected, adjust the selection. If some parts are not selected, brush with the mouse on those parts. If some parts are over selected, press & hold the “ALT” button from your keyboard and brush with the mouse on those parts. After selection is done, scroll down the right side’s panel, go to the “Output settings” section, and set the “Output to” option as “New layer with layer mask” option. After that, click on the “OK” button. A new layer with a mask will be added afterward. Background layer will be hidden automatically.
Step 3: Create a Clipping Mask
- Now create a new solid color fill layer. To do that, go to the layer panel, select the masked layer you have created, then click on the “Create new fill or adjustment layer” button from the bottom of the layer panel, and then select the “Solid color” option.
- A window will pop up. From this window, we will select the black color. To do that, drag the color picker to the bottom left side of the color palette. After that, click on the “OK” button. A new color fill layer will be created.
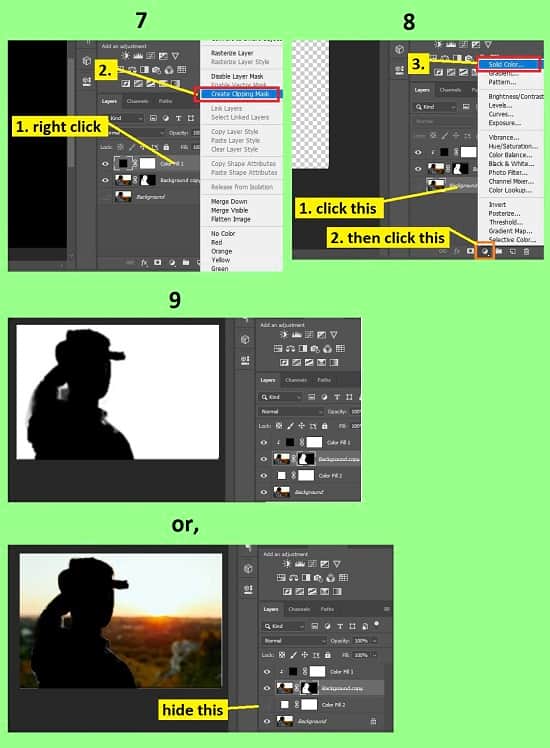
- Now, right click on the color fill layer you have just created and select the “Create clipping mask” option.
- A clipping mask will be created afterward.
- Now, if you want to edit the masked part of the masked layer, you can do that to make it perfect. To do that, go to the layer, in the masked layer, click on the mask thumbnail, then go to the left side’s tools panel, select the “Brush tool”, set the foreground color white & background color black from the left side’s tools panel. Now go to the top bar, click on the brush presets, select the “Hard round” brush, set the hardness to “100%” and press the “Enter” button. Now, brush on the photo.
Step 4: Give the Masked Layer a New Background Color
- To do that, go to the layer panel, click on the background layer, then click on the “Create new fill or adjustment layer” button from the bottom of the layer panel, and then select the “Solid color” option.
- A window will pop up. From this window, you can select any color, we will use the white color as an example. To make the white color, drag the color picker to the top left side of the color palette. After that, click on the “OK” button. A new color fill layer will be created between the background layer and the masked layer.
- Your silhouette image is created.
- If you want to see the silhouette effect on the original background, make visible the background layer and hide the color fill layer which is between the background layer and the masked layer.
- That’s it.
Video Tutorial about “How To Make A Silhouette In Photoshop” who really don’t want to read whole article just follow below video.
That’s how you can make the silhouette images in photoshop. In this tutorial I have tried to show you the process of making a silhouette in Photoshop. Here I have tried to show the process of selecting the background, selecting the subject, masking, clipping masking and many more. You will also find various important keyboard shortcuts which will be beneficial for you. I hope you have understood How to make a silhouette in Photoshop.