
Facebook Frame is a great way to show your creativity to your facebook friends and other users around the world. But, you have no clue how you can upload a frame? If you want to create a facebook frame, you can do it easily with photoshop.
In this tutorial article, I am going to show you How to create a Facebook frame. So, read this article till the end and follow the steps with care, you will get easy instructions from this article, you will be able to do it. So, let’s see how to create facebook frame:
Create Facebook Profile Frame
Step 1: Configure your Design Image
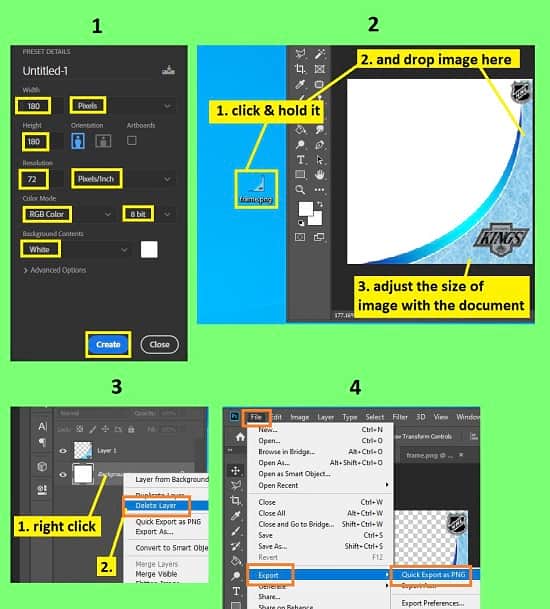
- First of all, open your photoshop and create a new document. To do that, go to the “File” menu and then select the “New” option. You will see that a window has appeared where you can choose a preset canvas or create a custom canvas. Because we are going to make a frame for facebook, we have to create a custom canvas instead of choosing a preset.
- To create a custom one for facebook, set “Pixels” for size, set the “Width” size as “180”, then set the “Height” size as “180”, then set the “Resolution” as “72 pixels/inch”, and then set the “Color mode” as “RGB color 8 bit”. After that, click on the “Create” button. A new document will be created afterward.
- Now, you have to insert the design image into that new document. To do that, go to your image location and drag & drop the design image in the document in photoshop. A new layer will be added there. Make sure that your design image has a transparent background and is in png format.
- If your design image does not have a transparent background, you have to do it differently. Go to the “File” menu, then select the “Open” option, then select your design image and click on the “Open” button. After the image has been opened in your photoshop, go to the layer panel, and click on the padlock icon of the background layer to unlock the layer. Now, select the background of the design image with the “Marquee tool”, “Lasso tool”, “Quick selection tool” or “Magic wand tool” and then press the “Delete” button from the keyboard. Background will be removed afterward. After that, go to the “File” menu, select the “Export” option, then select the “Quick export as png”, rename the file name if you want and then click on the “Save” button. After that, insert the newly created png design image into that new document. To do that, go to your newly created png image location and drag & drop the design image in the document in photoshop. A new layer will be added there.
- After inserting the design image into your document, go to the layer panel, right click on the “Background” layer, select the “Delete layer” option and click on the “OK” button.
- After that, go to the “File” menu, select the “Export” option, then select the “Quick export as png”, rename the file name if you want and then click on the “Save” button.
- Your design file will be prepared for facebook.
Above I have mentioned various selection tools like “Marquee tool”, “Lasso tool”, “Quick selection tool” and “Magic wand tool”. If you want to know more about these selection tools, I have given details about selection tools along with the object removal process in the How to remove objects in Photoshop – Unwanted objects article. So, read this article, you will know more about the selection tools.
Step 2: Upload the Frame in Facebook and Use It
- First of all, open your chrome browser, visit facebook.com and login to your facebook account. To upload the facebook frame, login to facebook account is necessary. If you do not have google chrome browser, download and install the browser. If you do not know how to download and install the chrome browser, read How to Download google chrome in windows 10 2021 | google chrome app, you will be able to do it easily.
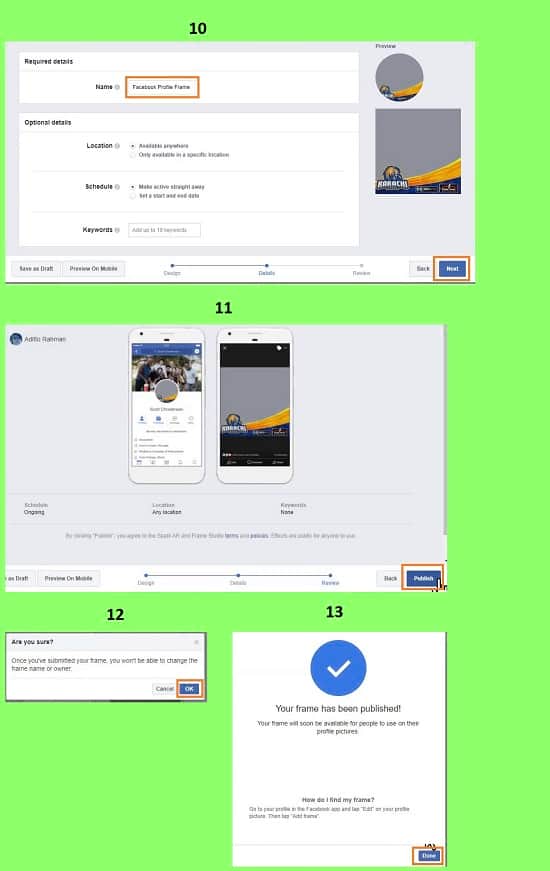
- Now, open a new tab of your browser, visit google.com and search for “facebook frame studio” and visit the first link. Or, alternatively, visit this link https://developers.facebook.com/products/frame-studio/
- Now, from that website, click on the “Create a frame” button. If you do not found this button, then click on the “Manage frames” button.
- Then, click on the “Create frame” button again.
- After that, drag & drop the frame you have created. Then, click on the “Next” button.
- Now, you have to give a frame name for your frame. Then, click on the “Next” button.
- A dialog box will appear. Click on the “OK” button. After that, click on the “Publish” button. Another dialog box will appear, click on the “OK” button.
- A confirmation window will appear afterward, click on the “Done” button.
- Your frame is successfully uploaded.
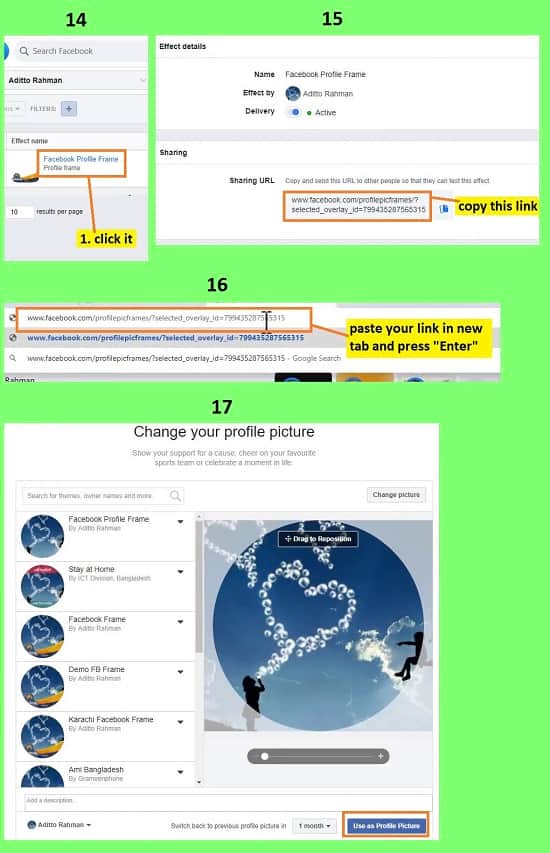
- Now, you will see that a frame is added to the list. So, click on the frame name. A window will appear. From that window, in the “Sharing” section, you will find the “Sharing URL”. So, copy the link from there, just click on the copy button, your link will be copied.
- Now, open a new tap of your browser, paste the link you have copied and press “Enter” from your keyboard.
- After that, click on the “Use as profile picture” button.
- That’s it. Your frame is added to your profile picture. Your other friend also will be able to use your frame.
Video Tutorial about “How To Create A Facebook Frame” who really don’t want to read whole article just follow below video.
That’s how you can create a facebook frame in photoshop and use it on your profile. In this tutorial I have shown you the correct way to configure the facebook frame, how to save the image in png format, and the process of uploading the frame in facebook. I hope you have understood How to create a Facebook frame. This is a very easy technique to create a facebook frame.