
One of the profound things about photoshop is, it will let you remove objects from a photo without any trace. It wipes unwanted objects in such a fashion like the object never exists before in the photo. If you want to remove objects from an image, photoshop offers you various ways to do this. In this tutorial article, I am going to show you How to remove objects in Photoshop. So, read this article till the end and follow the steps with care, you will get easy instructions from this article, you will be able to do it. So, let’s see how to remove unwanted objects:
How to remove unwanted objects in photoshop
Step 1: Open a Photo and Duplicate the Layer
- First of all, insert a photo in photoshop. To do this, go to the “File” menu and select the “Open” option. Then, go to your image location and select your image and then click on the “Open” button.
- Now, make a duplicate copy of the background layer. To do that, go to the layer panel, right click on the background layer, select the “Duplicate layer” and click on the “OK” button. Or, select the background layer, then go to the “Layer” menu, select the “Duplicate layer” option and then click on the “OK” button. Or, click & hold the background layer and drag it towards the “Create a new layer” button from the bottom.
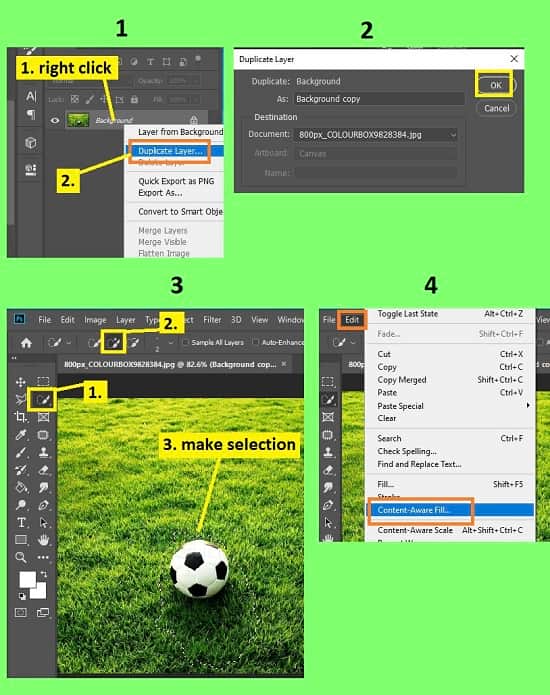
Step 2: Remove the Object
There are various ways to remove unwanted objects from a photo. Let’s have a look at those ways:
Content-Aware Fill Method
- First of all, make a selection around the object. You can make the selection in many ways. You can use the “Marquee tool”, “Lasso tool”, “Quick selection tool” and “Magic wand tool” depending on the necessity, effectiveness and ease.
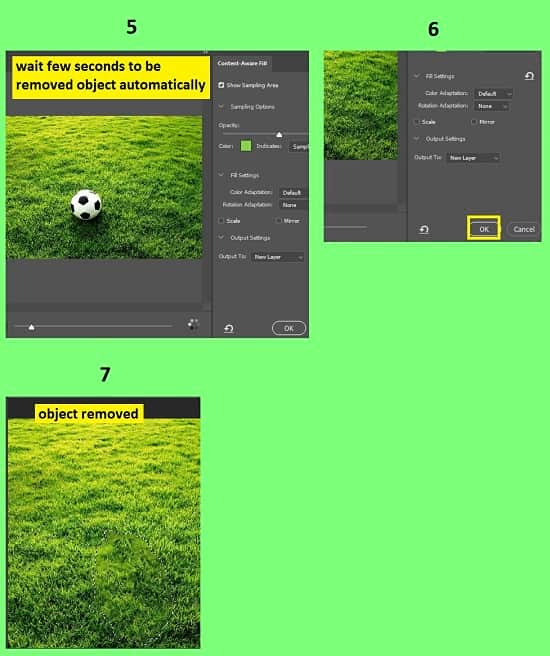
- After the selection, go to the “Edit” menu and select the “Content-Aware fill” option.
- You will see that a review window is popped up and in the review window you will see that the object is removed.
- After that, click on the “OK” button.
- Your selected object will be removed afterward.
Clone Stamp Method
- After inserting the photo and duplicating the background layer, now select the “Clone Stamp tool” from the tool panel which is located on the left side of Photoshop. Alternatively, you can activate this tool by pressing “S” from the keyboard.
- After selecting the tool, right-click on the photo by the mouse. A dialog box will appear. Now, set the brush size as per your preference and set the hardness also as per your preference.
- After that, you have to take the sample near the watermark to remove the object. To do that, hold the “Alt” key from the keyboard and then click with the cursor near the object area to select pixels. After selecting the pixel, release the “Alt” button.
- Now, start brushing over the object. You may need to take the pixel samples several times from the photo to stamp. Keep doing this until the object is removed completely.
Healing Brush Tool Method
- After inserting the photo and duplicating the background layer, now select the “Spot Healing Brush Tool” from the left side tool panel or simply press the “J” key from the keyboard.
- After selecting the spot healing brush tool, go to the top bar where the brush setting is located. Click the down arrow option which is located to the left of the “Mode” option. A dialog box will appear. Set the “Size” of the brush which will cover the font size to make corrections. After that, set the Hardness to “10%” and set the Spacing to “25%”.
- Now you have to brush over the object to remove the object with extra pixels around the object..
- If any outline or patches are left in the image, you can use the “Clone stamp tool” to remove any outline or any unwanted patches from the image. I have mentioned above the way to use the clone stamp tool.
Patch Tool Method
- First of all, Select the Patch tool, you will find the patch tool in the “healing brush tool” section from the left side’s tool panel. So right click on the “healing brush tool” and select the patch tool.
- Now, draw a selection path around your object. This time do not select extra pixels, select only the object like the Lasso selection.
- Now, click & hold the selected object and then drag it to the left, right, or in any other area to which it will replace the object. You will see the preview of the photo while you drag the selection.
- When you release the mouse in another area, Photoshop will blend the pixels of the object with other area’s pixels. You may need to do this several times to get the perfect blend.
Some Information about Various Selection Tools
All of the tools mentioned below you will find them in the left side’s tools panel.
Marquee tool:
- Rectangular Marquee tool: Just click & drag in the photo, it will make rectangular selection. If you want to get square selection, press & and hold the “Shift” key from the keyboard and then click & drag in the photo, it will make square selection.
- Elliptical Marquee: just click & drag in the photo, it will make a round selection. If you want to get equal proportioned circle selection, press & and hold the “Shift” key from the keyboard and then click & drag in the photo, it will make circle selection.
Lasso tool
- Lasso tool: With the Lasso tool, you will be able to draw the selection border around the object freely like a pencil.
- Polygonal Lasso tool: With the Polygonal Lasso tool, you will be able to draw the straight-edge selection border around the object.
- Magnetic Lasso tool: When you use the Magnetic Lasso tool, it will automatically define the border of the object.
Quick Selection tool
With the Quick Selection tool, you have to brush over the object with a round brush tip. The brush tip is adjustable. When you drag this tool, the selection expands outward and the selection automatically finds and follows defined edges of the object.
Magic Wand tool
The Magic Wand tool is the easiest way to select areas of a photo with a single click. It is handy for selecting an object that is entirely one color.
Video Tutorial about “How To Remove Objects In Photoshop” who really don’t want to read whole article just follow below video.
That’s how you can remove unwanted objects in photoshop. In this article I have mentioned the process of duplicating the image layer, different object removing techniques like Content-Aware Fill Method, Clone Stamp Method, Healing Brush Tool Method, and Patch Tool Method. Here I have included the information of various selection tools. I hope you have understood How to remove objects in Photoshop. These are very effective techniques to remove unwanted objects.