
One of the amazing things about photoshop is you can make watermarks and control the watermark effect. If you want to make a watermark for your company and stamp on your photos, photoshop offers various tools and features to do this. In this tutorial article, I am going to show you How to make a watermark in Photoshop. So, read this article till the end and follow the steps with care, you will get easy instructions from this article, you will be able to do it. So, let’s see how to make a watermark:
How to create a watermark in photoshop
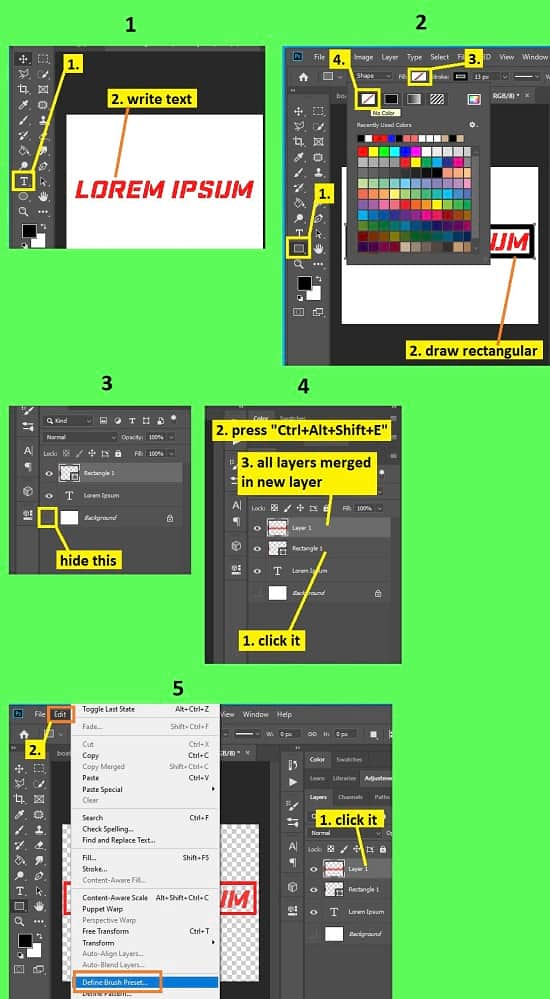
Step 1: Insert a Photo
First of all, insert a photo in photoshop. To do this, go to the “File” menu and select the “Open” option. Then, go to your image location and select your image and then click on the “Open” button.
Step 2: Make a Watermark Brush
- Now, create a new document. To do that, go to the “File” menu and then select the “New” option. You will see that a window has appeared where you can choose a preset canvas or create a custom canvas. There are various preset sections available like photos, print, Art & Illustration, Web, Mobile, and Film & Video. So, go to one of those sections, select the preset canvas whichever you want and click on the “Create” button. If you want to create a custom one, give “Width” and “Height” size and click on the “Create” button. A new document will be created afterward.
- In this step, you have to write the text or insert any symbol or both to make the watermark symbol. If you want to add a text, click on the text icon which is “T” from the left side tools panel. Or, alternatively, simply press the “t” button from your keyboard, the text tool will activate. Then, click on your document and write your text.
- If you want to add a shape for your watermark symbol, go to the left side tools panel and right click on the “Rectangle Tool”. You will see various options like “Rectangle Tool”, “Ellipse Tool”, “Rounded rectangle tool”, “Polygon tool”, “Line tool” and “Custom shape tool”. In the “Custom shape tool”, you will find more shapes, so you can pick shapes from there as well. If you choose the “Custom shape tool”, then go to the top bar and click on the “Shape” option, you will find the custom shapes. After selecting the shape, click and drag in the document. You will see the shape is created. But it is only the shape, you have to give color to make it visible.
- To change the color of the line of the shape, go to the top bar, select the “Fill” option & select “No color”, then go to the “Stroke” option, select the color and then increase the stroke size. To fill the shape with a color of a shape, go to the top bar, then select the “Fill” option and select your color.
- Now, click on the eye icon of the background layer to hide.
- Then, select the text layers and the shape layers you have created earlier, press “Shift+Ctrl+Alt+E” to merge them in a new layer. You will see a new layer has been created. Do not include the background layer for merge.
- Now, go to the layer panel, select the new layer you have created, then go to the “Edit” menu, and select the “Define brush preset’ option. A dialog box will appear, rename the brush name and click on the “OK” button. Your watermark brush will be created afterward.
Step 3: Stamp Watermark in the Photo
- Now, go to the photo tab you have inserted earlier.
- Then go to the left side’s tool panel and select the “Brush tool”. Then go to the top bar, go to the brush preset picker option, scroll down and select the watermark brush.
- Now, go to the “Window” menu and select the “Brushes” option. The Brush panel will appear. You can increase or decrease the brush size in the brushes panel.
- If you want to decrease the opacity of the brush, go to the top bar and set the “Opacity” option as per your choice.
- Now, stamp on your photo. You will see that the watermark is stamped on your photo.
- That’s it.
- You can also create a new layer to stamp. Creating a new layer will allow you to use more settings in the layer panel.
![]()
Video Tutorial about “How To Make A Watermark In Photoshop” who really don’t want to read whole article just follow below video.
That’s how you can make a watermark in photoshop. Above I have mentioned the process of making watermarks in photoshop. Here I have described the way of inserting text, adding various shapes for watermark, changing shape color, converting text & shape into watermark brush, and stamping the watermark on photo. I hope you have understood How to make a watermark in Photoshop. This is a very easy technique to use.