Stamp is necessary for any business organization. It carries the identity of a brand. But, making a stamp is not everything, it has to be well designed. So, how to make a stamp in stretching? In this tutorial article, I am going to show you How to make a stamp from an image in photoshop. So, read this article till the end and follow the steps with care, you will get easy instructions from this article, you will be able to do it easily. Let’s see how to make a stamp from an image in photoshop:
Before starting making a stamp, you need a background photo and a portrait photo to make your work easy. Let’s start making the stamp:
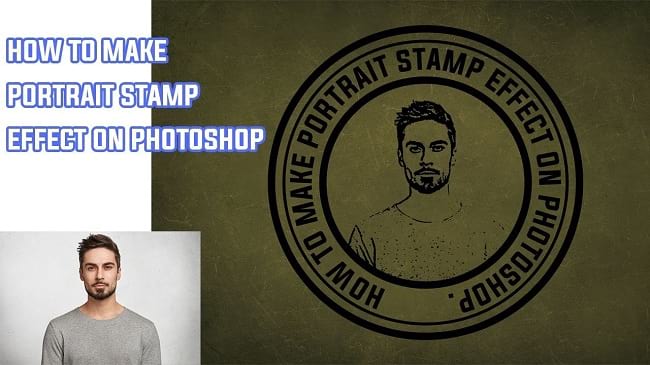
Make a Digital Stamp using Photoshop
Step 1: Open a Background Photo in Photoshop
To do that, go to the “File” menu and select the “Open” option. Then, go to your image location and select your image and then click on the “Open” button. Your image will be opened in photoshop afterward.
Step 2: Draw a Circle for Stamp
- First, you have to create a new layer. To do that, go to the layer panel, click on the “Create a new layer” button from the bottom of the layer panel. A new layer “Layer 1” will be created above the background layer.
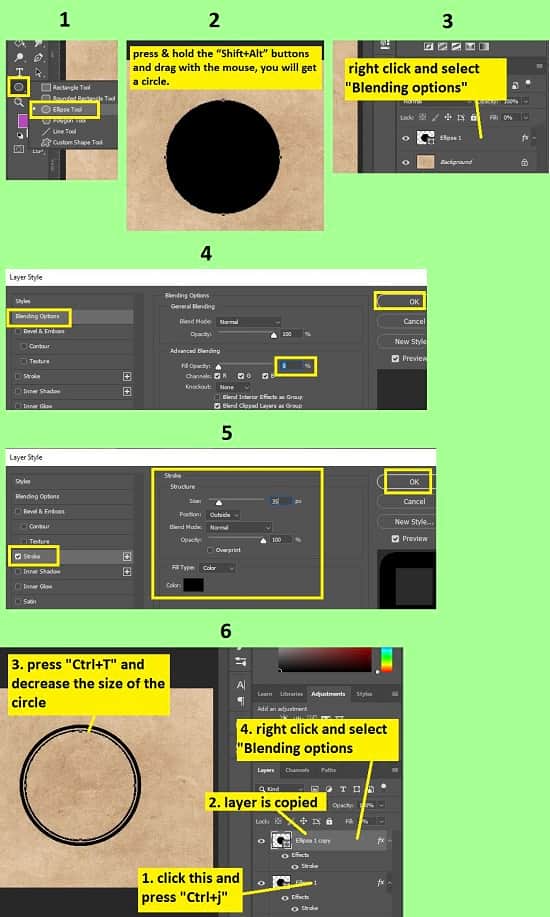
- Now, go to the left side’s tools panel and right click on the “Rectangle Tool” and select the “Ellipse Tool”.
- Now, click & hold the left mouse button and press & hold the “Shift+Alt” buttons from your keyboard and drag the mouse on the photo, you will get an equal proportioned circle. You may get a filled circle.
- The new layer “Layer 1” will be renamed to “Ellipse 1” automatically.
- Now, go to the layer panel, right click on the “Ellipse 1” layer and select the “Blending options” option from the context menu.
- A window will pop up. From there, you need to click on the “Blending options” from the left side. After that, on the right side, set the “Fill opacity” as “0%”. Now, click on the “Stroke” option from the left side. After that, on the right side, set the “Size” between 25 to 35, set the “Position” as “Outside” and set the “Blend mode” as “Normal”. Then, click on the “OK” button.
- Now, duplicate the “Ellipse 1” layer. To do this, go to the layer panel, click on the “Ellipse 1” layer and then press “CTRL+J” from the keyboard. A new layer “Ellipse 1 copy” will be created afterward.
- Now, free transform the copied layer. To do this, go to the layer panel, click on the “Ellipse 1 copy” layer and then press “CTRL+T” from the keyboard. Free transform will be activated after that and you will see the free transform handlers are visible around the shape. Now decrease the size. To do that, press & hold the “Shift+Alt” button from the keyboard and click & hold the bottom right corner handler and drag it inward. The size will be decreased equally. Make sure that the stroke of this circle is thinner than the previous one.
- Now, go to the layer panel, right click on the “Ellipse 1 copy” layer and select the “Blending options” option from the context menu.
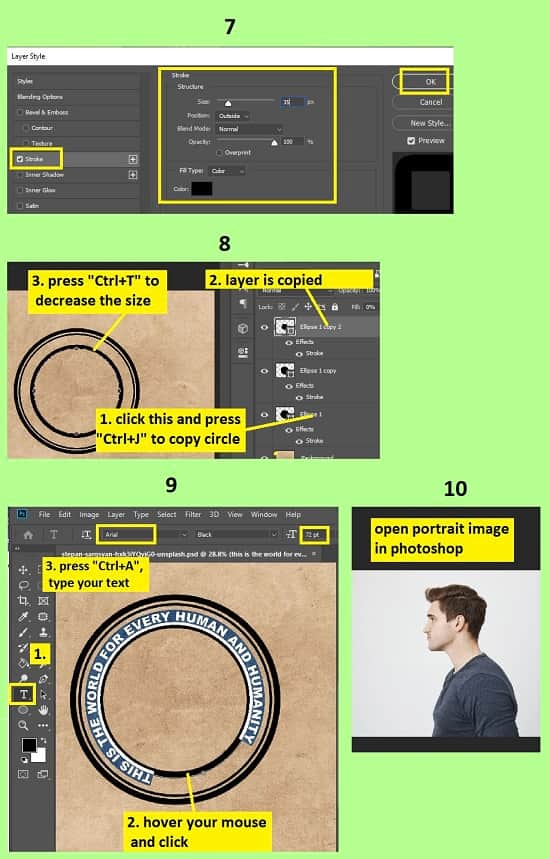
- A window will pop up. From there, click on the “Stroke” option from the left side. After that, on the right side, set the “Size” between 10 to 15, set the “Position” as “Outside” and set the “Blend mode” as “Normal”. Then, click on the “OK” button.
- Now, duplicate the “Ellipse 1” layer again. To do this, go to the layer panel, click on the “Ellipse 1” layer and then press “CTRL+J” from the keyboard. A new layer “Ellipse 1 copy 2” will be created afterward.
- Now, go to the layer panel, click & hold on the “Ellipse 1 copy 2” layer and drag it above the “Ellipse 1 copy” layer.
- Now, free transform the copied layer “Ellipse 1 copy 2”. To do this, go to the layer panel, click on the “Ellipse 1 copy 2” layer and then press “CTRL+T” from the keyboard. Free transform will be activated after that and you will see the free transform handlers are visible around the shape. Now decrease the size. To do that, press & hold the “Shift+Alt” button from the keyboard and click & hold the bottom right corner handler and drag it inward. The size will be decreased equally. Make sure that the stroke of this circle is similar to the first one.
- We have three circles for the stamp now.
Step 3: Add Text Outside of the Smallest Circle
- We have to add text in a circular direction. To do this, go to the left side’s tools panel and select the “Text tool”. Now, hover your mouse on the stroke of the smallest circle, you will see that the mouse tip is slightly changed which indicates the circular direction text, so click there. A circular directed text box will appear. If any random text is inserted by default, press “CTRL+A”, then press the “Delete” button and then type your text. After that, press the “ESC” button. A text layer will be inserted.
- You will see that the text is aligned with the circle. Now, increase the text direction area so that the text is visible outside the smallest circle. To do that, go to the layer panel, click on the text layer and then press “CTRL+T” from the keyboard. Free transform will be activated after that and you will see the free transform handlers are visible around the text shape. Now, press & hold the “Alt” button from the keyboard and click & hold the bottom right corner handler and drag it outward. The area size will be increased equally. After that, press the “Enter” button. Make sure that the area is outside the smaller circle.
- Now, if you want to increase the text size, go to the left side’s tools panel and select the “Text tool”. Now, click on the text, then press “CTRL+A” to select all text, then go to the top bar, input the text size number and press the “Enter” button. You can change the font style in the same way.
- Now, if you want to change the text color, go to the left side’s tools panel and select the “Text tool”. Now, click on the text, then press “CTRL+A” to select all text, then go to the left side’s tools panel again, click on the foreground color option and set the color. But, black color is preferred for stamps.
- If you want to rotate the text area, go to the layer panel, click on the text layer and then press “CTRL+T” from the keyboard. Free transform will be activated after that and you will see the free transform handlers are visible around the text shape. Now, if you hover your mouse outside of the free transform area, you will see the rotate icon on the mouse tip. So, click the mouse and rotate.
Step 4: Add a Portrait in the Stamp
- First of all, you have to open a portrait photo on another tab of the photoshop. To do this, go to the “File” menu and select the “Open” option. Then, go to your image location and select the portrait image and then click on the “Open” button. Your portrait image will be opened in the new tab of the photoshop afterward.
- Now, press “CTRL+L” to open the color levels. A window will appear. From there, whiten the entire complexion slightly. Then click on the “OK” button
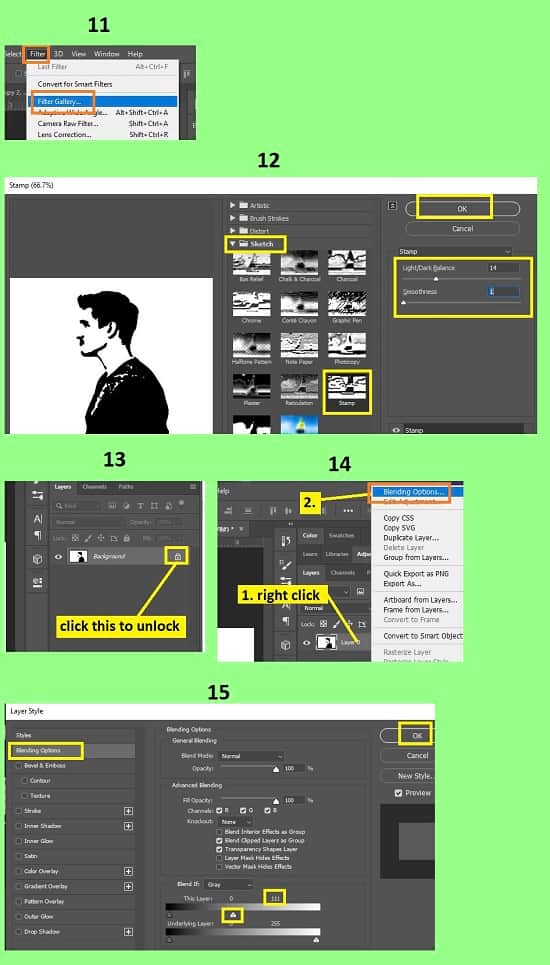
- Now, go to the “Filter” menu and then select the “Filter gallery” option. A window will appear. From there, expand the “Sketch” gallery and then select the “Stamp” option. Now, on the right side, set the “Light/Dark Balance” and “Smoothness” as per your preference. Then click on the “OK” button.
- Now, unlock the background layer. To do this, go to the layer panel and click on the padlock icon of the background layer, your background layer will be unlocked. The background layer will be renamed to “Layer 0” automatically.
- Now, go to the layer panel, right click on the “Layer 0” layer and select the “Blending options” option from the context menu. A window will pop up. Then, click on the “Blending options” from the left side. Now, on the right side, in the “Blend if” section you will see two color sliders. So, in the first color slider, slide the right side’s slider to the “111” point. Then click on the “OK” button.
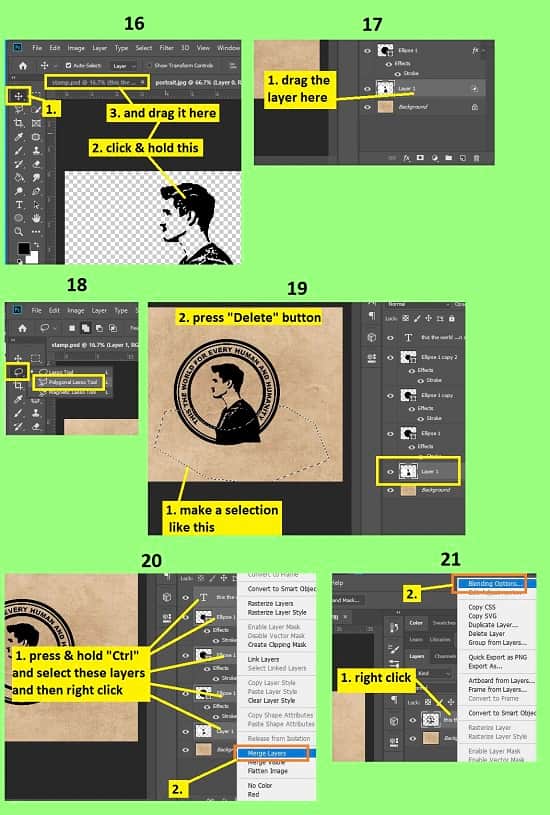
- Now, go to the left side’s tools panel, and select the “Move tool”. Now, click & hold with the mouse on the photo and drag it to your stamp image’s tab. It will be added in a new layer “Layer 1”.
- Now drag the portrait layer “Layer 1” above the background layer. To do this, go to the layer panel, click & hold the portrait layer “Layer 1” and drag it down and put it above the background layer.
- Now, go to the layer panel, click on the portrait layer “Layer 1”, then press “CTRL+T” from the keyboard. Free transform will be activated after that and you will see the free transform handlers are visible around the portrait. Now, click & hold the bottom right corner handler and drag it outward. The size of the portrait will increase. Now, drag the portrait photo in the middle of the stamp.
- If you see that the portrait image area is gone beyond the stamp area, you have to erase those extra parts. To do this, go to the layer panel, click on the portrait layer “Layer 1”, then go to the left side’s tools panel and select the “Polygon Lasso tool”. Now, draw a selection path from the edge of the smallest circle towards the outside of the stamp and portrait photo. Now press the “Delete” button. Extra parts will be erased afterward.
- After that, press “CTRL+D” to deselect the selection.
- Now, go to the layer panel, click on the portrait layer “Layer 1”, then press “CTRL+L” to open the color levels. A window will appear. From there, darken the portrait image’s complexion slightly. Then click on the “OK” button
- Now, go to the layer panel, press & hold the “CTRL” button and click on all the layers except the background layer, then right click and select the “Merge Layers” option. Selected layers will be merged afterward.
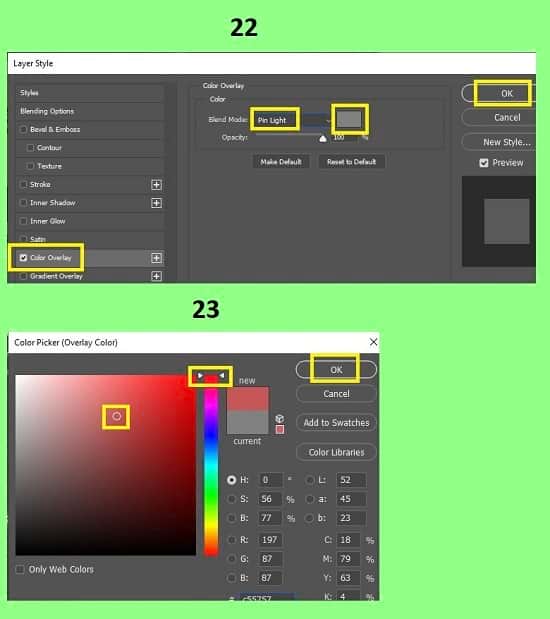
- Now, go to the layer panel, right click on the merged layer and select the “Blending options” option from the context menu. A window will pop up. Then, click on the “Color overlay” from the left side. Now, on the right side, set the “Blend mode” as “Pin light”, then click on the color overlay, a color picker window will popup and select your color as per your preference and click on the “OK” button. Click on the “OK” button again.
- That’s it.
Video Tutorial about “How To Make A Stamp From An Image In Photoshop” who really don’t want to read whole article just follow below video.
That’s how you can make a stamp from an image in photoshop. In this article I have tried to show you the way of drawing circles, adding texts, converting portraits in stamps, merging layers and many more. Here I have included lots of important keyboard shortcuts to make it easy for you. Not only that, I have tried to show you the steps in deep detail. I hope you have understood How to make a stamp from an image in photoshop.