
If you love the artistic effect of a photo, pixel stretching is another effect you can try. This artistic effect is very popular nowadays. So, how to do pixel stretching? In this tutorial article, I am going to show you how to make a pixel stretch effect in Photoshop. So, read this article till the end and follow the steps with care, you will get easy instructions from this article, you will be able to do it easily. Let’s see how to make a pixel stretch effect in Photoshop:
Stretching an image in photoshop
Step 1: Open Your Image in Photoshop
First of all, open your photo in photoshop. To do that, go to the “File” menu and select the “Open” option. Then, go to your image location and select your image and then click on the “Open” button. Your image will be opened in photoshop afterward.
Step 2: Select the subject of the Image and Separate the Subject in New Layer
- To do that, go to the left side’s tools panel, select the “Quick selection tool”, then go to the top option bar, and select the “Add to selection” button.
- Now, select the background of the image. So, after selecting the quick selection tool, brush over the background and you will see that selection is happening automatically.
- Now, go to the “Select” menu and then choose the “Inverse” option. You will see that the subject is selected.
- Now, go to the “Select” menu again, then go to the “Modify” option and then choose the “Feather” option. A window will pop up. From that window, set the “Feather radius” between 0.5 to 1. After that, click on the “OK” button.
- Then, press “CTRL+J” from the keyboard. You will see that the selected subject is separated in a new layer “Layer 1”.
- Now, hide the background layer. To do this, go to the layer panel and click on the eye icon of the background layer.
Step 2: Add a New Colored Background for the Separated Image
- First, you have to add a new layer between the “Background” layer and the “Layer 1” layer. To do that, go to the layer panel, click on the background layer, then click on the “Create a new layer” button from the bottom of the layer panel.
- A new transparent layer “Layer 2” will be created between the “Background” layer and the “Layer 1”.
- Now, go to the layer panel again, click on the new transparent layer “Layer 2”, then click on the “Create new fill or adjustment layer” button from the bottom of the layer panel and then select the “Solid color” option.
- A window will pop up. From there, select a background as per your preference. Then click on the “OK” button. Solid color will be added in the new transparent layer and the “Layer 2” layer will be renamed to “Color fill 1” automatically.
Step 3: Rotate the Separated Image
If the subject of the image is right side faced, you can rotate the subject.
- To rotate the image, go to the layer panel and select the separated image’s layer “Layer 1”
- Now, press “CTRL+T” from the keyboard to activate the free transform. You will see that free transform is activated around the photo.
- Now, right click on the photo and select the “Flip horizontal” option from the context menu.
- After that, press the “Enter” button from the keyboard.
- Now, reposition the subject slightly on the left side. To do this, go to the left side’s tools panel and select the “Move tool”. Then, click & hold the photo with the mouse and drag it to the left side slightly.
![]()
Step 4: Stretch the Pixel
- You have to select pixels from the subject horizontally. To do that, go to the layer panel, click on the separated image layer “Layer 1”, then go to the left side’s tools panel, and select the “Rectangular marquee tool”.
- Now, make a thin horizontal selection from the top side of the subject towards the bottom side, select as long as you can within the subject. If any part is impossible to select, we will select that part later. For example, selection can be made of a person from hair towards the waist, then select towards waist and then we will make a selection again from the waist towards the leg later.
- After making the selection, press “CTRL+J” from the keyboard. The selected part will be copied to a new layer “Layer 2”.
- Now, go to the layer panel, select the new layer “Layer 2”, then press “CTRL+T” from the keyboard to activate the free transform. You will see that free transform is activated around that thin image part.
- Now, press & hold the “SHIFT” button and click & hold the right middle handler of the free transform with the mouse and drag the handler to the right. You will see that the pixel is stretched. Press the “Enter” button.
- Now, we will make the selection of the unselected part. To do this, go to the layer panel, click on the “Layer 1” layer, then go to the left side’s tools panel and select the “Pen tool”. Now start the horizontal selection path from where the previous selection was ended, then continue the selection path towards the bottom, then draw a thin vertical path to the right and then end the to where the previous selection was ended. Now convert the path into a selection. To do that, just press “CTRL+Enter” from the keyboard. Now, press “CTRL+J” from the keyboard. The selected part will be copied to a new layer “Layer 3”.
- Now, go to the layer panel, select the new layer “Layer 3”, then press “CTRL+T” from the keyboard to activate the free transform. You will see that free transform is activated around that thin image part.
- If the selection is a little bit tilted to the left side or right side, make it a straight horizontal line. To do that, after activating the free transform, hover the mouse outside the selected part, you will see the rotation icon on the mouse tip, then click & hold the mouse and tilt to right or left.
- After that, press & hold the “SHIFT” button and click & hold the right middle handler of the free transform with the mouse and drag the handler to the right. You will see that the pixel is stretched. Then, press the “Enter” button from the keyboard.
- Now, merge the “Layer 2” and “Layer 3” layers. To do that, go to the layer panel, press & hold the “CTRL” from the keyboard and click on the “Layer 2” & “Layer 3” and right click and then select the “Merge layer” option. Those layers will be merged.
- Now, go to the layer panel, click on the merged layer “Layer 2”, then go to the “Filter” menu, then go to the “Distort” option and then select the “Wave” option. A window will appear. From that window, set the “Number of generators” as “1” and set the rest of settings as per your preference. Then click on the “OK” button.
- Now, to do that, go to the layer panel, then click & hold the merged layer “Layer 2” and drag it below the “Layer 1”.
- If you see that the stretched pixel’s extra stretched pixel is visible on the left side of the subject, you have to erase that. To do that, go to the layer panel, select the merged layer “Layer 2”, then go to the left side’s tools panel, select the “Lasso tool”, make a selection circle from the top of the subject towards the bottom along with extra areas from the left side. Then press the “Delete” button from the keyboard. After that, press “CTRL+D” to deselect the selection.
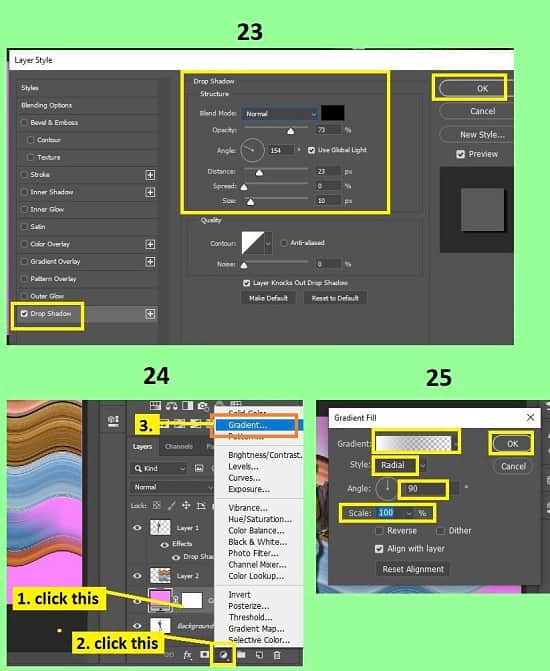
- Now, go to the layer panel, right click on the “Layer 1” layer and select the “Blending option. Then, go to the “Drop shadow” option from the left side. Now, in the right side, set the “Blend mode” as “Normal”, set the “Opacity to “70%”, set the “Angle” to “154 degree”, set the “Distance” between 20 to 25, set the “Spread” to “0%”, set the “Size” 10px, and then click on the “OK” button. In your case, the above mentioned adjustment numbers may differ, so choose numbers according to the need.
- Now, add a gradient layer behind the subject and stretched pixel. To do that, go to the layer panel, click on the “Color fill 1” layer, then click on the “Create new fill or adjustment layer” button from the bottom of the layer panel and then select the “Gradient” option. A window will pop up. From that window, set the gradient pattern as per your preference, set “Style” as “Radial”, set “Angle” as “90”, and set the scale as per your preference. After that, click on the “OK” button.
- Now add a shadow below the subject. To do that, first of all, create a new layer. To do that, go to the layer panel, select the “Gradient fill 1” layer and then click on the “Create a new layer” button from the bottom of the layer panel. A new transparent layer “Layer 3” will be created between the “Layer 2” and “Gradient fill 1”. Now, go to the layer panel, select the new transparent layer “Layer 3” layer, then go to the left side’s tools panel, select the “Elliptical marquee tool”, make an thin oval shape selection below the subject, then then go to the left side’s tools panel, set the foreground color as same as the photo background color but slightly darker color, and then press “ALT+Backspace” to fill the color. After that, press “CTRL+D” to deselect the selection.
- Now, go to the layer panel, select the “Layer 3” layer, then go to the “Filter” menu, then go to the “Blur” option and then select the “Gaussian blur” option. A window will pop up. From that window, set the “Radius” between 4 to 6. And then click on the “OK” button.
- That’s it.
![]()
![]()
![]()
Video Tutorial about “Pixel Stretch Effect App In Photoshop” who really don’t want to read whole article just follow below video.
That’s how you can make a pixel stretch effect in Photoshop. In this article I have tried to show you the way of making a pixel stretch effect in Photoshop. Above I have tried to show the way of separating subject from photo, rotating the photo, adding new background, selection of pixels & stretching and many more. Here I have included lots of important keyboard shortcuts to make it easy for you. Not only that, I have tried to show you the steps in depth. I hope you have understood how to make a pixel stretch effect in Photoshop.