If you are a beginner and just started to learn photoshop, you might be facing difficulty in understanding photoshop. Keep in mind that Photoshop is a premium and world’s best photo editing software which has thousands of editing tools and you can not master Photoshop in one day. You have to learn this bit by bit. But, it does not mean it is hard to learn. Rather, it is easy to use. In this tutorial, I am going to show you How to make a border in photoshop. So, read this article till the end and follow the steps with care, you will be able to do it. It is a way to add a border outside the image. So, lets see how to do it:
How to put a border around an image
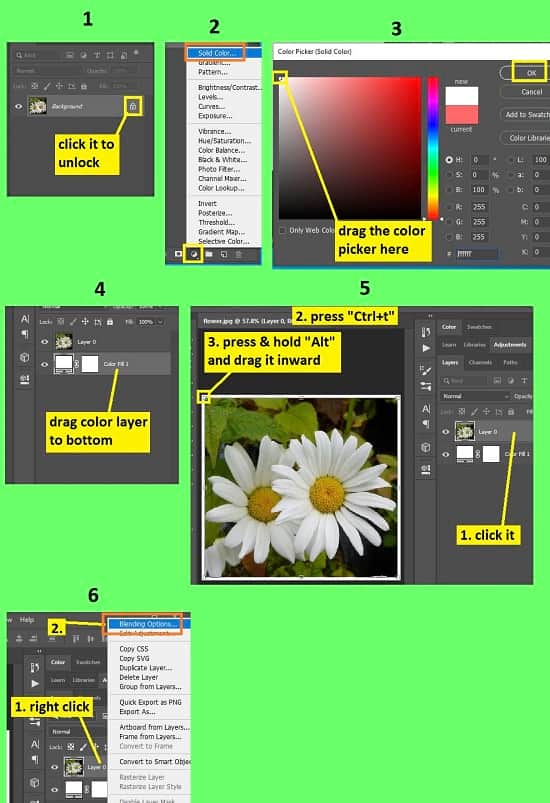
Insert a Background Color Layer
- First of all, insert a photo in photoshop. To do this, go to the “File” menu and select the “Open” option. Then, go to your image location and select your image and then click on the “Open” button.
- Now, you have to unlock the background layer to add a background color. To do this, go to the layer panel and click on the “Lock” icon of the background layer and it will be unlocked. Or, alternatively, press and hold the “CTRL” key from the keyboard and mouse “Double click” on the layer simultaneously, and the background layer will be unlocked. Or, go to the “Layer” menu, then go to “New” option, select “Layer from background” option then click on the “OK” button, background layer will be unlocked afterward. The background layer will be renamed to “Layer 0” automatically
- Now, add a background color. To do this, go to the layer panel, click on the “Create new fill or adjustment layer” icon from bottom and then select the “Solid color” option. Now, to get a white background, drag the color picker towards the top left side of the color palette, then click on the “OK” button. A new layer “color fill 1” will be created. Now, click and hold this layer drag down below the “Layer 0” layer.
- Now, decrease the size of the image. So, select the “Layer 0” layer from the layer panel and press “CTRL+T” from the keyboard. Image will be selected. Now press & hold the “ALT” button from the keyboard and mouse click & hold on the corner of the image and drag to inside. Size will be decreased at equal proportion.
Create a Border
- Now, we will create a border. Go to the layer panel, right click on the image layer and select the “Blending options” from the context menu.
- Then, go to the “Stroke” option from the left side’s panel. Click on the “Color” option, pick a color with the color picker and click on the “OK” button. Now, increase the size of the border, just slide the size option or put the size amount. Click on the “OK” button. A simple border will be created there. You will see that two new sublayers have been added to your image layer.
- If you want to add a second border, double click on the “Stroke” sublayer of the image layer, and the blending options window will appear again. Now, go to the “Bevel & emboss” option from the left side panel. Set the “Style” option as “Emboss”, set the “Technique” as “Chisel hard”, increase the “Depth” between 500%-600% and then increase the “Size” a little bit around 2-5px. Then click on the “OK” button.
Create a Border with Texture
- Insert a new image, create a white color background layer, decrease the size of the image, I have shown you above how you can insert an image and create a white background layer etc.
- Go to the layer panel, right click on the image layer and select the “Blending options” from the context menu.
- Then, go to the “Stroke” option from the left side’s panel. Click on the “Color” option, pick a color with the color picker and click on the “OK” button.
- After that, increase the size of the border if you want, just slide the size option or put the size amount. A border will be created.
- Now, go to the “Bevel & emboss” option from the left side panel. Set the “Style” option as “Pillow Emboss”, set the “Technique” as “Chisel hard”, increase the “Depth” if you want. Then click on the “OK” button. Two new sublayers will be added to your image layer
- Now, go to the layer panel again and go to your image layer. Now, hover your mouse on the “fx” and right click. Then select the “Create layers” from the context menu. Several new layers will be created afterward. If you see that the shadow layer and highlights layer is above the image layer, drag them below the image layer.
- Now select the shadows layer, highlights layer and stroke layer from the layer panel and right click and then select the “Merge layers” option. It will transformed into the emboss shadows layer
- After that, go to the “Window” menu and select the “Styles” option. Styles window will appear. Now, click on the emboss shadows layer and click on the textures from the “Style” window. You will see that the textures become the border.

Video Tutorial about “How To Make A Border In Photoshop” who really don’t want to read whole article just follow below video.
That’s how you can make a border design in photoshop. In this tutorial I have shown you how to create a background layer, how to use the blending option to make borders, how to use texture to make borders and many more. I hope you have understood How to make a border in photoshop. If you’re not able to make the border perfectly, try and practice over and over again, you will be able to do it easily.