Generally, photo cropping is mostly used to remove irrelevant details or unwanted subjects from a photo. Not only that, it is used to improve composition or change the aspect ratio of a photo. If your images have unwanted objects or improve the composition of your images, you can crop images. In this tutorial article, I am going to show you How to crop a picture in photoshop. So, read this article till the end and follow the steps with care, you will get easy instructions from this article, you will be able to do it easily. So, let’s see how to crop a photo:
How to crop image in Photoshop without cropping background
Step 1: Open Your Picture in Photoshop
First of all, you have to insert your photo in photoshop. To do this, go to the “File” menu and select the “Open” option. Then, go to your image location and select your image and then click on the “Open” button.
Step 2: Enable Cropping Tool
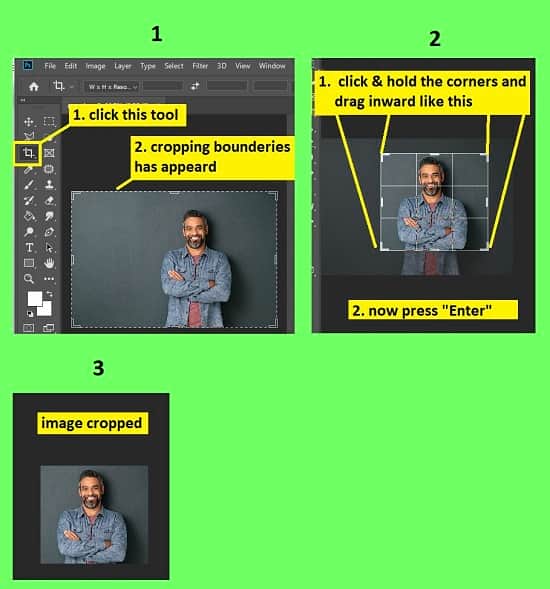
To enable the crop tool, go to the left side’s tools panel, then select the crop tool. Or, alternatively, press the “C” button from the keyboard, crop tool will enable. After that, you will see that your mouse tip has the crop tool
Step 3: Cropping the Picture
Method 1: Direct cropping
- After enabling the crop tool, if you see the boundaries of the image have appeared automatically, you will see that there are eight edge handles. If the boundaries have not appeared, click & drag with the mouse from the top left corner of the image towards the bottom right corner of the image, you will see that there are eight edge handles. If you click & drag the edge handles, you can specify the cropping boundaries.
- After setting the crop boundaries, press the “Enter” button from the keyboard to crop the image. Or, right click on the photo and select the “Crop” option, your image will be cropped.
- That’s it.
Method 2: Square Shape Cropping
- After enabling the crop tool, if you see the crop boundaries of the image have appeared automatically, you have to inactive the boundaries. To do that, just press the “ESC” button from the keyboard.
- Now, press & hold the “Shift” button from the keyboard and click & drag with the mouse in your photo simultaneously, you will get a square shape cropping boundaries.
- After setting the crop boundaries, press the “Enter” button from the keyboard to crop the image. Or, right click on the photo and select the “Crop” option, your image will be cropped.
- That’s it.
Method 3: Equal Proportion Cropping
- After enabling the crop tool, if you see the crop boundaries of the image have appeared automatically, you have to inactive the boundaries. To do that, just press the “ESC” button from the keyboard.
- Now, press & hold the “ALT” button from the keyboard and click & drag with the mouse in your photo simultaneously, you will see that crop boundaries are spreading in the opposite directions at an equal proportion.
- After setting the crop boundaries, press the “Enter” button from the keyboard to crop the image. Or, right click on the photo and select the “Crop” option, your image will be cropped.
- That’s it.
Method 4: Cropping with Specific Width and Height
- After enabling the crop tool, if you see the boundaries of the image have appeared automatically, go to the top bar or option bar. From there, select the cropping aspect as “W x H x Resolution” option. Then, in the next field, input width size in pixels, for example: type “720px” in the width field. Then, in the next field, input height size in pixels, for example: type “540px” in the height field. And then, in the next field, input resolution size in pixels and set the aspect as “px/in”, for example, type “300” in the resolution field and select “px/in” from the resolution aspect drop down menu.
- Or, if you do not see the cropping boundaries in the image after enabling the crop tool, go to the top bar or option bar. From there, select the cropping aspect as “W x H x Resolution” option. Then, in the next field, input width size in pixels, for example: type “720px” in the width field. Then, in the next field, input height size in pixels, for example: type “540px” in the height field. And then, in the next field, input resolution size in pixels and set the aspect as “px/in”, for example, type “300” in the resolution field and select “px/in” from the resolution aspect drop down menu. Then, press the “Enter” button from the keyboard. After that, click & drag with the mouse in the image and draw the crop boundaries. Then the edge handle will appear.
- Now, click & drag the edge handles, you will see that boundaries are specified.
- After setting the crop boundaries, press the “Enter” button from the keyboard to crop the image. Or, right click on the photo and select the “Crop” option, your image will be cropped.
- That’s it.
Video Tutorial about “How To Crop A Picture In Photoshop” who really don’t want to read whole article just follow below video.
That’s how you can crop a photo in photoshop. In this tutorial I have shown you the easiest process of cropping an image. Here, I have described different methods of cropping like direct cropping, square shape cropping, equal proportion cropping and many more. I hope you have understood How to crop a picture in photoshop. These are very easy ways to crop the photos.