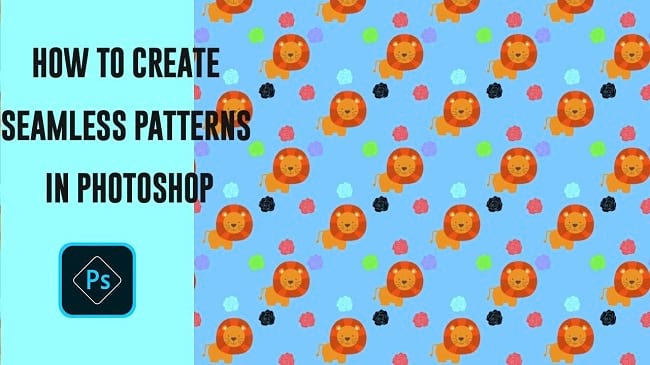
A pattern in photoshop is a type of image which is repeated. It is generally used to fill a selection or a layer. Photoshop has various preset patterns. With the help of photoshop, you can create a new pattern, save them in the pattern library and use your pattern whenever you need. In this tutorial article, I am going to show you How to create seamless patterns in photoshop. So, read this article till the end and follow the steps with care, you will get easy instructions from this article, you will be able to do it easily. So, let’s see how to make a seamless pattern:
Create seamless pattern from image
First, Create a Pattern
Step 1: Insert Images and Create New Document
- To create a pattern, you can use both shapes of photoshop and your saved images. I will show you to use both sources to make a pattern.
- To insert your saved images, go to the “File” menu and select the “Open” option. Then, go to your image location and select your image and then click on the “Open” button.
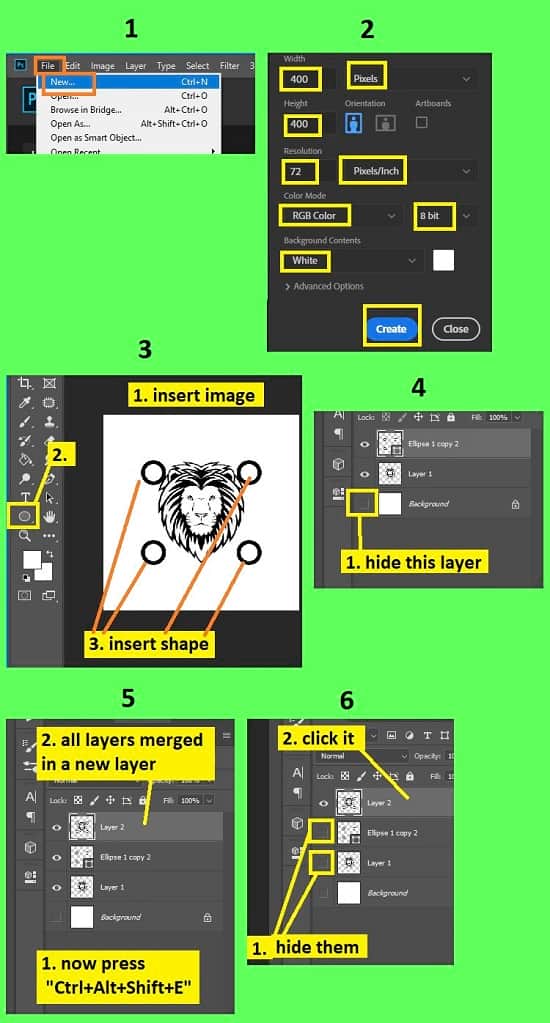
- Now, you have to create a new blank document. To do that, go to the “File” menu and then select the “New” option. You will see that a window has appeared where you can choose a preset canvas or create a custom canvas. Because we are going to make a pattern, we have to create a custom canvas instead of choosing a preset.
- To create a custom document for pattern, set “Pixels” for size aspect, set the “Width” size as “400”, then set the “Height” size as “400”, then set the “Resolution” as “72 pixels/inch”, and then set the “Color mode” as “RGB color 8 bit”. After that, click on the “Create” button. A new document will be created afterward.
Step 2: Import the Inserted Image In the Document
- Now, you have to import your image in the new document. So, go to your image tab, then go to the left side’s tools panel & select the “Move tool” or press “v” from the keyboard to active the move tool, then click & hold the image & drag it in front of the new document tab, new document will pop up and then release the mouse in the white area of the document. Your image will be imported in your new document.
- Now, if you want to increase or decrease the size of the image you have imported, go to the layer panel, select the newly added image layer, then press “CTRL+T” from the keyboard to activate the free transform for the image. Or, alternatively, go to the “Edit” menu and select the “Free transform” option to activate the free transform for the image. Now click & hold the corner of the photo and then drag the mouse to increase or decrease the size of the photo as per your choice. After resizing the picture, press “Enter” from the keyboard or press “v” from the keyboard to stop the free transformation.
Step 3: Add Shapes in the Document
- Now, you can add shapes from photoshop. To add shape, go to the left side tools panel and right click on the “Rectangle Tool”. You will see various options like “Rectangle Tool”, “Ellipse Tool”, “Rounded rectangle tool”, “Polygon tool”, “Line tool” and “Custom shape tool”. In the “Custom shape tool”, you will find more shapes, so you can pick shapes from there as well.
- If you choose the “Custom shape tool”, then go to the top bar and click on the “Shape” option, you will find the custom shapes. After selecting the shape, click and drag with the mouse in the document. You will see the shape is created. But it is only the shape, you have to give color to make it visible.
- To change the color of the line of the shape, go to the top bar, select the “Fill” option & select “No color”, then go to the “Stroke” option, select the color and then increase the stroke size. To fill the shape with a color of a shape, go to the top bar, then select the “Fill” option and select your color.
- If you want to know more about shapes, read How to make shapes in Photoshop – 5 Minute solution
- Now, if you want to increase or decrease the size of the shape you have inserted, go to the layer panel, select the shape layer, then press “CTRL+T” from the keyboard to activate the free transform. image. Now click & hold the corner of the shape and then drag the mouse to increase or decrease the size of the shape as per your choice. After resizing the picture, press “Enter” from the keyboard.
- Now, if you want to make multiple copies of the shape you have created, select the “Move tool” from the left side’s tools panel first, then press & hold the “ALT+ Mouse click” the shape with the mouse simultaneously and drag the shap. Do not release the “ALT” button while dragging the shape. Shape will be copied afterward. Do it multiple times to copy the shape for multiple times.
- Now arrange the copied shape, change the shape color and a lot more things as per your choice.
- Now, go to the layer panel, and make the background layer invisible. To do that, just click on the eye icon of the background layer.
- Now, in the layer panel, select the top layer and press the “CTRL+ALT+SHIFT+E” buttons from the keyboard to merge all visible layers in a new layer. A new merged layer will be created afterward. Click on the eye icons of other shape layers to hide them and only the merged layer and your image layer will remain visible.
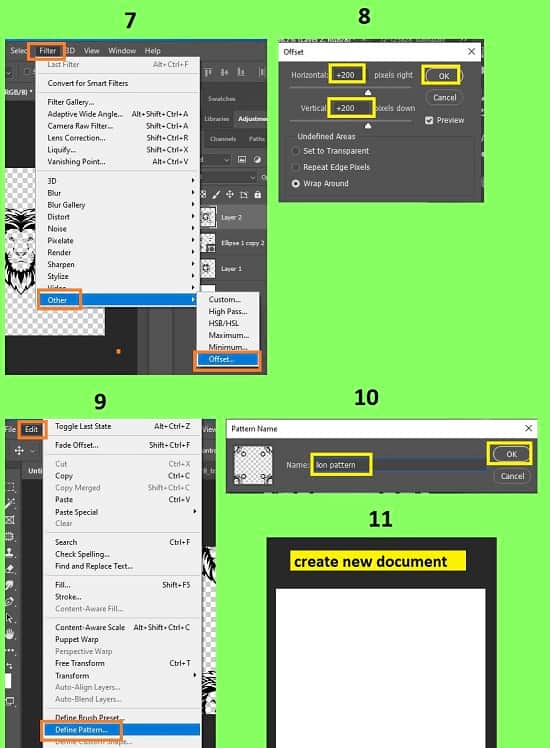
- Now, select the newly merged layer, then go to the “Filter” menu, then go to the “Other” option and then select the “Offset” option. A dialog box will appear. From that dialog box, set the “Horizontal” level as “+200” and set the “Vertical” level as “200” and click on the “OK” button.
- Now, go to the “Edit” menu, and then select the “Define pattern” option. A dialog box will appear, rename the pattern name and click on the “OK” button.
- Your pattern has been created.
Now, Apply the Pattern
- Now, create a new document. To do that, go to the “File” menu and then select the “New” option. You will see that a window has appeared where you can choose a preset canvas or create a custom canvas. There are various preset sections available like photos, print, Art & Illustration, Web, Mobile, and Film & Video. So, go to one of those sections, select the preset canvas whichever you want and click on the “Create” button. If you want to create a custom one, give “Width” and “Height” size and click on the “Create” button. A new document will be created afterward.
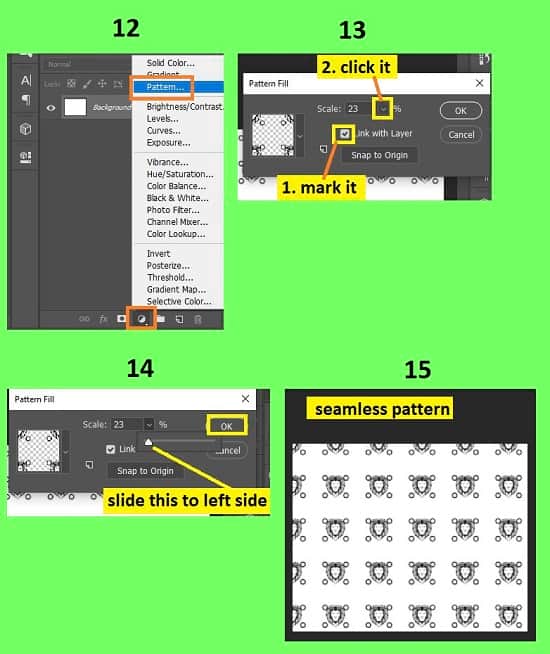
- Then, go to the layer panel, click on the “Create new fill or adjustment layer” button from the bottom of the layer panel and select the “Pattern” option. A dialog box will appear. From the dialog box, open the pattern drop down option & select your pattern, put a check mark on the “Link with layer” option, then click on the drop down option of “Scale” and slide the slider, you will see that the pattern size is increasing or decreasing.
- After selecting the pattern scale, click on the “OK” button.
- That’s it.
Video Tutorial about “How To Create Seamless Patterns In Photoshop” who really don’t want to read whole article just follow below video.
That’s how you can create a seamless pattern in photoshop. In this tutorial I have shown you the easiest process of making a seamless pattern. Here, I have described how to insert images, how to insert shapes, how to merge all layers in a new layer, how to define patterns from images and many more. For your convenience, I have included various keyboard shortcuts so that you can do your work fast. I hope you have understood How to create seamless patterns in photoshop.