
Different styles of fonts give you different designs. Sometimes a simple use of fonts become a trademark of a company. Fonts are essential to make watermarks, neon texts, 3D texts and many more. In this tutorial article, I am going to show you How to add fonts to photoshop. So, read this article till the end and follow the steps with care, you will get easy instructions from this article, you will be able to do it easily. So, let’s see how to add fonts:
Add fonts to photoshop in windows 10
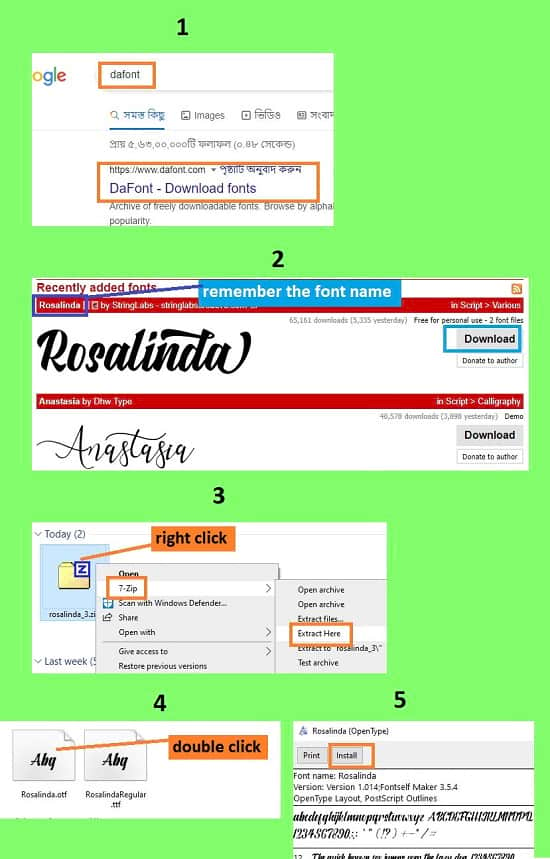
Step 1: Download Fonts
- First of all, open your google chrome browser, visit google.com and search for “dafont”. If you do not have google chrome browser, read How to Download google chrome in windows 10 2021 | google chrome app, you will be able to do it easily.
- You will see that there are various search results. So, select the first one, this is also the official website of dafont. Here you will find lots of fonts there. So, download your fonts as per your choice. Download file will be in the zip file.
- Now, go to your download location, and unzip the font.
- Now, double click on the font. You will see the installation window with font preview. Click on the “Install” button.
- Font will be installed afterward.
- Remember the font name so that you can find the font easily in photoshop.
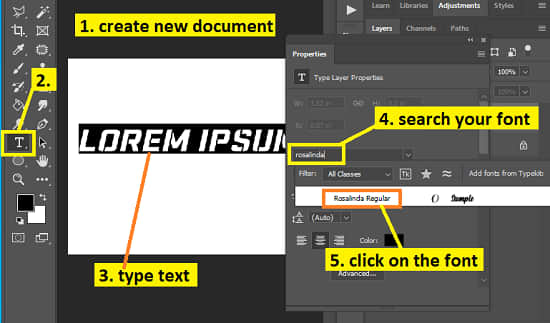
Step 2: Use the font In Photoshop
- Now, you have to create a new document. To do that, go to the “File” menu and then select the “New” option. You will see that a window has appeared where you can choose a preset canvas or create a custom canvas. You can select the preset canvas whichever you want. After selecting the preset canvas, click on the “Create” button. If you want to create a custom one, give “Width” and “Height” size and click on the “Create” button. A new document will be created afterward.
- Or, you can insert a photo in photoshop to use your font. To do that, go to the “File” menu and select the “Open” option. Then, go to your image location and select your image and then click on the “Open” button. Your image will be opened in photoshop.
- Now, you have to write the text. To do that, click on the text icon which is “T” from the left side tools panel. Or, alternatively, simply press the “t” button from your keyboard, the text tool will activate. Then, click on your document or image and write your text.
- After writing the text, press “v” from the keyboard.
- Now, go to the layer panel and click on the text layer.
- Now, go to the “Window” menu and select the “Properties” option.
- From the properties panel, in the “Character” section, click on the font name, clear the name and type your font name, font search will appear and click on your desired font. Or, click on the down arrow button of the font, then scroll down to find your font name and click on the font.
- To change the font color, go to the properties panel, click on the “Color” option and select your color.
- To increase or decrease the font size, go to the properties panel, click on the font size box, clear the size, type your size and press “Enter” from the keyboard. Or, click on the down arrow button of the font size, then select the font size. Or, press “CTRL+T” from the keyboard, free transform edge handle will appear, click & drag the corner of your text, font will increase or decrease, press “Enter” from the keyboard.
- That’s it.
Video Tutorial about “How To Add Fonts To Photoshop” who really don’t want to read whole article just follow below video.
That’s how you can add fonts to photoshop. In this tutorial I have shown you the process of adding fonts in photoshop. Here, I have described where you will find the font, download process of the font, installation process of the font and how to use the font in photoshop. I hope you have understood How to add fonts to photoshop. This is a very easy way to add fonts.