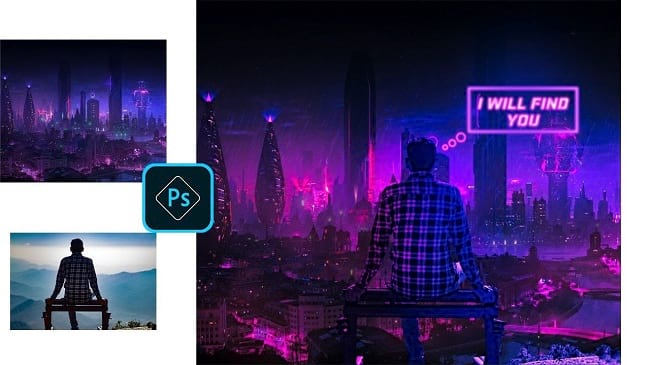
Cyberpunk is an action based video game which created a sensation in the gaming world. But the sensation is not limited in the gaming world only, it is also spread out among the photo editors. People nowadays love to make cyberpunk effect on their photos. So, how to make the Cyberpunk effect photoshop? In this tutorial article, I am going to show you how to make the Cyberpunk effect photoshop. So, read this article till the end and follow the steps with care, you will get easy instructions from this article, you will be able to do it easily. Let’s see how to make the Cyberpunk effect photoshop:
Before you start making cyberpunk effects on photos, make sure that you have necessary photos. First one is the image of a city. And the second one is, you need a photo of a lone person from the back side. Let’s start making cyberpunk effect:
How to create cyberpunk effect in Photoshop
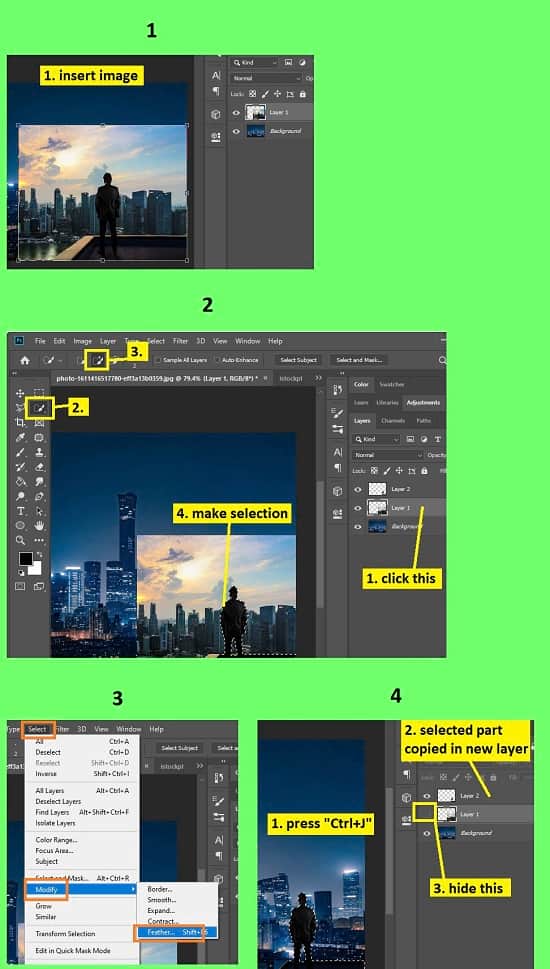
Step 1: Open a Photo of a City in Photoshop
To do that, go to the “File” menu and select the “Open” option. Then, go to your image location and select your base image and then click on the “Open” button. Your base image will be opened in photoshop afterward.
Step 2: Insert a Photo of a Man in Photoshop
Here, I have selected a photo of a man who is standing on a rooftop. You can insert the photo in three ways:
Method 1: Drag & Drop
Go to your image location where you have your saved image. Then, hold & drag the image towards the photoshop application in the taskbar, photoshop will pop up, then release the image there. A new layer will be created. Rename the layer as “Layer 1”.
Method 2: Inserting Image From Other Image Tab in Photoshop
Go to the “File” menu and select the “Open” option. Then, go to your image location and select your image and then click on the “Open” button. Your image will be opened in a new tab in photoshop afterward. Then go to the left side’s tools panel & select the “Move tool”, then click & hold the image & drag it to your existing image’s tab, that tab will pop up and then release the mouse in the image. Your image will be imported in your existing image and a new layer “Layer 1” will be created.
Method 3: Copying Image From Other Image Tab in Photoshop
Go to your new inserted image tab, press “CTRL+A” from the keyboard to select the whole image, then press “CTRL+C” from the keyboard to copy the whole image, then come to the existing image’s tab and press “CTRL+V” to paste the copied image. A new layer “Layer 1” will be added.
Step 3: Make a Selection of the Subject and Copy It in a New Layer
To do this, you can use the quick selection tool.
- Go to the left side’s tools panel and select the “Quick selection tool”. Now, brush over the subject. You will see that selection is selecting the area automatically. If you see that you have over selected, press & hold the “ALT” button and then brush over the over selected areas.
- Now, go to the “Select” menu, then go to the “Modify” option and then choose the “Feather” option. Set the feather radius between 0.5 to 2. Then click on the “OK” button.
- Now, press “CTRL+J” from the keyboard to copy the selected part in a new layer. You will see that the selected part is copied in a new layer “Layer 2”.
- Now, hide the “Layer 1”. To do this, go to the layer panel, and click on the eye icon of the “Layer 1” layer.
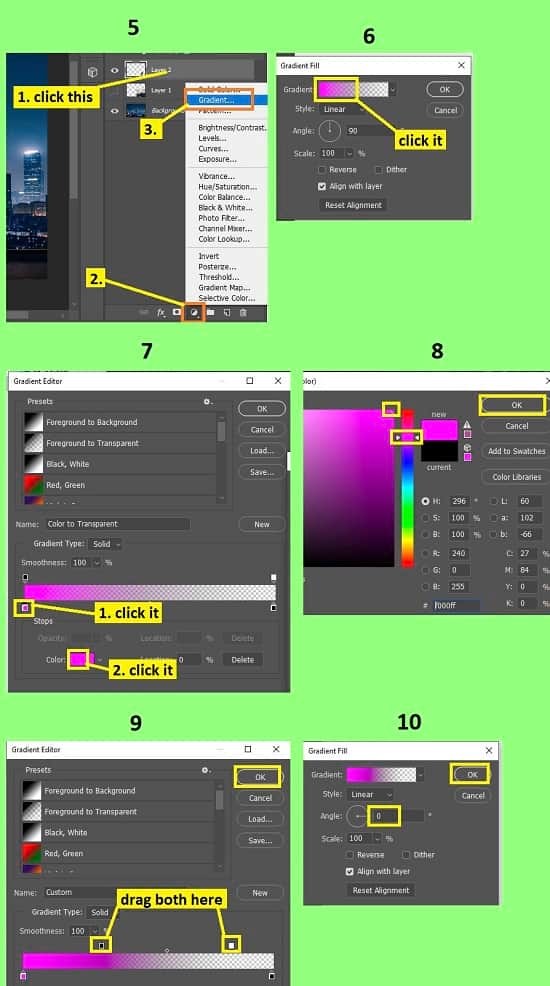
Step 4: Add a Gradient Layer
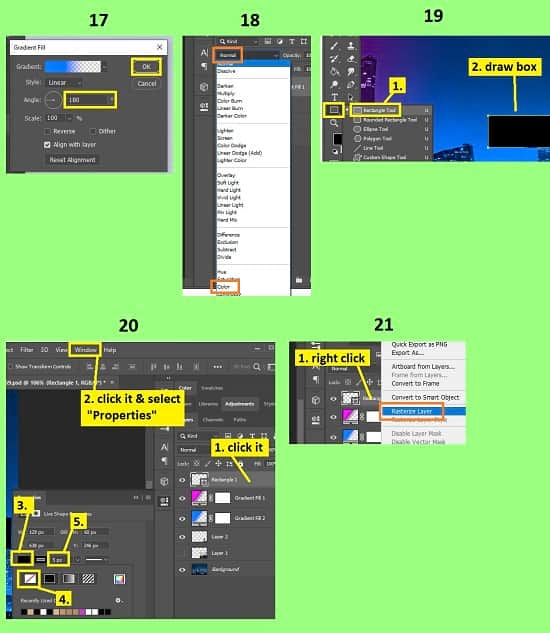
- To do this, go to the layer panel, and click on the “Layer 2” layer. Then click on the “Create new fill or adjustment layer” button from the bottom of the layer panel and then select the “Gradient” option.
- A window will pop up. From there, click on the Gradient” option. Another window “Gradient editor” will pop up. Below you will see a color slider. From that color slider, from the left side’s slider switch, click on the down side switch, then click on the “Color” option, a color picker window will appear, select the pinkish color from the color palette, and click on the “OK” button. Now, From that color slider, from the left side’s slider switch, click on the top side switch and slide it to the right side a little bit. Now, From that color slider, from the right side’s slider switch, click on the top side switch and slide it to the left side a little bit.
- Then click on the “OK” button of the “Gradient editor” window.
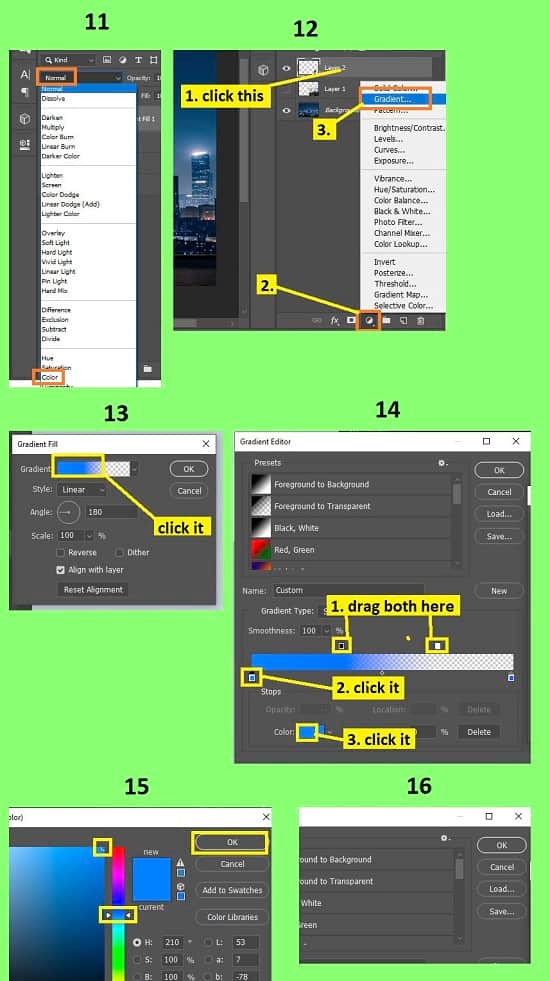
- Now set the “Style” as “Liner”, set the “Angle” as “0 degree” and then click on the “OK” button. A gradient layer “Gradient fill 1” will be added above the “Layer 2” layer. Now, go to the layer panel, and click on the “Gradient fill 1” layer. Then, in the layer panel, click on the blend mode drop down menu and select the “Color” option. You will find the blend mode option beside the “Opacity” option.
- Again, go to the layer panel, and click on the “Layer 2” layer. Then click on the “Create new fill or adjustment layer” button from the bottom of the layer panel and then select the “Gradient” option.
- A window will pop up. From there, click on the Gradient” option. Another window “Gradient editor” will pop up. Below you will see a color slider. From that color slider, from the left side’s slider switch, click on the down side switch, then click on the “Color” option, a color picker window will appear, select the blueish color from the color palette, and click on the “OK” button. Now, From that color slider, from the left side’s slider switch, click on the top side switch and slide it to the right side a little bit. Now, From that color slider, from the right side’s slider switch, click on the top side switch and slide it to the left side a little bit.
- Then click on the “OK” button of the “Gradient editor” window.
- Now set the “Style” as “Liner”, set the “Angle” as “180 degree” and then click on the “OK” button. A gradient layer “Gradient fill 2” will be added above the “Layer 2” layer. Now, go to the layer panel, and click on the “Gradient fill 2” layer. Then, in the layer panel, click on the blend mode drop down menu and select the “Color” option. You will find the blend mode option beside the “Opacity” option.
- Now, go to the layer panel, and click on the background layer, Then click on the “Create new fill or adjustment layer” button from the bottom of the layer panel and then select the “Color balance” option. Adjust the color balance as per your preference.
Step 5: Add Text
- We will add text inside a box. So, first create a box. To do this, go to the layer panel, and click on the “Gradient fill 1” layer, then go to the left side’s tools panel and select the “Rectangle tool”. Now draw a box around the man. A rectangle layer “Rectangle 1” will be added above all the layers.
- You may see the box is filled with color and you need only the stroke of the box. So, go to the layer panel, and click on the “Rectangle 1” layer, then go to the “Window” menu and select the “Properties” option. The Properties panel will appear. Now, click on the “Set shape fill type” option and select the “No color” option. Then, increase the stroke size.
- Then, go to the layer panel, and right click on the “Rectangle 1” layer, and select the “Rasterize layer” option.
- Now, press & hold the “CTRL” button and then click on the thumbnail of the “Rectangle 1” layer from the layer panel to extract the selection from the shape. Then, go to the left side’s tools panel and set the background color white. Then, press “CTRL+Backspace” to change the color of the shape into white color. Then press “CTRL+D” to deselect the selection.
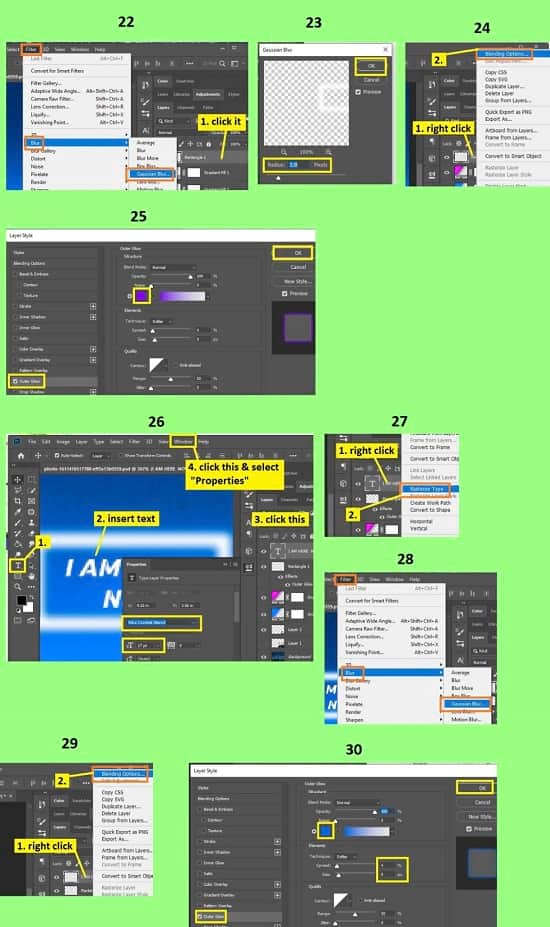
- Now, go to the layer panel, and click on the “Rectangle 1” layer, then go to the “Filter” menu, then go to the “Blur” option and then select the “Gaussian blur” option. A window will appear. Set the radius between 2.5 to 5. Click on the “OK” button.
- Again, go to the layer panel, and right click on the “Rectangle 1” layer, and select the “Blending options” option. A window will pop up. From there, select the “Outer glow” from the left side. Now, on the right side, click on the color and set the blueish color, then set the “Spread” as “4”, and set the “Size” as “9”. Click on the “OK” button.
- Now we will add text inside the box. To do this, go to the left side’s tools panel and select the “Text tool”. Then click inside the box, some random text will be there, press “CTRL+A” to select all the text, and then type your text. If the size of the text is large, go to the layer panel, click on the text layer, then go to the “Window” menu, then click on the “Properties” option. Text properties panel will appear afterward. From there decrease the size as per your preference. Now, from the properties panel, click on the color and select the white color. Now, from the properties panel, click on the color and select the white color. Now, from the properties panel, Set “Nike combat stencil” font as font style.
- After that, go to the layer panel, and right click on the text layer, and select the “Rasterize type” option. Then go to the “Filter” menu, then go to the “Blur” option and then select the “Gaussian blur” option. A window will appear. Set the radius between 1.5 to 4. Click on the “OK” button.
- Now, go to the layer panel, and right click on the text layer, and select the “Blending options” option. A window will pop up. From there, select the “Outer glow” from the left side. Now, on the right side, click on the color and set the blueish color, then set the “Spread” as “4”, and set the “Size” as “8”. Click on the “OK” button.
Step 6: Merge All layers and Color Adjustment
- Now, merge all the visible layers in a new layer. To do this, press “CTRL+ALT+SHIFT+E” from the keyboard. A new layer “Layer 3” will be created.
- Now, go to the layer panel, and click on the “Layer 3”, then go to the “Filter” menu and select the “Camera raw filter” option.
- A window with color adjustment settings and image preview will appear. From there, adjust temperature, tint, vibrance, saturation, color grading etc. as per your preference. After that, click on the “OK” button.
- That’s it.
Video Tutorial about “Cyberpunk Effect Photoshop” who really don’t want to read whole article just follow below video.
That’s how you can make the Cyberpunk effect photoshop. In this article, I have tried to show you the easiest way of making a Cyberpunk effect. Here I have described the way of making selection, inserting photos, adding gradient effect, blending the effect, adding text, color adjustment of text, doing glowing effect and many more. Here I have several important keyboard shortcuts to make it easy for you. Not only that, I have tried to show you the steps in deep detail. I hope you have understood how to make the Cyberpunk effect photoshop.