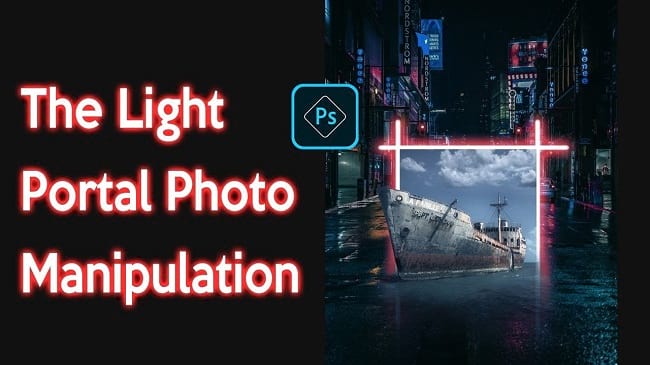
Sometimes we see some unusual photos like a boat coming out in the road or an airplane is parking in the road etc. via a light portal. These fantasy-like photos are generally found in social media. But, how to create such an effect? In this tutorial article, I am going to show you how to make the Light Portal Photo Manipulation in photoshop. So, read this article till the end and follow the steps with care, you will get easy instructions from this article, you will be able to do it easily. Let’s see how to make the Light Portal Photo Manipulation in photoshop:
Light portal photo manipulation in photoshop
Photos You Must Need
You must need two types of photo. Those are:
- You need a background photo in which you will make a light portal.
- You need a photo of an object which you will put in the light portal. A photo of an object can be anything like a boat, air plane, vehicles, fish etc.
Let’s start making a light portal photo manipulation
Step 1: Open the Background Photo in Photoshop
To do that, go to the “File” menu and select the “Open” option. Then, go to your image location and select your base image and then click on the “Open” button. Your background image will be opened in photoshop afterward.
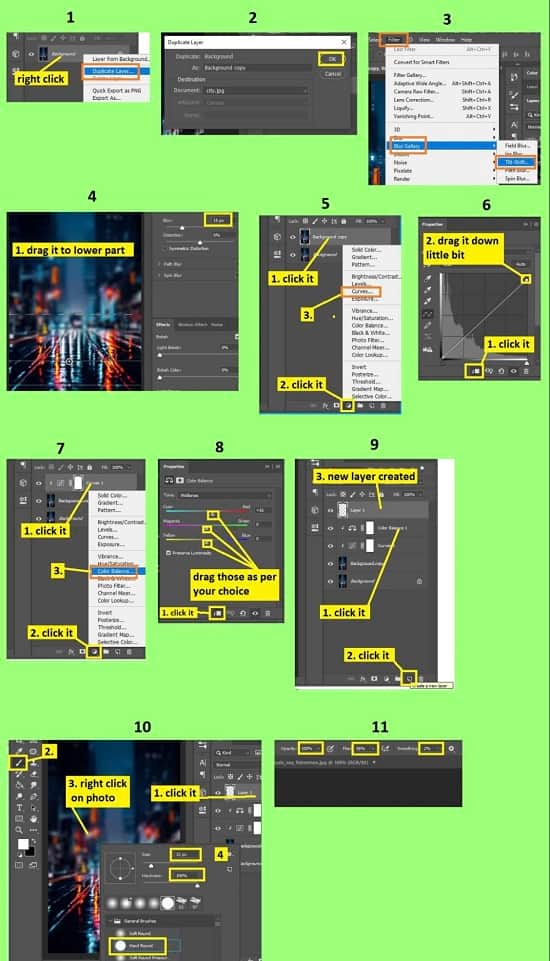
Step 2: Duplicate the Background Layer
You can duplicate the background layer in four ways,
Method 1:
To duplicate the layer, go to the layer panel, right click on the background layer, select the “Duplicate layer” and click on the “OK” button.
Method 2:
Or, select the background layer, then go to the “Layer” menu, select the “Duplicate layer” option and then click on the “OK” button.
Method 3:
Or, click & hold the background layer and drag it towards the “Create a new layer” button from the bottom. Your background layer will be duplicated.
Method 4:
Or, just press “CTRL+J” from the keyboard. Your background layer will be duplicated. Rename the duplicate layer from “Layer 1” to “Background copy”.
Step 3: Blur the Image and Adjust Color
- To do this, go to the layer panel, select the duplicate layer “Background copy”, then go to the “Filter” menu, then go to the “Filter gallery” and then select the “Tilt-shift” option. The image will be previewed in a new window, drag the blur gesture to the bottom side, set the “Blur” amount between 15 to 25 from the right side. And then click on the “OK” button from the top bar.
- Now, go to the layer panel, select the duplicate layer “Background copy”, then click on the “Create new fill or adjustment layer” button and then select the “Curves” option. Color curves panel will appear. From there, select the “click to clip to layer” button from the bottom of the curves panel. Then, click & hold the top right corner’s curve and drag it down a little bit to darken the image slightly. A “Curves 1” layer will be created afterward.
- Now, again go to the layer panel, select the “Curves 1” layer, then click on the “Create new fill or adjustment layer” button and then select the “Color balance” option. Color balance panel will appear. From there, select the “click to clip to layer” button from the bottom of the color balance panel. Then, slide the color slider and adjust as per your preference. A “Color balance 1” layer will be created afterward.
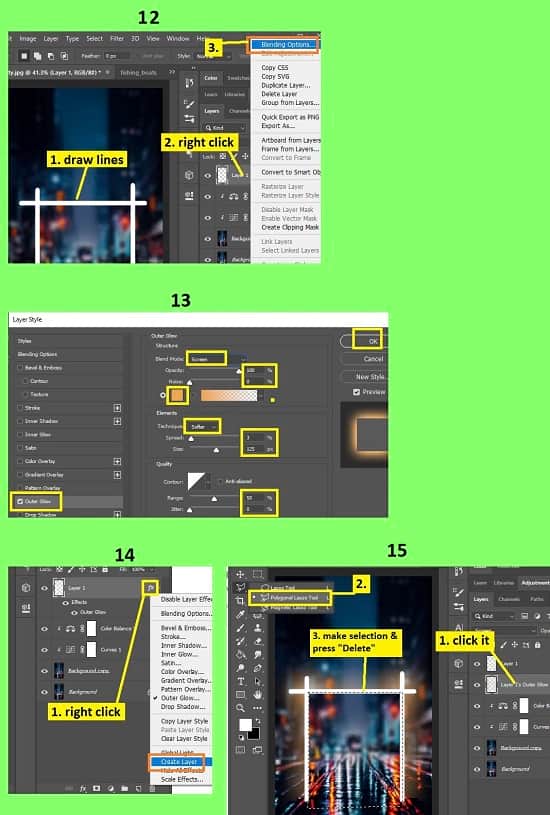
Step 4: Draw Light Portal
- First, create a new layer at the top. To do that, go to the layer panel, select the “Color balance 1” layer and then click on the “Create a new layer” button from the bottom of the layer panel. A new transparent layer “Layer 1” will be created above the “Color balance 1” layer.
- Now, go to the layer panel, and select the “Layer 1” layer. Then, go to the left side’s tools panel and select the “Brush tool”, then right click on the photo and select the “Hard round”, then go to the top bar and set the “Smootnes” to “2%”. Then, go to the left side’s tools panel again and set the foreground color white. You are all set to draw the light portal.
- To draw the light portal, first draw a horizontal line. To do this, click & hold with the mouse on the photo and then press & hold the “Shift” button from the keyboard and drag a line from left to right. You will get a straight horizontal line.
- Now, draw two vertical straight lines. One line is from the left corner of the horizontal line and the other line is from the right corner of the horizontal line. Make sure that both the lines are a little bit on the inner side and both the corner is left alone. To draw the line, click & hold with the mouse on the photo and then press & hold the “Shift” button from the keyboard and draw a line from top to bottom. You will get a straight vertical line. Do this for other lines as well.
- We have drawn three lines for the light portal.
- If you see that both the vertical lines are not equal from the bottom, erase from the bottom a little bit. To erase, go to the layer panel, and select the “Layer 1” layer. Then, go to the left side’s tools panel and select the “Rectangular marquee tool”, then draw a selection line including the two vertical lines and then press the “Delete” button from the keyboard. Then press the “CTRL+D” to deselect the selection.
- Now, we will glow the lines. To do this, go to the layer panel, and right click on the “Layer 1” layer and then select the “Blending options”. A window will appear. From that window, select the “Outer glow” option from the left side. Now, in the right side, set the “Blend mode” as “Screen”, set the “Opacity” as “100%”, set the “Noise” as “0%”, select the red color, set the “Technique” as “Softer”, set the “Spread” as “3%, set the “Size” as “125 px”, set the “Range” as “50%”, and set the “Jitter” as “0%”. Then, click on the “OK” button. Two sub-layer will be added in the “Layer 1” layer.
- Now, go to the layer panel, from the “Layer 1” layer, hover your mouse on the “fx” and right click and select the “Create layer” option. Glowing part will be separated in a new layer “Layer 1’s Outer glow”.
- You will see that the light portal we have drawn has the glowing inside of the light portal as well. So, we have to erase the inside part of the glowing. First, erase from the bottom side a little bit. To do this, go to the layer panel, and select the “Layer 1’s Outer glow” layer. Then, go to the left side’s tools panel and select the “Rectangular marquee tool”, then draw a selection line including the two vertical lines and then press the “Delete” button from the keyboard. Then press the “CTRL+D” to deselect the selection. Now, erase from the inside part. To do this, go to the layer panel, and select the “Layer 1’s Outer glow” layer. Then, go to the left side’s tools panel and select the “Polygon lasso tool”, then draw a selection line at the edge of the inside part of the lines, then press the “Delete” button from the keyboard. Then press the “CTRL+D” to deselect the selection. Inside glowing part will be erased afterward.
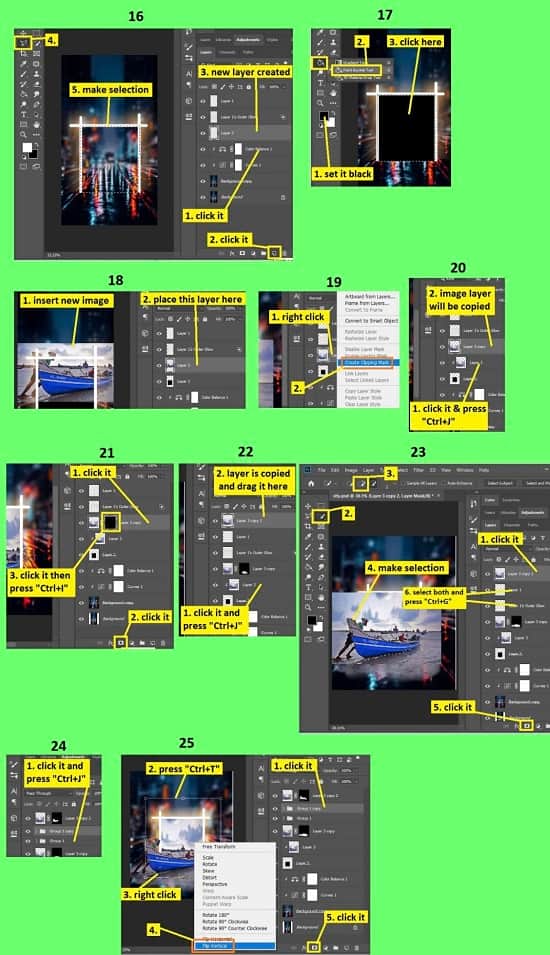
- Now, create a new layer above the “Color balance 1. To do that, go to the layer panel, select the “Color balance 1” layer and then click on the “Create a new layer” button from the bottom of the layer panel. A new transparent layer “Layer 2” will be created above the “Color balance 1” layer.
- Now, we will fill the inside part of the light portal with black. To do this, you have to make a box-like selection line including the edge of the inside part of the three lines. So, go to the left side’s tools panel and select the “Polygon lasso tool” again, then draw a selection line at the edge of the inside part of the three lines towards the bottom of the lines and make the selection line like a box. Then, go to the layer panel, select the “Layer 2” layer, then go to the left side’s tools panel and set the foreground color black, then select the “Paint bucket tool” from the left side’s tools panel and then click inside the selection. Selected part will be filled with black color. Then press the “CTRL+D” to deselect the selection.
Step 5: Insert Object Image
Here, I have selected a photo of a boat. You can insert the photo in three ways:
Method 1: Drag & Drop
Go to your image location where you have your saved image. Then, hold & drag the image towards the photoshop application in the taskbar, photoshop will pop up, then release the image there. A new layer will be created. Rename the layer as “Layer 3”.
Method 2: Inserting Image From Other Image Tab in Photoshop
Go to the “File” menu and select the “Open” option. Then, go to your image location and select your image and then click on the “Open” button. Your image will be opened in a new tab in photoshop afterward. Then go to the left side’s tools panel & select the “Move tool”, then click & hold the image & drag it to your existing image’s tab, that tab will pop up and then release the mouse in the image. Your image will be imported in your existing image and a new layer “Layer 3” will be created.
Method 3: Copying Image From Other Image Tab in Photoshop
Go to your new inserted image tab, press “CTRL+A” from the keyboard to select the whole image, then press “CTRL+C” from the keyboard to copy the whole image, then come to the existing image’s tab and press “CTRL+V” to paste the copied image. A new layer “Layer 3” will be added.
Step 6: Inject the Object Image in the Light Portal
- Make sure that the inserted image layer “layer 3” is above the “layer 2” layer. If not, drag the inserted image layer and put it above the “Layer 2” layer.
- Now, we will clipping mask the inserted image. To do this, go to the layer panel, right click on the “Layer 3” layer and select the “Create clipping mask” option.
- Now, we need another copy of the inserted image layer “Layer 3” and we will duplicate the inserted image layer “Layer 3”. So, go to the layer panel, select the “Layer 3” layer and press the “CTRL+J” from the keyboard. Inserted image will be copied in a new layer “Layer 3 copy”.
- Now, go to the layer panel, select the “Layer 3 copy” layer, then click on the “Add layer mask” button from the bottom of the layer panel. You will see that a mask thumbnail is added in the “Layer 3 copy” layer and the mask thumbnail is in white color. Now, click on the mask thumbnail of the “Layer 3 copy” layer and press “CTRL+I” from the keyboard. You will see that the mask thumbnail has become black.
- Now, click on the mask thumbnail of the “Layer 3 copy” layer, then go to the left side’s tools panel and select the “Brush tool”. Now, right click on the photo and select the “Soft Round” brush and increase the brush size and press “Enter”. Now, go to the top bar, set the “Opacity” between 60 to 65, set the “Flow” between 50 to 60 and set the “Smoothness” as “2%”. Then, go to the left side’s tools panel again, set the foreground color white and set the background color black. Now, brush on the bottom of the object photo to blend the object photo with the background.
- Now, we need another copy of the inserted image layer “Layer 3” and we will duplicate the inserted image layer “Layer 3”. So, go to the layer panel, select the “Layer 3” layer and press the “CTRL+J” from the keyboard. Inserted image will be copied in a new layer “Layer 3 copy 2”. Now, drag the copied layer “Layer 3 copy 2” at the top of all the layers.
- Now, make a selection of the object from the “Layer 3 copy 2” layer. To do this, go to the layer panel, select the “Layer 3 copy 2” layer, then go to the left side’s tools panel, select the “Quick selection tool” and then brush over the object. You will see that selection is selecting the area automatically. If you see that you have over selected, press & hold the “ALT” button and then brush over the over selected areas. After making the selection, go to the layer panel, select the “Layer 3 copy 2” layer, then click on the “Add layer mask” button from the bottom of the layer panel. You will see that a mask thumbnail is added in the “Layer 3 copy 2” layer. Then press the “CTRL+D” from the keyboard to deselect the selection.
- Now, we will make the whole object photo a little bit shiny. To do this, create a new transparent layer first. Go to the layer panel, select the “Layer 3 copy 2” layer and then click on the “Create a new layer” button from the bottom of the layer panel. A new transparent layer “Layer 4” will be created above the “Layer 3 copy 2” layer.
- Now, click on the “Layer 4” from the layer panel, then go to the left side’s tools panel and select the “Polygon lasso tool”. Now, create a selection line. Start the selection from the light portal’s bottom of the left line, then make a trapezoid shape selection, then join the selection to the light portal’s bottom of the right line and close the selection with the starting point.
- Then click on the “Create new fill or adjustment layer” button and then select the “Curves” option. Color curves panel will appear. From there, select the “click to clip to layer” button from the bottom of the curves panel. Then, click & hold the middle part of the curve and drag it upward a little bit to whiten the image slightly. A “Curves 2” layer will be created afterward.
Step 7: Make a Copy of the Three Lines and It’s Glow
- Now, we need a copy of both three lines and it’s glow we have created earlier. To do this, go to the layer panel, press & hold the “CTRL” button from the keyboard and click on the three line’s layer “Layer 1” and glow’s layer “Layer 1’s Outer glow” and then press “CTRL+G” to make them a group. Those layers will be grouped in a “Group 1” layer.
- Now, go to the layer panel, select the “Group 1” layer and then press the “CTRL+J” from the keyboard. The “Group 1” layer will be copied in a new layer “Group 1 copy”.
- Now, go to the layer panel, this time select the “Group 1 copy” layer and press “CTRL+T ” to activate the free transform. You will see that the free transform border is activated. Now, right click on the photo and select the “Flip vertical” option. The copied glowing lines will be flipped. Now, click & hold the free transformed photo and drag it to the bottom. We drag it to the bottom to make it a reflection of the light portal.
- Now, we will decrease the opacity of the “Group 1 copy” layer. To do this, go to the layer panel, select the “Group 1 copy” layer, then in the layer panel set the “Opacity” level between 20 to 30. After that, click on the “Add layer mask” button from the bottom of the layer panel.
- Now, go to the left side’s layer panel and set the foreground color black, then select the “Brush tool”, then right click on the photo and select the “Soft Round” brush and increase the brush size and press “Enter”. Now, go to the top bar, set the “Opacity” between 60 to 65, set the “Flow” between 50 to 60 and set the “Smoothness” as “2%”. After that, brush over the reflection of the glowing lines to fade them a little bit more.
- So, that’s it.
Video Tutorial about “Light Portal Photo Manipulation” who really don’t want to read whole article just follow below video.
That’s how you can make the Light Portal Photo Manipulation in photoshop. In this article, I have tried to show you the easiest way of making a light portal with deep details. Here I have described the way of blurring, drawing the light portal window, inserting & adjusting the object photo in the light portal, making selection, clipping mask & layer creating, color adjusting, doing glowing effect and many more. Here I have given you several important keyboard shortcuts to make it easy for you. Not only that, I have tried to show you the steps in deep detail. I hope you have understood how to make the Light Portal Photo Manipulation in photoshop.