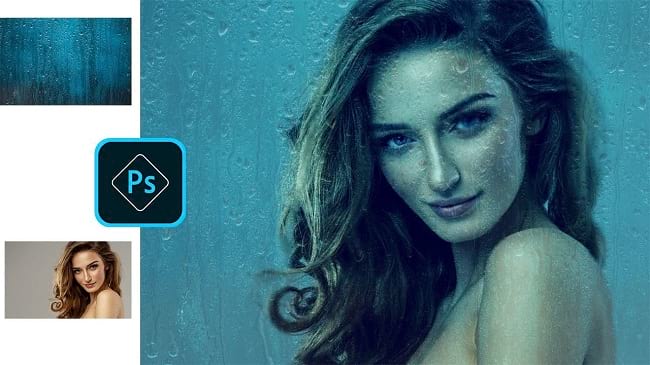
Wet glass effect gives the image a rainy mood and sometimes it also gives a cold look. No doubt, the popularity of this effect is increasing day by day. So, how can you add the wet glass effect on your photo? In this tutorial article, I am going to show you the process of wet glass effect Photoshop. So, read this article till the end and follow the steps with care, you will get easy instructions from this article, you will be able to do it easily. Let’s see How to add wet glass effect in Photoshop:
Before beginning the editing, make sure that you have a wet glass image along with your image. Now, let’s start the process:
Rainy window effect photoshop
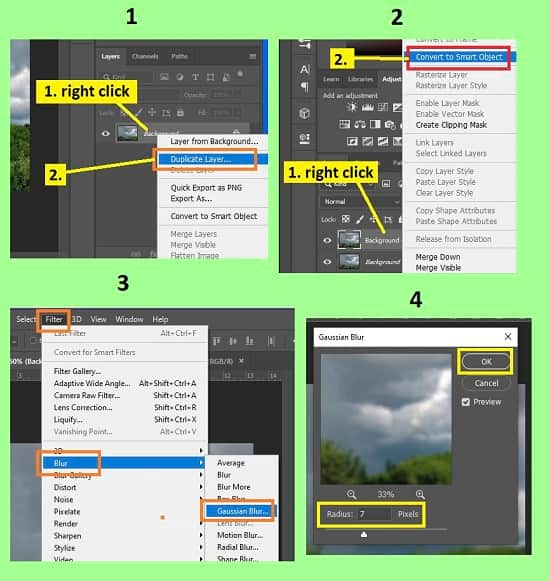
Step 1: Open Your Photo in Photoshop
First of all, open your photo in photoshop. To do that, go to the “File” menu and select the “Open” option. Then, go to your image location and select your image and then click on the “Open” button. Your image will be opened in photoshop afterward.
Step 2: Duplicate the Background layer
You can duplicate the layer in four ways,
Method 1:
To duplicate the layer, go to the layer panel, right click on the background layer, select the “Duplicate layer” and click on the “OK” button.
Method 2:
Or, select the background layer, then go to the “Layer” menu, select the “Duplicate layer” option and then click on the “OK” button.
Method 3:
Or, click & hold the background layer and drag it towards the “Create a new layer” button from the bottom. Your background layer will be duplicated.
Method 4:
Or, just press “CTRL+J” from the keyboard. Your background layer will be duplicated. Rename the duplicate layer from “Layer 1” to “Background copy”.
Step 3: Convert the Duplicate Layer in Smart Object
To convert the duplicate layer into a smart object, Go to the layer panel, right click on the duplicate layer “Background copy”, and then select the “Convert to smart object” option.
Step 4: Blur the Duplicate Layer
- To do that, go to the “Filter” menu, then go to the “Blur” option and then select the “Gaussian blur” option.
- A window will pop up.
- Set the “Radius” between 8 pixels to 10 pixels. Then click on the “OK” button.
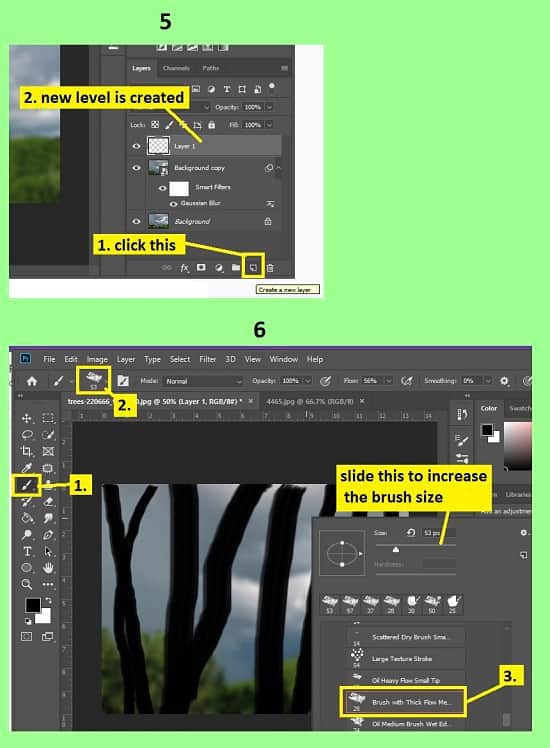
Step 5: Create a New Layer
To do that, go to the layer panel, select the “Background copy” layer and then click on the “Create a new layer” button from the bottom of the layer panel. A new transparent layer will be created above the “Background copy” layer.
Step 6: Draw Some Lines In the New Layer
You have to draw some random sized horizontal lines. Just a few free hand horizontal lines.
- To do that, go to the left side’s tools panel, then click on the “Brush tool”.
- Now, go to the top bar, click on the brush preset option, then expand the “Legacy brushes” option, then expand the “Wet media brushes” option and then select the “Brush with thick flow medium tip” brush. If you are not able to find this brush, go to the top bar, click on the brush preset option, then click on the gear icon from the top right side, then click on the “Legacy brushes” option and then click on the “OK” button. Now, you will find that brush.
- Now, draw lines on the photo with different sizes. To change the size of the brush, right click on the photo and slide the “Size” slider.
Step 7: Drag the Duplicate Layer Above the New Layer and Do Clipping Mask
- To do that, go to the layer panel, then click & hold the duplicate layer “Background copy” and drag it above the new layer “Layer 1”.
- Now, go to the layer panel again, right click on the duplicate layer “Background copy” and then select the “Create clipping mask” option.
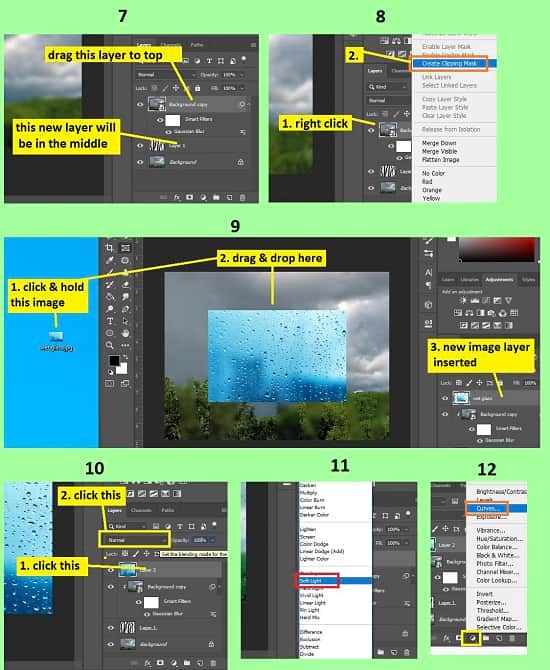
Step 8: Insert a Wet Glass Image in Your Image
First of all, you have to insert a wet glass image in the existing image. You can insert image in two ways:
Method 1:
Go to your image location where you have your saved image. Then, hold & drag the image towards the photoshop application in the taskbar, photoshop will pop up, then release the image there. A new layer will be created.
Method 2:
Or, Go to the “File” menu and select the “Open” option. Then, go to your image location and select your image and then click on the “Open” button. Your image will be opened in a new tab in photoshop afterward. Then go to the left side’s tools panel & select the “Move tool”, then click & hold the image & drag it to your existing image’s tab, that tab will pop up and then release the mouse in the image. Your image will be imported in your existing image and a new layer will be created.
Method 3:
Or, alternatively, go to your new inserted image tab, press “CTRL+A” from the keyboard to select the whole image, then press “CTRL+C” from the keyboard to copy the whole image, then come to the existing image’s tab and press “CTRL+V” to paste the copied image. A new layer will be added.
Step 9: Increase or Decrease the Wet Glass Image
If your wet glass image is smaller or bigger than your image, you can increase or decrease the size of the wet glass image as per your preference.
- To do that, go to the layer panel, select the wet glass image layer, then press “CTRL+T” from the keyboard to activate the free transform option.
- Now, click & hold the bottom right corner of the wet glass image and drag upward to decrease the size or drag downward to increase the size.
Step 10: Blend the Wet Glass Image with the Duplicate Image
- To do that, go to the layer panel, select the wet glass image.
- Then, in the layer panel, change the blend mode from “Normal” to “Soft light”. You will find the blend mode beside the “Opacity” option in the layer panel.
- You will see that the wet image is blended with the duplicate layer.
Step 11: Adjust the Color
- To do that, go to the layer panel, then click on the “Create new fill or adjustment layer” button from the bottom of the layer panel and then select the “Curves” option.
- Curves properties window will appear.
- From there, change the color channel from “RGB” to “Blue”. Now, click & hold the top right corner of the curve and drag it a little bit downward. Then, click & hold the bottom left corner of the curve and drag it a little bit upward. That’s it.
Video Tutorial about “Wet Glass Effect Photoshop” who really don’t want to read whole article just follow below video.
That’s how you can add wet glass effect Photoshop. In this article I have tried to show you the way of adding the wet glass effect in Photoshop. Here I have tried to show the way of blur effect, drawing lines, inserting process of an image, blending process and many more. Here you will see that I have included lots of important keyboard shortcuts to make it easy for you. Not only that, I have shown you various different methods in various steps. I hope you have understood How to add wet glass effect Photoshop.