Phone pop out effect is a technique of making unrealistic images or fictional images. It also shows your imagination power and creativity. For example, fish coming out from the phone screen, a road connected to the phone screen and many more. These may not be real, but they are very astonishing and lookrative. So, how can you create such things? In this tutorial article, I am going to show you How to make a Phone pop out effect photoshop. So, read this article till the end and follow the steps with care, you will get easy instructions from this article, and you will be able to do it easily. Let’s see How to make a Phone pop out effect photoshop:
3d phone pop out effect in photoshop
Photos You will need to make phone pop out effect
You have to make sure you have the following images for making phone pop out effect:
- A photo of a mobile holded by someone.
- A photo of a road.
- A photo of a castle or a house or a mansion.
- A photo of a man. Choose a photo which has a full body of the man.
Let’s begin the phone pop out effect making:
Step 1: Open a photo of a hand holding a mobile in photoshop
- To do that, go to the “File” menu and select the “Open” option. Then, go to your image location and select your mobile image and then click on the “Open” button. Your mobile image will be opened in photoshop afterward.
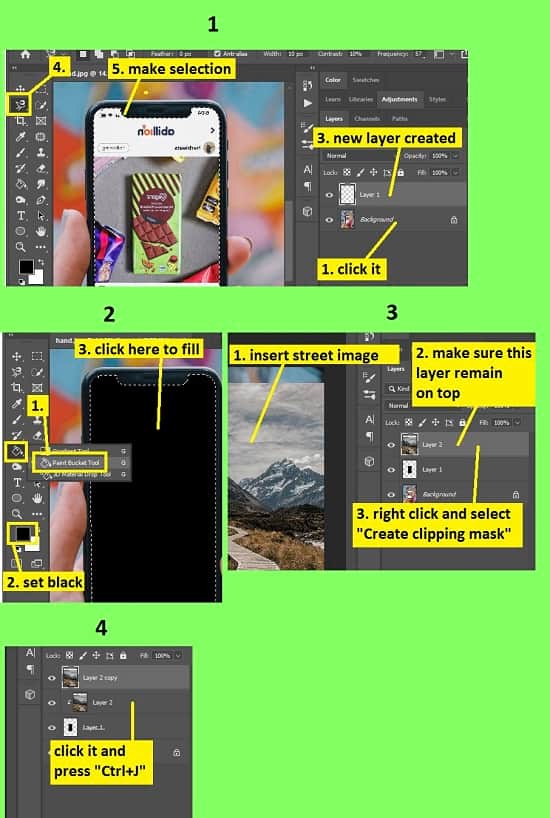
- Now, create a new layer. To do this, go to the layer panel, click on the “Create a new layer” button from the bottom of the layer panel. A new transparent layer “Layer 1” will be created.
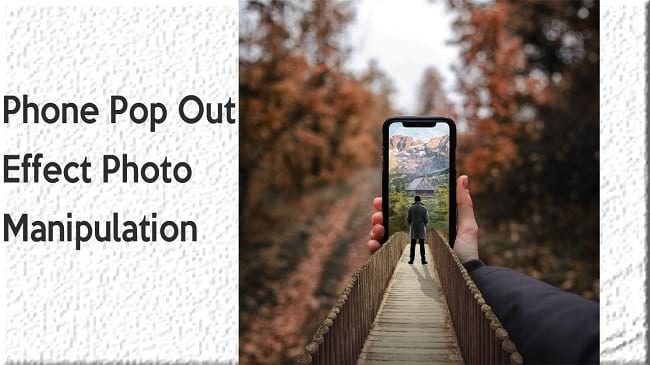
- Now, make a selection of the mobile screen. To do this, go to the layer panel, click on the “Layer 1” layer, then go to the left side’s tools panel and select the “Magnetic lasso tool”. You will find the Magnetic lasso tool under the “Lasso tool”. Now, start the starting point of the magnetic lasso tool from the edge of the mobile screen, then hover your cursor around the edge of the screen, you will see that it is drawing the selection path automatically and then join the path with the starting point, the selection will be made.
- Now, fill the selection with the black color. To do this, go to the left side’s tools panel and select the “Paint bucket tool” and you will see the paint bucket icon on your mouse tip. You will find the paint bucket tool under the “Gradient tool”. Then, in the left side’s tools panel and set the foreground color as black. Now, click on the selection area. You will see that the selected area has become black. Then, press “CTRL+D” to deselect the selection.
Step 2: Open a photo of a road and insert it in the main file
- Go to the “File” menu and select the “Open” option. Then, go to your image location and select your image and then click on the “Open” button. Your image will be opened in a new tab in photoshop afterward.
- Do some color adjustment of this photo. To do this, go to the “Filter” menu and select the “Camera raw filter” option. A window will appear. From there, decrease the “Exposure” a little bit, decrease the “Highlights” completely and increase the “Texture” and “Clarity” a little bit. Then, click on the “OK” button.
- Now, press “CTRL+A” from the keyboard to select the whole image, then press “CTRL+C” from the keyboard to copy the whole image, then come to the existing image’s tab and press “CTRL+V” to paste the copied image. A new layer “Layer 2” will be added. Make sure that this layer is on top of all the layers.
- Now, we will adjust the size of the road image we have inserted, adjust the size in a way where the far point of the road will be on the inside of the mobile screen. So, go to the layer panel, select the “Layer 2” layer, then press “CTRL+T” to activate the free transform. Now, drag the handler of the free transform outward and place the far point of the road inside the mobile screen. If you are not able to figure out where you are putting the road, decrease the opacity from the layer panel for a few moments, place the road and after the placement has done increase the opacity again. Press “Enter” after adjusting the size.
- Now, go to the layer panel, right click on the “Layer 2” layer and select the “Create clipping mask” option. You will see the image has been cropped.
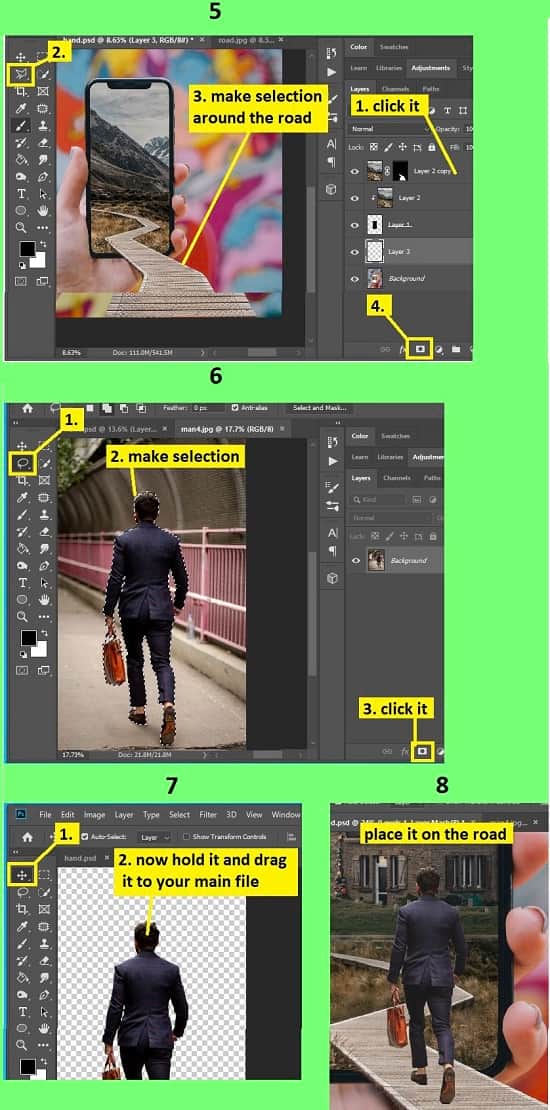
- We need to make the rest of the part of the road visible. To do this, make a duplicate of the “Layer 2” layer first. So, go to the layer panel, right click on the “Layer 2” layer and select the “Duplicate layer” option. A dialog box will appear, click on the “OK” button. A “Layer 2 copy” layer will be created. Or, alternatively, go to the layer panel, click on the background layer and press “CTRL+J” from the keyboard. A “Layer 2 copy” layer will be created.
- Now, make a selection of the road. To do this, go to the layer panel, click on the “Layer 2 copy” layer, then go to the left side’s tools panel and select the “Polygon lasso tool”. You will find the polygon lasso tool under the “Lasso tool”. Now, start the starting point of the polygon lasso tool from the edge of the road, then make a selection path around the edge of the road, and then join the path with starting point, selection will be made. Now, go to the layer panel, click on the “Add layer mask” button from the bottom of the layer panel. The road will be visible.
- Now, we will add a shadow near the mobile under the road. To do this, create a new layer above the background layer first. So, go to the layer panel, select the background layer, and click on the “Create a new layer” button from the bottom of the layer panel. A new transparent layer “Layer 3” will be created. Now, go to the left side’s tools panel and select the “Brush tool”, then set the foreground color black from the tools panel. Then, go to the top bar/option bar, set the “Opacity” between 50% to 70%, set the “Flow” between 50% to 70% and set the “Smoothing” between 2% to 5%. Now brush under the road near the mobile.
Step 3: Color adjustment of the road image
- Go to the layer panel, click on the “Layer 2 copy” layer which is the copied layer of road image, then click on the “Create new fill or adjustment layer” and select the “Levels” option. Levels panel will appear. From there, click on the “The adjustment affects all layers below (click to clip to layer)” button from the bottom of the levels panel. Now adjust the color levels. In the levels panel, from the bottom color slider, drag the right side’s slider to the left a little bit. Then, from the top side color level slider, slide the middle slider a little bit to the right. A new levels layer “Levels 1” will be created. Now, click on the white thumbnail of the “Levels 1” layer, and press “CTRL+I” from the keyboard. The road becomes whiter.
- We need to slightly darken the bottom part of the road image. To do this, click on the black thumbnail of the “Levels 1” layer, set the foreground color white from the left side’s tools panel, select the “Brush tool” from the tools panel, go to the top bar/ option bar and set “Opacity” between 35% to 50%, set the “Flow” between 60% to 70% and set the “Smoothing” as “3%”. Now, brush on the bottom part of the road image.
Step 4: Open a photo of a castle and insert it in the main file
- Go to the “File” menu and select the “Open” option. Then, go to your image location and select your image and then click on the “Open” button. Your image will be opened in a new tab in photoshop afterward.
- Now, press “CTRL+A” from the keyboard to select the whole image, then press “CTRL+C” from the keyboard to copy the whole image, then come to the existing image’s tab and press “CTRL+V” to paste the copied image. A new layer “Layer 4” will be added. Make sure that this layer is above the original road image’s layer “Layer 2”.
- Now, we will adjust the size of the castle image we have inserted, adjust the size in a way where the castle image will be inside of the mobile. So, go to the layer panel, select the “Layer 4” layer, then press “CTRL+T” to activate the free transform. Now, drag the handler of the free transform outward and place the castle inside the mobile screen. If you are not able to figure out where you are putting the castle, decrease the opacity from the layer panel for a few moments, place the castle and after the placement has done increase the opacity again. Press “Enter” after adjusting the size.
- Now, go to the layer panel, right click on the “Layer 4” layer and select the “Create clipping mask” option. You will see the image has been cropped. Now, click on the “Add layer mask” button from the bottom of the layer panel. A white thumbnail will be added.
- So, click on the white thumbnail of the “Layer 4”, then go to the left side’s tools panel, select the “Brush tool”, set the foreground color black and go to the top bar/ option bar and set “Opacity” between 35% to 50%, set the “Flow” between 60% to 70% and set the “Smoothing” as “3%”. Now, brush on the mobile screen to reveal the road.
Step 5: Open a picture of a man and insert it in the main file
- Go to the “File” menu and select the “Open” option. Then, go to your image location and select the man’s image and then click on the “Open” button. Your image will be opened in photoshop afterward.
- Unlock the background layer. To do this, go to the layer panel and click on the padlock icon in the background layer. The layer will be unlocked afterward and the layer will be renamed as “Layer 0” automatically.
- Now, we will only copy the man portion and insert it in our main photo. To do this, you can use either the lasso tool or the quick selection tool. So, go to the left side’s tools panel, select the “Lasso tool” and make a selection path on the edge of the man and join with the starting point.
- After making the selection, go to the layer panel and click on the “Add layer mask” button from the bottom of the layer panel. The selected part will be separated.
- Now, go to the left side’s tools panel, and select the “Move tool”. Now, click & hold the man’s photo and drag to the main file. A new layer “Layer 5” will be created. Drag the “Layer 5” layer on top of all the layers.
- Increase or decrease the size of the man’s photo, press “CTRL+T”, then click & drag the corner’s handler and drag it outward to increase or drag inward to decrease the size. Then, place the photo on the road. Then press “Enter”.
- Now, go to the layer panel, click on the man’s image layer “Layer 5”, then click on the “Create new fill or adjustment layer” button from the bottom of the layer panel and select the “Levels” option, a new layer “Levels 2” will be created. A levels panel will appear. From there, click on the “The adjustment affects all layers below (click to clip to layer)” button from the bottom of the levels panel to clip with the layer. Now adjust the color levels. In the levels panel, from the bottom color slider, drag the left side’s slider to the right slightly to darken the man’s image color. Then, from the top side’s color level slider, slide the middle slider to the right slightly.
- Now, put a shadow of the man. Create a new layer below the man’s image layer “Layer 5”. To do this, go to the layer panel, click on the “Levels 1” layer which is related to the road’s layer, then click on the “Create new layer” button from the bottom of the layer panel. A new transparent layer “Layer 6” will be created below the man’s image layer “Layer 5”. Now, go to the left side’s tools panel and select the “Brush tool”, then set the foreground color as black from the tools panel, then go to the top bar/option bar, set the opacity around 60% to 70%, and then brush below the legs of the man and then set the opacity around 60% to 70% from the layer panel.
- Now, merge all the layers in a new layer. So, go to the layer panel and select the top layer of the list. Then press “CTRL+ALT+SHIFT+E” from the keyboard. All the layers will be merged in a new layer “Layer 7”.
- Now, go to the layer panel, click on the merged layer “Layer 7”, then go to the “Filter” menu, then go to the “Blur gallery” option and select the “Iris blur” option. Now, put the center of the iris blur near the man, then from the right side’s panel set the “Blur” between 25px to 35px. Then click on the “OK” button from the top.
- That’s it.
Video Tutorial about “Phone Pop Out Effect Photoshop” who really don’t want to read whole article just follow below video.
That’s how you can make a Phone pop out effect photoshop. In this tutorial I have shown you the process of making a phone pop out effect in Photoshop. Above I have described the way of selecting the phone screen, inserting the road in the phone screen, separating the object from an image, adjusting color adjustments and many more. For your convenience, I have included various keyboard shortcuts so that you can do your work fast and easily. I hope you have understood How to make a Phone pop out effect photoshop. This is a very easy way to do this.