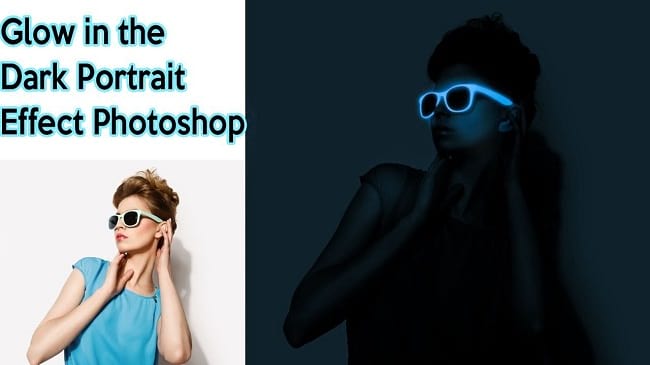
Sometimes we see images in social media, various photo related websites where the images have a glowing effect especially on eyeglasses, watches, earring etc. Sometimes we become curious where they got those glowing devices? If those aren’t real, then how is it glowing? In this tutorial article, I am going to show you How to make a glow in the dark photoshop Effect. So, read this article till the end and follow the steps with care, you will get easy instructions from this article, and you will be able to do it easily. Let’s see How to make a glow in the dark photoshop Effect:
Glow in the dark effect in photoshop
Step 1: Open your image in photoshop
To do that, go to the “File” menu and select the “Open” option. Then, go to your image location and select your image and then click on the “Open” button. Your image will be opened in photoshop afterward. Here I have chosen a photo of a man with eyeglasses and I will attempt to glow the eyeglasses.
Step 2: Decrease the light of the image
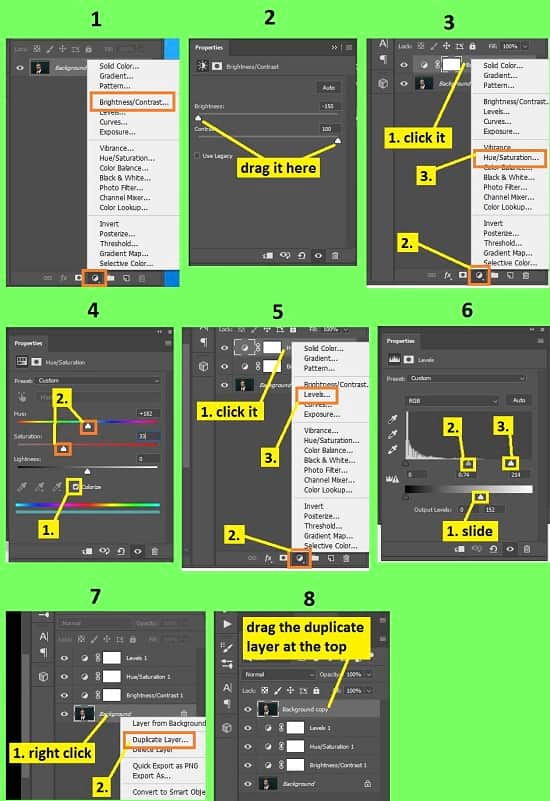
- To do this, go to the layer panel, then click on the “Create new fill or adjustment layer” button from the bottom of the layer panel and select the “Brightness/Contrast” option, a new layer “Brightness/Contrast 1” will be created.
- A Brightness/Contrast panel will appear. From there, drag the slider of the brightness option all the way to the left and drag the slider of the contrast option all the way to the right.
- Now, go to the layer panel again, click on the “Brightness/Contrast 1” layer, then click on the “Create new fill or adjustment layer” button from the bottom of the layer panel and select the “Hue/Saturation” option, a new layer “Hue/Saturation 1” will be created above the “Brightness/Contrast 1” layer.
- A Brightness/Contrast panel will appear. From there, put a tick on the “Colorize” option, then set the “Hue” as “182” and set the “Saturation” as “33”.
- Now, go to the layer panel again, click on the “Brightness/Contrast 1” layer, then click on the “Create new fill or adjustment layer” button from the bottom of the layer panel and select the “Levels” option, a new layer “Levels 1” will be created above the “Brightness/Contrast 1” layer.
- A Levels panel will appear. From there, from the bottom color slider, slide the right side slider to the left. Then, from the top color sliders, slide the middle slider slightly to the right and slide the right side’s slider slightly to the left.
Step 3: Duplicate the background layer
- Now, make a duplicate of the background layer. To do this, go to the layer panel, right click on the background layer and select the “Duplicate layer” option. A dialog box will appear, click on the “OK” button. A “Background copy” layer will be created. Or, alternatively, go to the layer panel, click on the background layer and press “CTRL+J” from the keyboard. A “Background copy” layer will be created.
- Now, drag the “Background copy” layer above all the layers.
Step 4: Glow in the dark
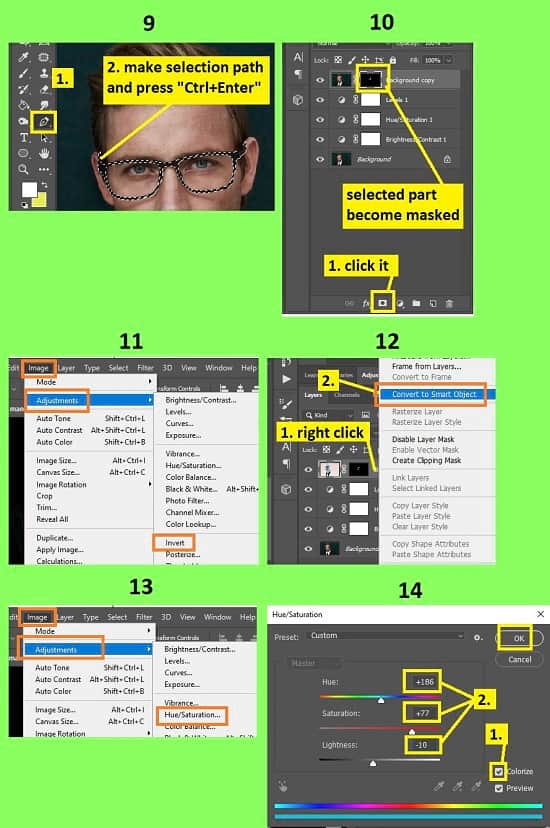
- Now, we will make a selection of the eyeglasses. We will use the pen tool for this. Go to the left side’s tools panel and select the “Pen tool”. Now, make a selection path at the outer edge of the eyeglass’ frame and join the selection path with the starting point. Then, again make a selection path at the inner edge of the both glasses of the eyeglasses. After making the selection path, convert it to a selection. To do this, press “CTRL+Enter” from the keyboard.
- Now, in the layer panel, click on the “Add layer mask” button from the bottom of the layer panel, and the eyeglass portion will be separated.
- Now, go to the layer panel again, click on the “Background copy” layer, then go to the “Image” menu, then go to the “Adjustments” option and then select the “Invert” option. You will see that the eyeglasses become whitish.
- Now, go to the layer panel again, right click on the “Background copy” layer and select the “Convert to smart object” option.
- Now, go to the layer panel again, click on the “Background copy” layer, then go to the “Image” menu, then go to the “Adjustments” option and then select the “Hue/Saturation” option. A Hue/Saturation window will appear. From there, put a tick on the “Colorize” option, then set the “Hue” as “186”, set the “Saturation” as “77” and set the “Lightness” as “-10”. Then click on the “OK” button.
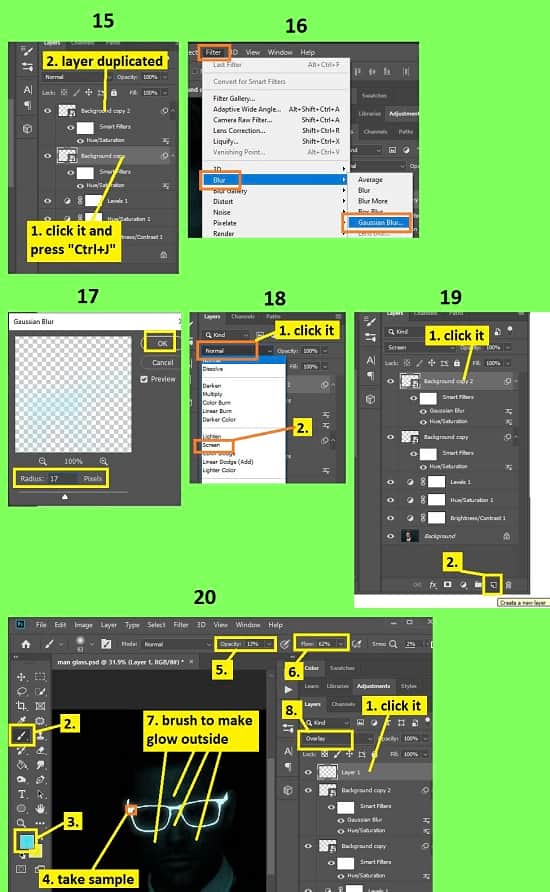
- Now, make a duplicate of the “Background copy” layer. To do this, go to the layer panel, right click on the “Background copy” layer and select the “Duplicate layer” option. A dialog box will appear, click on the “OK” button. A “Background copy 2” layer will be created. Or, alternatively, go to the layer panel, click on the “Background copy” layer and press “CTRL+J” from the keyboard. A “Background copy 2” layer will be created.
- Now, go to the layer panel again, click on the “Background copy 2” layer, then go to the “Filter” menu, then go to the “Blur” option and then select the “Gaussian blur” option. A window will appear. From there, set the radius between 15 pixels to 20 pixels. Then click on the “OK” button. Then, go to the layer panel and set the blending mode from “Normal” to “Screen”. You will find the blending option beside the opacity option in the layer panel.
- Now create a new layer. To do this, go to the layer panel again, click on the “Background copy 2” layer, then click on the “Create a new layer” button from the bottom of the layer panel. A new layer “Layer 1” will be created above the “Background copy 2” layer. Now, go to the left side’s tools panel, select the “Brush tool”, click on the foreground color from the tools panel, take a sample from the eyeglasses frame and click on the “OK” button. Now, go to the top bar/option bar and set the opacity between 20% to 35% and set the flow around 30%. Then, brush on the nose slightly or outside of the eyeglass which will look like the glow of light has fallen on the nose. After that, go to the layer panel again, click on the “Layer 1” layer and set the blending mode from “Normal” to “Overlay”. You will find the blending option beside the opacity option in the layer panel.
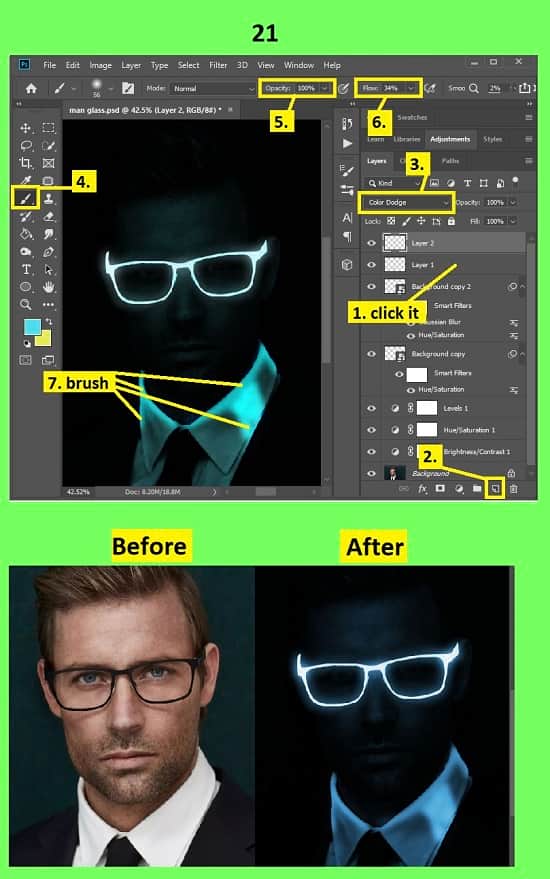
- Now create a new layer above the “Layer 1” layer. To do this, go to the layer panel again, click on the “Layer” layer, then click on the “Create a new layer” button from the bottom of the layer panel. A new layer “Layer 2” will be created above the “Layer 1” layer. Then, in the layer panel, set the blending mode from “Normal” to “Color dodge”. You will find the blending option beside the opacity option in the layer panel. Now, go to the left side’s tools panel, select the “Brush tool”, no need to change the foreground color as the foreground color sample has been taken from the eyeglasses frame previously. Now, go to the top bar/option bar and set the opacity 100% and set the flow around 30%. Then, brush on the shirt’s collar or shoulder which will look like the glow of light has fallen on the collar roughly.
- Now, go to the layer panel, click on the “Layer 2” layer, then click on the “Create new fill or adjustment layer” button from the bottom of the layer panel and select the “Hue/Saturation” option. A Hue/Saturation panel will appear. From there, put a tick on the “Colorize” option, then set the “Hue” as “203”, set the “Saturation” as “51” and set the “Lightness” as “0”. A new “Hue/Saturation 2” layer will be created above the “Layer 2” layer.
- Now, go to the layer panel again, click on the “Hue/Saturation 2” layer, then click on the “Create new fill or adjustment layer” button from the bottom of the layer panel and select the “Curves” option. A Curves panel will appear. From there, hold the 2nd point from the top side of the curve and drag it slightly towards the upward and hold the 2nd point from the down side of the curve and drag it slightly towards the downward. A new “Curves 1” layer will be created above the “Hue/Saturation 2” layer.
- That’s it.
Video Tutorial about “Glow In The Dark Photoshop Effect” who really don’t want to read whole article just follow below video.
That’s how you can make a glow in the dark photoshop Effect. In this tutorial I have shown you the process of making a glowing effect in Photoshop. Above I have described how to decrease the light of the image, how to separate the object from an image, how to adjust color adjustments to make the glowing effect and many more. For your convenience, I have included some keyboard shortcuts so that you can do your work fast and easily. I hope you have understood How to make a glow in the dark photoshop Effect. This is a very easy way to do this.