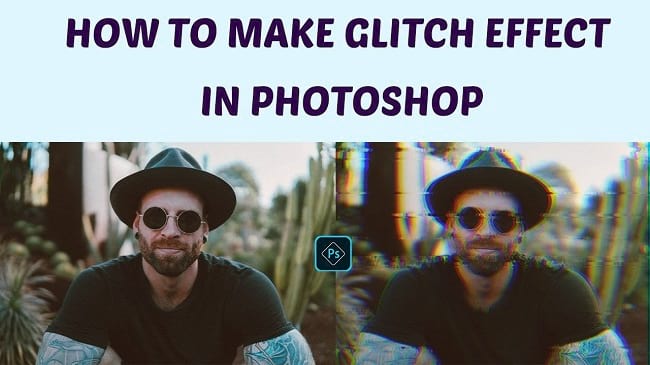
Glitch effect of a photo is becoming very popular nowadays. It brings an artistic look to a photo along with the imperfection effect. If you are one of the glitch effect lovers, you can make this effect on your own. In this tutorial article, I am going to show you How to make glitch effect in photoshop. So, read this article till the end and follow the steps with care, you will get easy instructions from this article, you will be able to do it easily. Let’s see how to make the glitch effect:
How to make a glitch effect in Photoshop
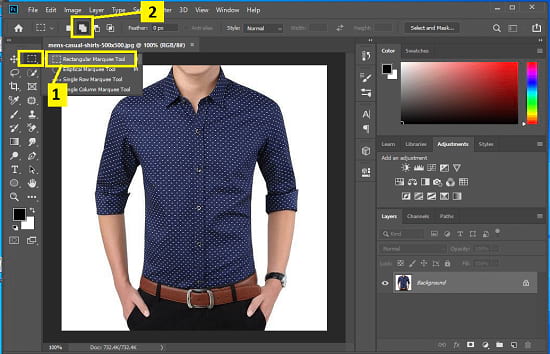
Step 1: Open Your Photo in Photoshop
To open your photo in photoshop, go to the “File” menu and select the “Open” option. Then, go to your image location and select your image and then click on the “Open” button. Your image will be opened in photoshop afterward.
Step 2: Make Glitch Effect
Method 1: Glitch Effect Without Any Color Adjustment
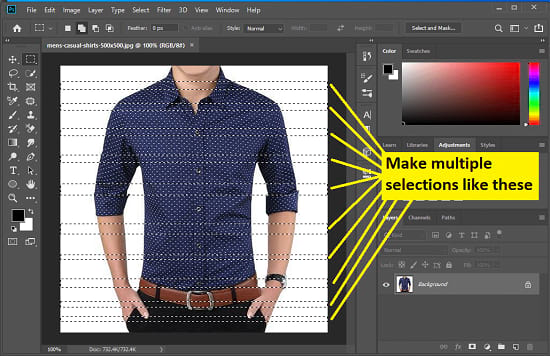
- After opening the photo, you have to make several rectangular selections on the photo. To do that, click on the merged layer, then go to the left side’s layer panel, and select the “Rectangular marquee tool”. Then go to the top side option bar, and select the “Add to selection” button to make multiple selections.
- Now make multiple selections like horizontal line or vertical line multiple times on the photo.
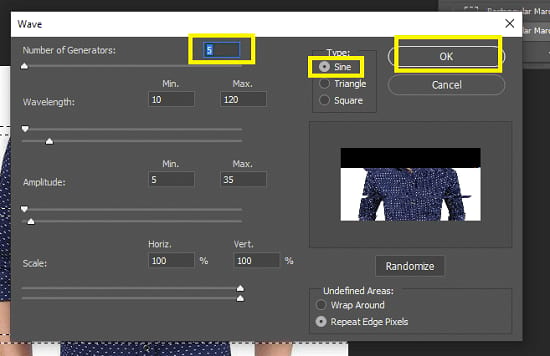
- After making the selections, go to the “Filter” menu, then go to the “Distort” option and select the “Wave” option. A pop up window will appear. From there, set the “Number of generators” level as “15”. But if your image is low quality and size is smaller, you have set the level between 2 to 5. After that click on the “OK” button.

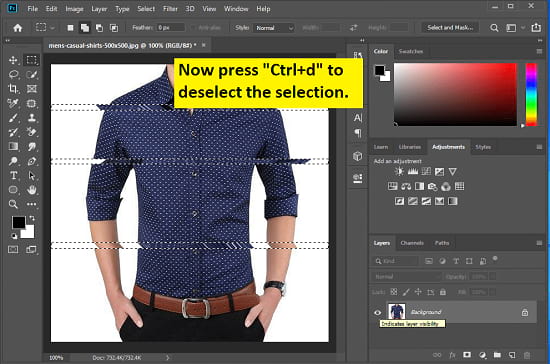
- After that, deselect the selection. To do that, press “CTRL+D” from the keyboard.
- Now, go to the left side’s tools panel and select the “Moov tool”. Or, alternatively press “v” from the keyboard.
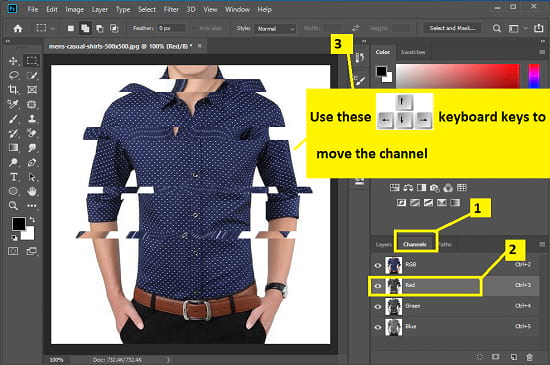
- Now, go to the “Channels” panel. You will find this panel beside the layer panel. If the channels panel is not visible, go to the “Window” menu and select the “Channels” option.
- Now, in the channel panel, you will see four channels such as “RGB”, “Red”, “Green”, “Blue”. Now, click on the “Red” channel, you will see that other channels are hidden, you have to make them visible, so click on the eye icon of the “RGB” option and then click on the “Red” option again. After selecting the “Red” option, go to the photo, click & hold the mouse cursor and move to left or right or up or down slightly, you will see the glitch effect. Or, if you do not want to use the mouse, then press the left button or right button or up button or down button from the keyboard. You will also see the glitch effect. You can choose the “Green” or “Blue” option instead of “Red” as well.
- That’s it.

Method 2: Glitch Effect With Any Color Adjustment
- After opening the photo, go to the layer panel, click on the “Create new fill or adjustment layer” button from the bottom the layer panel and select the “Levels” option. A levels panel will appear and a new levels layer will be created. Now, adjust the color level as per your choice.
- Then, in the layer panel, select both the background layer and levels layer. To do that, press & hold the “CTRL” button from the keyboard and click on the layers from the layer panel and layers will be selected.
- After selecting the layers from the layer panel, right click and select the “Flatten image” option. All layers will be merged in the background layer.
- Now, you have to make several rectangular selections on the photo. To do that, click on the merged layer, then go to the left side’s layer panel, and select the “Rectangular marquee tool”. Then go to the top side option bar, and select the “Add to selection” button to make multiple selections.
- Now make multiple selections like horizontal line or vertical line multiple times on the photo.
- After making the selections, go to the “Filter” menu, then go to the “Distort” option and select the “Wave” option. A pop up window will appear. From there, set the “Number of generators” level as “15”. But if your image is low quality and size is smaller, you have set the level between 2 to 5. After that click on the “OK” button.
- After that, deselect the selection. To do that, press “CTRL+D” from the keyboard.
- Now, go to the left side’s tools panel and select the “Moov tool”. Or, alternatively press “v” from the keyboard.
- Now, go to the “Channels” panel. You will find this panel beside the layer panel. If the channels panel is not visible, go to the “Window” menu and select the “Channels” option.
- Now, in the channel panel, you will see four options such as “RGB”, “Red”, “Green”, “Blue”. Now, click on the “Red” option, you will see that other options got hidden, you have to make them visible, so click on the eye icon of the “RGB” option and then click on the “Red” option again. After selecting the “Red” option, go to the photo, click & hold the mouse cursor and move to left or right or up or down slightly, you will see the glitch effect. Or, if you do not want to use the mouse, then press the left button or right button or up button or down button from the keyboard. You will also see the glitch effect. You can choose the “Green” or “Blue” option instead of “Red” as well.
- That’s it.
Video Tutorial about “How To Make Glitch Effect In Photoshop” who really don’t want to read whole article just follow below video.
That’s how you can make a glitch effect in photoshop. In this tutorial I have tried to show you the process of making the glitch effect of a photo. Also, I have tried to show you the glitch effect in two different methods, you can follow any one of the methods. Try the steps I have mentioned above, you will find it very easy. Not only that, here I have mentioned various keyboard shortcuts which will benefit you to do it faster in the future. I hope you have understood How to make glitch effect in photoshop.