When we preview a gif file, sometimes we see some gif file has a moving character, it’s like a video is playing in the gif format. We become astonished how GIFs are moving even if those are one type of image format. Well, there is no magic spell behind this actually, rather there is a science behind this. You can make your own gif with Photoshop. In this tutorial article, I am going to show you How to make gifs in Photoshop. So, read this article till the end and follow the steps with care, you will get easy instructions from this article, and you will be able to do it easily. Let’s see How to make gifs in Photoshop:
Photo You Will Need To Make Gifs
Here photo selection is a very important factor. Because you can take any kind of image for gif making. You have to make sure you have the following image for gif:
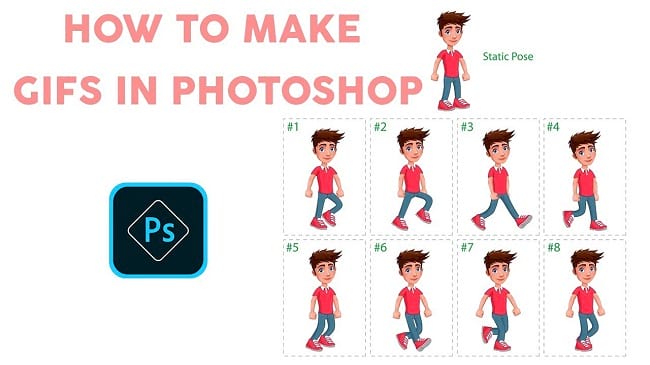
- Look for “cartoon characters to use” images and find an animated character or vector images. You will need frame by frame images of the same character with different posture.
Let’s begin the gif making.
Step 1: Open The Character’s Image In Photoshop
To do that, go to the “File” menu and select the “Open” option. Then, go to your image location and select the character’s image and then click on the “Open” button. Your image will be opened in photoshop afterward. Here I have selected an image which has 8 different frames of the character. So, I have to separate all the frames in new layers.
Step 2: Separate Frames In New Layers
Now, we will separate all the frames in new layers. To do this,
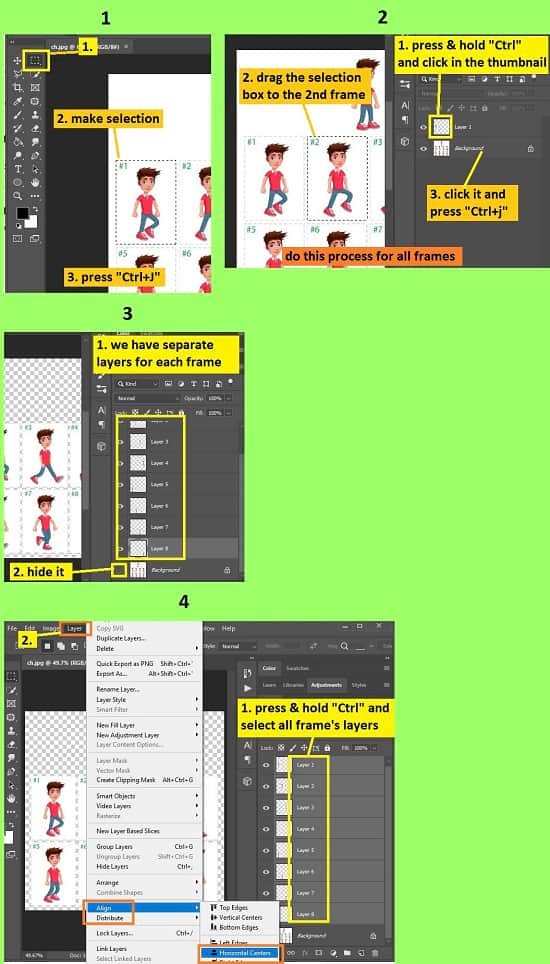
- First of all, go to the left side’s tools panel and select the “Rectangular marquee tool”.
- Now, make a selection on the edge of the first frame. You have to be very careful while selecting the frame, make accurate selection on all frames, unless it can ruin your gif. So, make corner to corner selection.
- Then press “CTRL+J” from the keyboard to copy the selected frame in a new layer. A new layer “Layer 1” will be created afterward. Also, the rectangular selection border also disappeared.
- Now, we will copy the next frame. First, bring back the rectangular selection border from the “Layer 1” so that the selection remains the same on the next frame as like the first frame. To do this, go to the layer panel, press & hold the “CTRL” button and click on the thumbnail of the “Layer 1” and you will see that the selection border has appeared again. After that, in the layer panel, select the background layer, then come to the photo and move the selection border to the next frame and then press “CTRL+J” from the keyboard to copy the selected frame in a new layer. A new layer “Layer 2” will be created afterward. Also, the rectangular selection border also disappeared.
- Do the same process for other frames as well.
- After copying all the frames in new layers, hide the background layer. To do this, go to the layer panel and click on the eye icon of the background layer. Background layer will be hidden afterward.
- You will see that all the frames come with a transparent background. Now, you have to tailor those frames in the same position.
Step 3: Tailor The Frames In The Same Position
- Go to the layer panel and select all the layers of the frames except the background layer. To select them, press & hold the “CTRL” button and click on each layer one by one, you will see that all layers of frames are selected.
- Now, go to the “Layer” menu, then go to the “Align” option, then select the “Horizontal centers” option. You will see that frames from the first row are gathered in the same place under the frame 1 and frames from the second row are gathered in the same place under the frame 5.
- Now, go to the layer panel again and select the “Layer 5” to “Layer 8” layers of the frames. To select them, press & hold the “CTRL” button and click on “Layer 5”, “Layer 6”, “Layer 7”, “Layer 8” layers, you will see that all layers of frames are selected. Now, go to the left side’s tools panel and select the “Move tool” or press “v” from the keyboard. Then, come to the photo, click & hold the frame 5 photo and drag it to the frame 1 photo. You will see all the frames now come in the same place.
- Now, go to the layer panel again and select all the layers of the frames except the background layer. To select them, press & hold the “CTRL” button and click on each layer one by one, you will see that all layers of frames are selected. Then, go to the “Layer” menu again, then go to the “Align” option, then select the “Horizontal centers” option. Then, go to the “Layer” menu again, then go to the “Align” option, then select the “Vertical centers” option. All the selected layers will be positioned properly.
- Now, increase the image size. To do this, go to the layer panel again and select all the layers of the frames except the background layer. Then, press “CTRL+T” from the keyboard and you will see that the free transformation is activated around the photo. Now, click & hold the right middle handler of the free transformation border and drag it outward. Image size will be increased.

Step 4: Remove Unwanted Background Areas Of The Frames And Insert New Similar Background
- Go to the left side’s tools panel and select the “Lasso tool”. Now, make a round selection outside of the character. Make sure that the character’s all parts remain intact. How can you make sure? First, hide all the layers first, then visible each layer from the bottom side and see that the selection border has included the character properly. If you see some parts of the character outside of the selection border, just draw a selection line outside of that part, the selection line must start from and end in the primary selection border.
- Then, go to the “Select” menu and choose the “Inverse” option.
- Now, go to the layer panel, click on each layer of the frame and press the “Delete” button from the keyboard. Do the same to all the layers of the frames.
- Unwanted background will be removed afterward. Now, press “CTRL+D” to deselect the selection.
- Now, go to the layer panel, select the background layer, then click on the “Create new fill or adjustment layer” button from the bottom of the layer panel and then select the “Solid color” option. A color palette window will appear. Now, hover your mouse on the remaining background color of the character and click on the background color to take the pixel sample, you will see that the color is selected on the color palette window. Then click on the “OK” button. New solid background layer “Color fill 1” is inserted.
Step 5: Make Gif
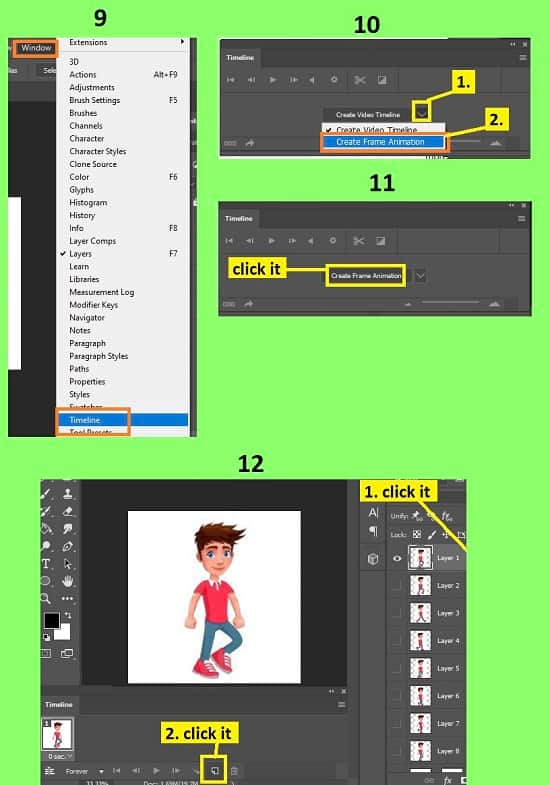
- Now, go to the layer panel, select the “Layer 1” layer, then go to the “Window” menu and then select the “Timeline” option. Timeline panel will appear afterward.
- If you see the panel is blank, you will see an option in the middle of the timeline panel. Click on the down arrow button of that option and select the “Create frame animation” option. Then click on the “Create frame animation” button from the middle of the timeline panel. Animation thumbnail will appear afterward.
- Now, hide all layers except the “Layer 1” and “Color fill 1” layers. To hide layers, click on the eye icon of the layers.
- Now, go to the layer panel, click on the “Layer 1” layer, then come to the timeline panel, click on the “Duplicates selected frames” button from the bottom of the timeline panel. You will see another frame added in the timeline.
- Then, go to the layer panel again, hide the “Layer 1” layer, make visible the “Layer 2” layer, click on the “Layer 2”, then come to the timeline panel, click on the “Duplicates selected frames” button from the bottom of the timeline panel. You will see another frame added in the timeline.
- Then, go to the layer panel again, hide the “Layer 2” layer, make visible the “Layer 3” layer, click on the “Layer 3”, then come to the timeline panel, click on the “Duplicates selected frames” button from the bottom of the timeline panel. You will see another frame added in the timeline.
- Then, go to the layer panel again, hide the “Layer 3” layer, make visible the “Layer 4” layer, click on the “Layer 4”, then come to the timeline panel, click on the “Duplicates selected frames” button from the bottom of the timeline panel. You will see another frame added in the timeline.
- Do this for the rest of the layers of the frames.
- Then, in the timeline panel, click on the down arrow button of all the frames and select the duration as per your choice, but “0.1 seconds” is preferable.
- Now, click on the play button from the timeline panel. You will see that your gif is playing.
Step 6: Save The Gif
Now, we are ready to save the gif file.
- To do this, go to the “File” menu, then go to the “Export” option and then select the “Save for web” option. Or, alternatively press “Alt+Shift+Ctrl+S” buttons from the keyboard.
- A window will appear. From there, set the file format as “Gif”. You will find this option below the “Preset” option. After that, click on the “Save” button.
- Then, set your location where you want to save your gif file, rename the file name and then click on the “Save” button.
- That’s it.

Video Tutorial about “How To Make Gifs In Photoshop” who really don’t want to read whole article just follow below video.
That’s how you can make gifs in Photoshop. In this tutorial I have shown you the process of making gifs in Photoshop. Above I have described how to copy frames in new layers, how to gather all frames in the same place, how to erase unwanted areas, how to timeline the frames and many more. For your convenience, I have included various keyboard shortcuts so that you can do your work fast and easily. I hope you have understood How to make gifs in Photoshop. This is a very easy way to make gifs in Photoshop.