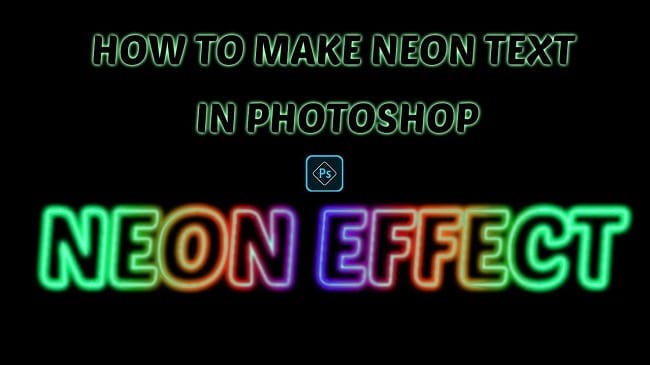
If you love the neon text effect, you can do it by yourself on photoshop. In this article, I am going to show you How to make neon text in photoshop. So, read this article till the end and follow the steps with care, you will be able to do it.
So, lets see how to make neon text in photoshop Easily
Step 1: Create New Document
To do that, go to the “File” menu and then select the “New” option. You will see that a window has appeared where you can choose a preset canvas or create a custom canvas. There are various preset sections available like photos, print, Art & Illustration, Web, Mobile, and Film & Video. So, go to one of those sections, select the preset canvas whichever you want and click on the “Create” button. If you want to create a custom one, give “Width” and “Height” size and click on the “Create” button. A new document will be created afterward.
Step 2: Create a Solid Color Layer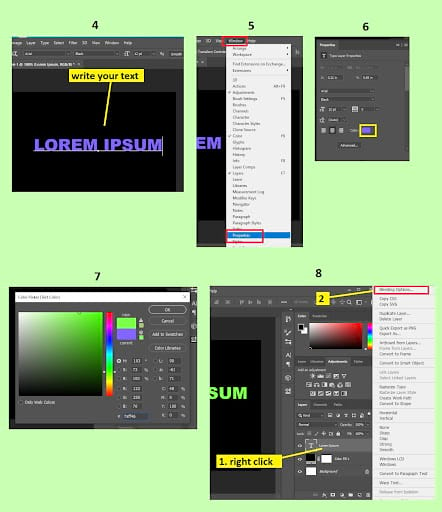
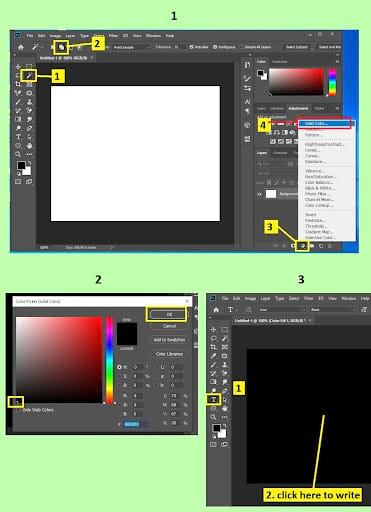
- Now, go to the layer panel which is located on the right side and click on the “Create new fill or adjustment layer” button. You will find this button in the bottom of the layer panel.
- From there, select the “Solid color” option.
- Now, a color picker window will appear. From there select black color. To select the black color, drag the color picker to the bottom left corner of the window. Then click on the “OK” button.
Step 3: Write Your Text and Make Neon Text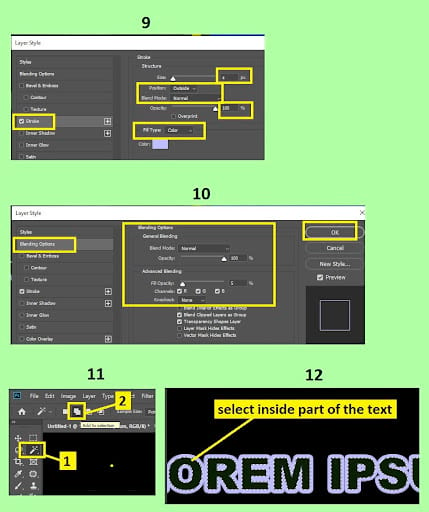
- To add the text, click on the text icon which is “T” from the left side tools panel. Or, alternatively, simply press the “t” button from your keyboard, the text tool will activate. Then, click on your document and write your text.
- Now, increase the size of the text if you want. To increase the size, first select the move tool from the left side tools panel. Then click on the text and then press “CTRL+T” from the keyboard. Now click on the corner of the text and increase the size as per your preference.
- Now, change the color of the text. To do that, go to color properties and click on the “Color” option. If your photoshop does not have the color properties option visible, simply go to the “Window” menu and put a tick mark on the “Properties” option.
- Now, go to the layer panel and right click on the text layer and select the “Blending options” from the context menu.
- A layer style window will pop up. From there, go to the “Stroke” menu from the left side options. Now, in the right side, from the “Structure” section, set the “Size” as “4px”, set the “Position” as “Outside”, set the “Blend mode” as “Normal”, and set the “Opacity” to “100%”. From the fill type section, set “Fill type” as “Color” and set the blue or whatever color you want from the “Color”.
- Now, go to the “Blending options” menu from the left side options. Now, on the right side, from the “General blending” section, set the “Blend mode” as “Normal” and set the “Opacity” level as “100%”. From the “Advanced blending” section, set the “File opacity” level as “5%” and the rest of the settings will be as it is.
- Now, go to the “Outer glow” menu from the left side options. Now, on the right side, from the “Structure” section, set the “Blend mode” as “Normal”, set the”Opacity” to”100%”, and set color as per your choice. From the “Elements” section, set the “Technique” as “Softer”, set the “Spread” level to “0%” and set the “Size” level to “24px”.
- Then click on the “OK” button.
- Now, go to the layer panel. From the text layer, click on the eye icon of “Outer layer” to hide the visibility.
- Now select the “Magic wand tool” from the left side tools panel then click on the “Add to selection” button from the top bar. Now select the inside part of all alphabets of your text.
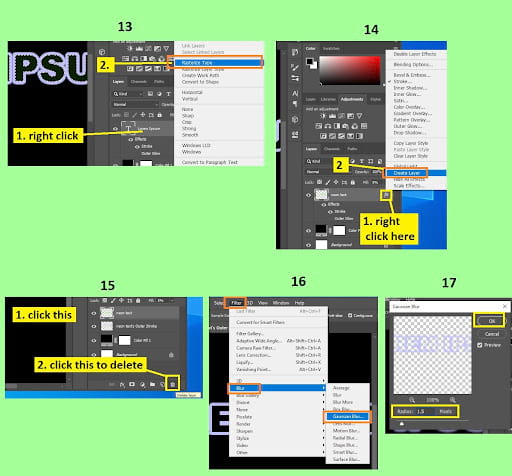
How to create a neon glow effect - Then, go to the layer panel again. Right click on the text layer and select the “Rasterize type” from the context menu. Rename the text layer, suppose “neon effect”.
- Now, go to the layer panel again and go to the “neon effect” text layer. Now, hover your mouse on the “fx” and right click. Then you need to select the “Create layer” from the context menu. A new layer “neon layer’s outer stroke” will be created afterward.
- Now, click on the “neon layer’s outer stroke” layer and press the “Delete” button from your keyboard. You will see the inside part of the text is removed.
- Now, select the “neon effect” layer and click on the delete icon from the bottom of the layer panel to remove the layer.
- After that, deselect the selection of text. To do that, Or just press “CTRL+D” from the keyboard.
- Now, click on the “neon leyer’s outer stroke” layer and then go to the “Filter” menu, then go to the “Blur” option and then select the “Gaussian Blur” option.
- Now set radius between 1.5 pixels to 2 pixels. Click on the “OK” button.
- Now, go to the layer panel again and right click on the “neon leyer’s outer stroke” layer and select the “Blending options” from the context menu.
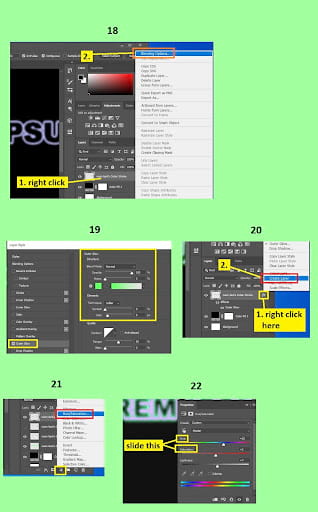
- Then, go to the “Outer glow” menu from the left side options. Now, on the right side, from the “Structure” section, set the “Blend mode” as “Normal”, set the ”Opacity” to”100%”, and set color as per your choice. From the “Elements” section, set the “Technique” as “Softer”, set the “Spread” level to “0%” and set the “Size” level to “9px”. Then, click on the “OK” button.
- Now, go to the layer panel again and go to the “neon leyer’s outer stroke” text layer. Now, hover your mouse on the “fx” and right click. Then just select the “Create layer” from the context menu. A new layer “neon leyer’s outer stroke’s outer glow” will be created afterward.
- Now, copy this “neon leyer’s outer stroke’s outer glow” layer 2 times. Now, in the layer panel, click on the eye icon of “neon leyer’s outer stroke’s outer glow copy” layer to hide.
- After that, select the click on the “Create new fill or adjustment layer” button and select the “Hue/Saturation” option.
- If you slide the color slider, you will see that neon effect.
Video Tutorial about “How to make neon text in photoshop – neon light font” who really dont want to read whole article just follow below video.
Final verdict
That’s how you can create a neon text on photoshop and easily create photoshop neon text effect or you can easily make neon letters on paper . In this article I have shown you the easiest way to make neon text. Here I have described the way of creating a solid color layer, writing text, using the blending option to make neon text and many more. I hope you have understood How to make neon text in photoshop. If you’re not able to perfect the neon text, try and practice over and over again, you will be able to do it easily.
If you are not able to understand any steps or have any questions, feel free to ask me in the comment section below, I will be happy to guide you.

