You might have been thinking how to turn the image into minecraft skin. If you want to create a minecraft skin, you will find the proper guideline in this article. Minecraft skins range varies. There are some skin which are very easy, some are extremely complex. In this article we will let you know facts of minecraft skin and how to turn any image into a Minecraft skin. Lets see how to make any image into a Minecraft skin.
Why Make Your Own Minecraft Skin?
Behind creating your own custom Minecraft skin, there are various reasons.
- You may see that online skin contents do not match your interests.
- You may need a specific design which is not available.
- You may have customizability and you want freedom to make your own skin.
- Sometimes you may find perfect skin but the gender preference does not match.
- Or, you may want a completely different one.
Everything you need to know before making minecraft skin
Before diving into how to create Minecraft skin, you should consider a few things.
Choose the appropriate tools
There are many photo editing software available where you can build your skin. Any program that is able to edit and process the images will work. Photoshop is the most premium and well known image editing software ever existed. You can easily build your Minecraft skin there. But, photoshop is not free to use, and everyone can not afford it. There are also a few alternatives of Photoshop which are completely free of charge like GIMP, PAINT.net etc.
Know the details of Minecraft skin template
Understanding the Minecraft skin is the most scary part. It is natural that most of the people are not familiar with the Minecraft skin. Here is the detail.
Editing the skin
If you have a good idea about minecraft skin or gained an idea of minecraft skin, you should start editing your new skin. If you don’t know where to start, read the rest of the article.
how to put a picture on a minecraft skin?
To convert a picture to minecraft skin, you have to go through some necessary steps. Let’s see how to do it.
Step 1: Choosing a proper image
Before you make any minecraft skin, choosing a proper skin is important. You should choose a photo which has a single object in the foreground. On top of that, if the image is in high-resolution and square resolution, then it will be even better.
Step 2: Remove the background from the image
After choosing the image, now you have to remove the background of that image. Removing the background will allow you to see the main object clearly. Here we will talk about two websites which are well known to all regarding the background removing. One is removebg and the other one is lunapic. Let’s see how we can erase the background with the removebg.
Remove Background
Removebg is the most Commonly Used website where users remove the background of the image. This website deletes backgrounds without any cost. Lets see how removebg works. Or if you need professional background remove or need transparent background with proper clipping path service then contact with us also.
How to edit
- First, visit the remove BG website.
- Then, click the “Upload image” option.
- After that, select your image which you want to edit. Then, click “Open”.
- That’s it! Your image’s background is removed automatically. Now, you can download the edited image.
Or, Lunapic
Lunapic is also another most commonly used website. This cloud based photo editor is full of features. The design of the lunapic website may seem outdated but the editing is very effective. You can easily remove the background image with the lunapic. Lunapic offers video tutorials to know how to utilize it. Let’s see how we can remove the background with lunapic.
How to edit:
- First, browse the lunapic website. Then click on the “Upload” menu.
- Then, click the “Choose file” option and select your desired photo and click “Open”. The photo will upload automatically.
- In this step, you have to select a background removing tool. To do that, first go to the “Edit” menu and then select the “Transparent Background” option.
- Now, click the outside colors of the object within the photo which you want to remove. Then you will see the background has been removed.
- After that, click the “Apply” button.
- If any background is left to remove, click those again after clicking the “Apply”. After clicking the other background, click the “Apply” button again. Do this process until all background has been removed.
- Now you have to save the photo. To do that, go to the “File” menu and select “Save image” option.
- Now, a list photo format will appear. To make your photo background transparent, choose “PNG” format. After that, edited photo will be downloaded automatically.
These websites are very effective to make transparent background and remove the background.
Step 3: Resize and create a skin with an image
In this step you have to resize the image which you just removed the background from. You have to resize the image into 64 x 32 pixels. To do this, we will suggest two applications and you can choose any one of them. Those applications are adobe photoshop and Gimp. Let’s see how to resize the photo in photoshop.
Adobe photoshop
Before resizing in photoshop, download the minecraft sample. We will work on this sample. Because that simple is minecraft’s appropriate size 64 x 64 pixels. The sample name is steve.png which is from minecraft.net. Let’s create the skin:
- First open minecraft sample in photoshop. Go to the “file” menu and then select the “Open” option. After that, select the sample and click open.
- Zoom it for your convenience.
- Now, open your backgroundless image. Go to the “file” menu and then select the “Open” option. After that, select the backgroundless image and click open.
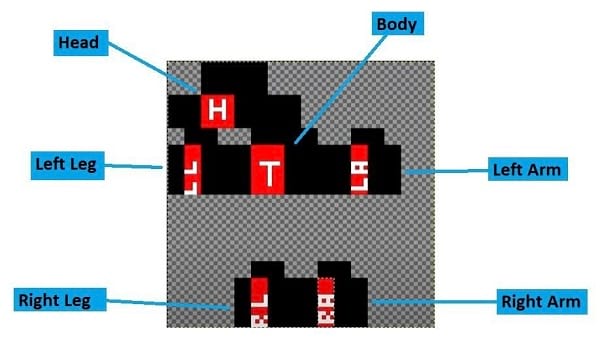
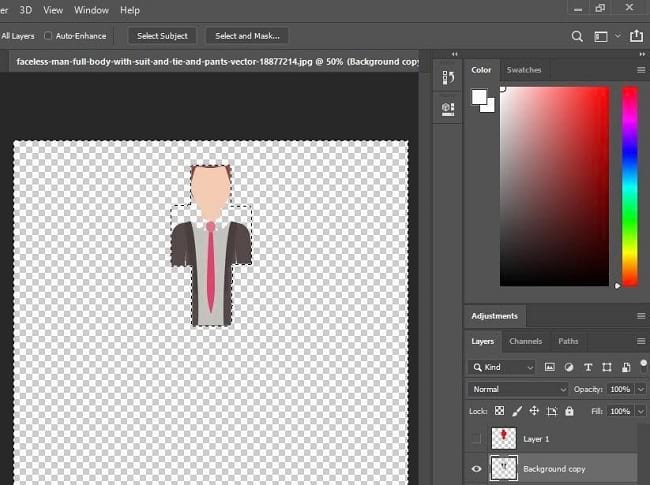
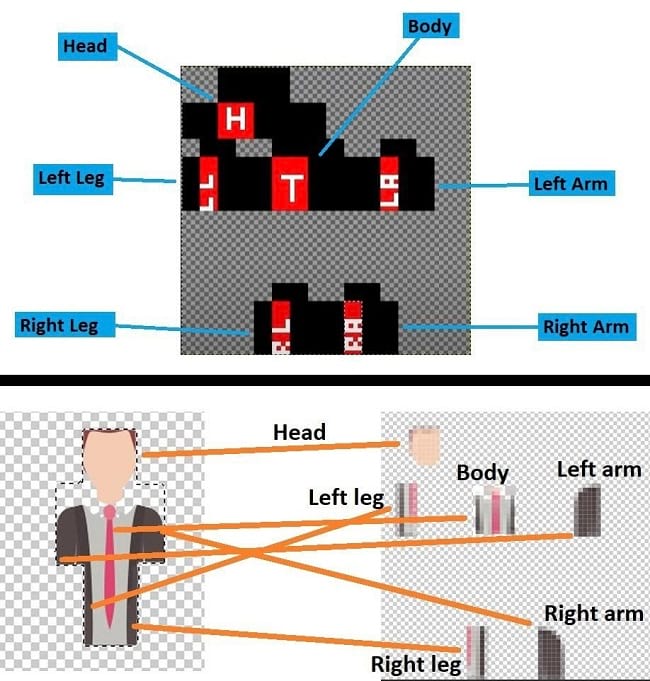
- In this step you have to be very careful. You have to put each body part in a backgroundless image according to the minecraft sample. This part is complicated. You have to put the head in place of minecraft’s head. Likewise, you have to put arms, legs, body according to the sample. First identify the details of the minecraft sample.

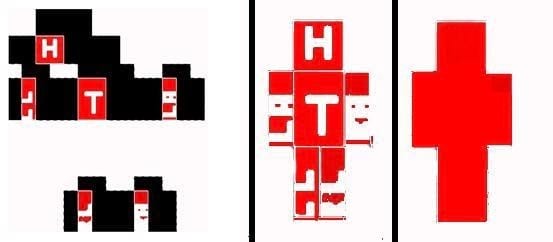
- Now, rearrange the body parts for our convenience. Before doing this make a copy of the sample file for safety. Rearrange only the red portions. After rearranging, fill up the rest of the blank portions. Like this.
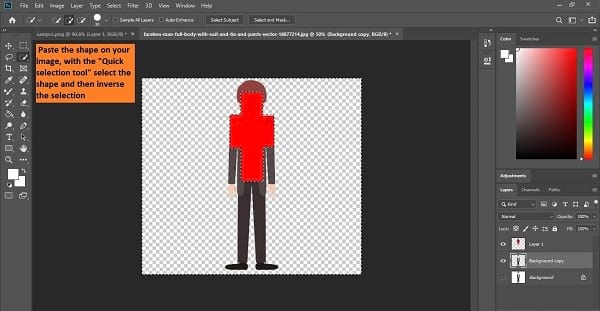
- Now, copy the shape which you just created and paste to your image. Paste the shape on your image. After that, select the shape with the “Quick selection tool” and then inverse the selection. To inverse the selection, go to the “Select” menu and select the “Inverse” option.
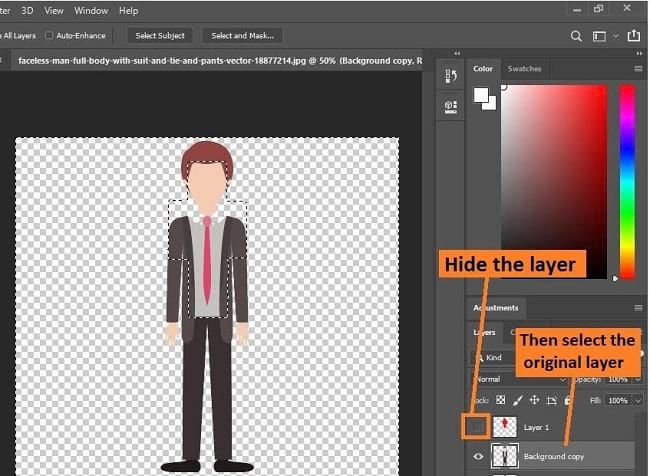
- After inverse the selection, hide the shape’s layer and then select the original layer. Now, you will see the selection is made over your image.
- After that, press the “delete” button from the keyboard. Your image will be resized to the shape size.
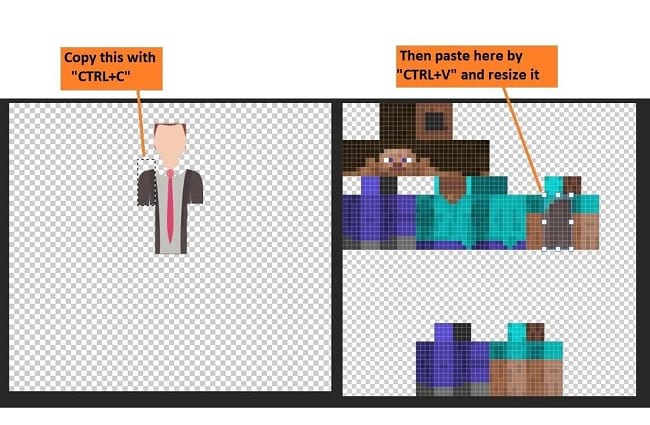
- Now, copy each body part and paste on the minecraft skin’s specific place. Like this. After paste the body part, you should resize it to place it properly.
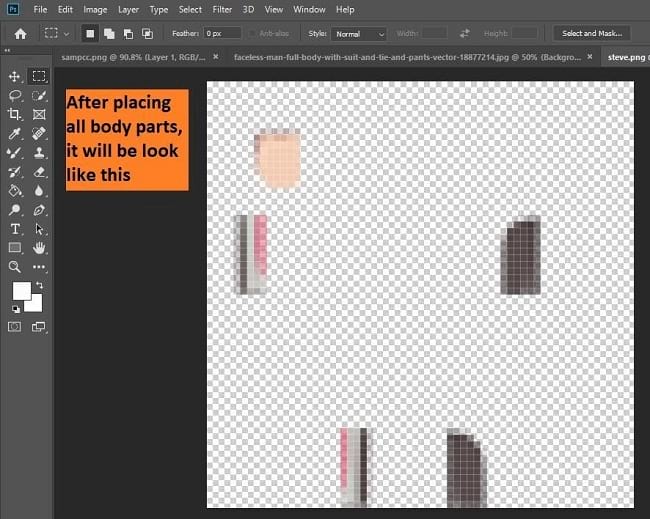
- After placing all body parts, hide the original minecraft sample. The image will look like this after placing all body parts on the specific place.
- Now, export the image. To do that, go to the “File” menu and select the “Export” option. From the export option, select the “Quick export as png” option. Then rename the file and select the “save” button.
- Your minecraft skin is created.
Step 4: Apply and visualize your image
Now, we have to see how the newly created skin looks like in minecraft. You can do this in two ways. Either you can use this in minecraft.net if you have an account or any alternative skin viewer website.
Lets see how to do it.
Minecraft.net
From your Minecraft profile page, you can download the sample if you did not find the sample yet. You will see a sample link to get the sample file called “download the reference skin”. However, if you finish editing your skin, it is time to visualize the skin. Let’s see how we can upload the skin.
How to upload Minecraft skin:
- Go to the minecraft.net website and login to your profile.
- Then, select the “Choose file” option and select your newly created image.
- Then click the upload button.
- Now, whenever you login to your profile, it will visualize your newly uploaded skin.
Alternative skin viewer
There are various skin viewers available. We will work with the two well known skin viewers called “MinecraftSkins skin editor” and “Nova skin editor”. These skin viewers allow users to visualize their created skin model. Let’s see how we can do that.
MinecraftSkins skin editor
MinecraftSkins skin editor is a famous alternative minecraft skin visualizer. This program allows users to upload and visualize the skin. It also allows users to edit the skin or create a new skin. Lets see how we can upload skin there.
How to upload
- First visit the website.
- Now scroll down a little and you will see three options which are located on the right side of the website.
- From the three options, select the “Upload from computer” option.
- Then, select your skin and open it.
- After that, two options will pop up. One option is “Classic (4 px arms) and the other option is “Slim (3 px arms)”. You can choose any one of them.
- After that, you will see that your skin is visualized in their model.
Or, Nova skin editor
Nova skin editor is another famous alternative minecraft skin visualizer. It is quite different from the MinecraftSkins skin editor. This skin editor comes with a colorful background. This page is full of features and tools. These features are to edit your skin. However, This program also allows users to upload and visualize the skin. It also allows users to edit the skin or create a new skin. Lets see how we can upload skin there.
How to upload
- First visit the website.
- Navigate to the top left side of the page and select the “Open” option.
- Now, select your skin and open it.
- After that, you will see that your skin is visualized in their model.
Also like : invert colors in Photoshop
Conclusion
If you are a beginner then you might find Minecraft skin making being a daunting task. But, the more you practice, the more it will become easy for you. In this article we tried to give basic facts and ways of making Minecraft skin and we hope it will be a benefitting for you.