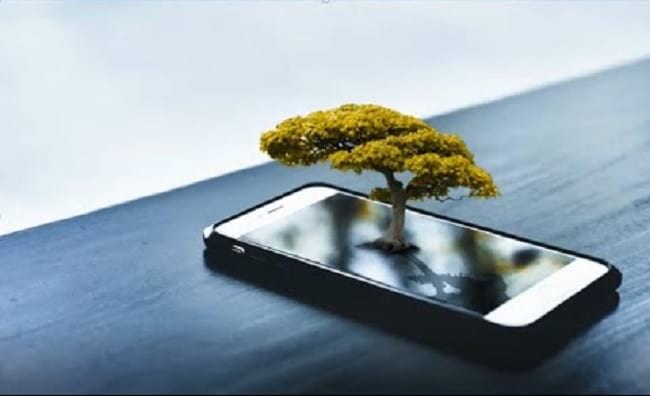
Pop out effect is a good example of great imagination and creative thinking. It also increases creativity level as the time goes. So, how can you make a pop up effect? In this tutorial article, I am going to show you How to make a Pop out effect photoshop. So, read this article till the end and follow the steps with care, you will get easy instructions from this article, and you will be able to do it easily. Let’s see How to make a Pop out effect photoshop:
Create pop out effect image in Photoshop
Photos You will need to make pop out effect photoshop
You have to make sure you have the following images for making pop out photo effect:
- A photo of a mobile.
- A photo of a tree.
- A photo of a grass field.
Let’s begin the pop out effect making:
Step 1: Open a photo of a mobile in photoshop
- To do that, go to the “File” menu and select the “Open” option. Then, go to your image location and select your mobile image and then click on the “Open” button. Your mobile image will be opened in photoshop afterward.
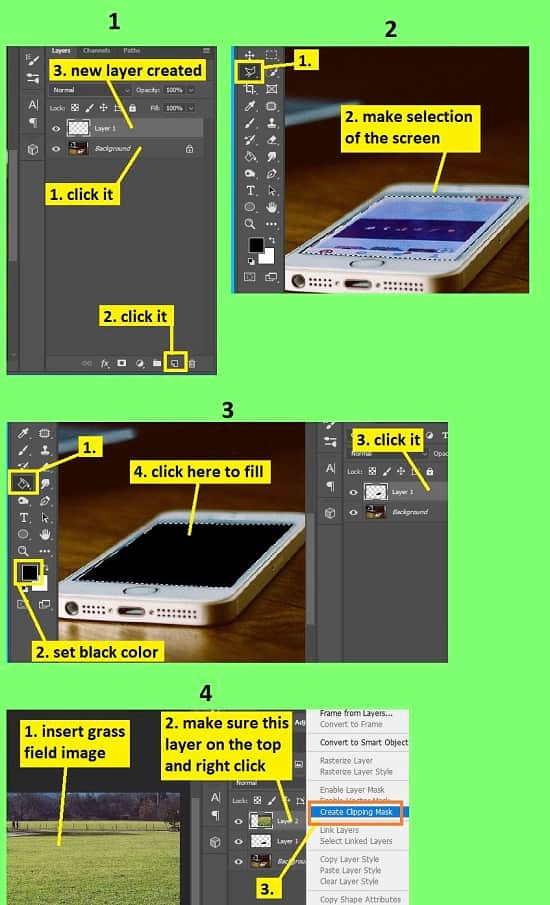
- Now, create a new layer. To do this, go to the layer panel, click on the “Create a new layer” button from the bottom of the layer panel. A new transparent layer “Layer 1” will be created.
- Now, make a selection of the mobile screen. To do this, go to the layer panel, click on the new layer “Layer 1”, then go to the left side’s tools panel and select the “Polygon lasso tool”. You will find the polygon lasso tool under the “Lasso tool”. Now, start the starting point of the polygon lasso tool from the edge of the mobile screen, make the selection path around the edge of the screen and then join the path with starting point, selection will be made.
- Now, fill the selection with the black color. To do this, go to the left side’s tools panel and select the “Paint bucket tool” and you will see the paint bucket icon on your mouse tip. You will find the paint bucket tool under the “Gradient tool”. Then, in the left side’s tools panel and set the foreground color as black. Now, click on the selection area. You will see that the selected area has become black. Then, press “CTRL+D” to deselect the selection.
Step 2: Open a photo of a grass field and insert it in the main file
- Go to the “File” menu and select the “Open” option. Then, go to your image location and select your image and then click on the “Open” button. Your image will be opened in a new tab in photoshop afterward.
- Now, press “CTRL+A” from the keyboard to select the whole image, then press “CTRL+C” from the keyboard to copy the whole image, then come to the existing image’s tab and press “CTRL+V” to paste the copied image. A new layer “Layer 2” will be added. Make sure that this layer is on top of all the layers.
- Now, we will adjust the size of the grass field image we have inserted, adjust the size in a way where the grass will be visible on the mobile screen. So, go to the layer panel, select the “Layer 2” layer, then press “CTRL+T” to activate the free transform. Now, drag the handler of the free transform outward and place the grass image on the mobile screen. If you are not able to figure out where you are putting the grass field, decrease the opacity from the layer panel for a few moments, place the grass field and after the placement has done increase the opacity again. Press “Enter” after adjusting the size.
- Now, go to the layer panel, right click on the grass field image layer “Layer 2” and select the “Create clipping mask” option. You will see the image has been cropped.
- Now, we will darken the grass a little bit. So, go to the layer panel, click on the “Layer 2” layer which is the grass field image, then click on the “Create new fill or adjustment layer” and select the “Levels” option. Levels panel will appear. From there, click on the “The adjustment affects all layers below (click to clip to layer)” button from the bottom of the levels panel. Now adjust the color levels. In the levels panel, from the bottom color slider, drag the right side’s slider to the left a little bit. Then, from the top side color level slider, slide the middle slider a little bit to the right. The grass becomes darker slightly. A new levels layer “Levels 1” will be created.
- Now, we will do some color balance of the grass. So, go to the layer panel, click on the “Levels 1” layer, then click on the “Create new fill or adjustment layer” and select the “Color balance” option. Color balance panel will appear. From there, click on the “The adjustment affects all layers below (click to clip to layer)” button from the bottom of the panel. Then slide the “Cyan” color slider to the right side a little bit. A new color balance layer “Color Balance 1” will be created.
Step 2: Open a photo of a tree and insert it in the main file
- Before inserting the tree image, make sure that you collect the photo of a tree with a transparent background.
- Go to the “File” menu and select the “Open” option. Then, go to your image location and select your image and then click on the “Open” button. Your image will be opened in a new tab in photoshop afterward.
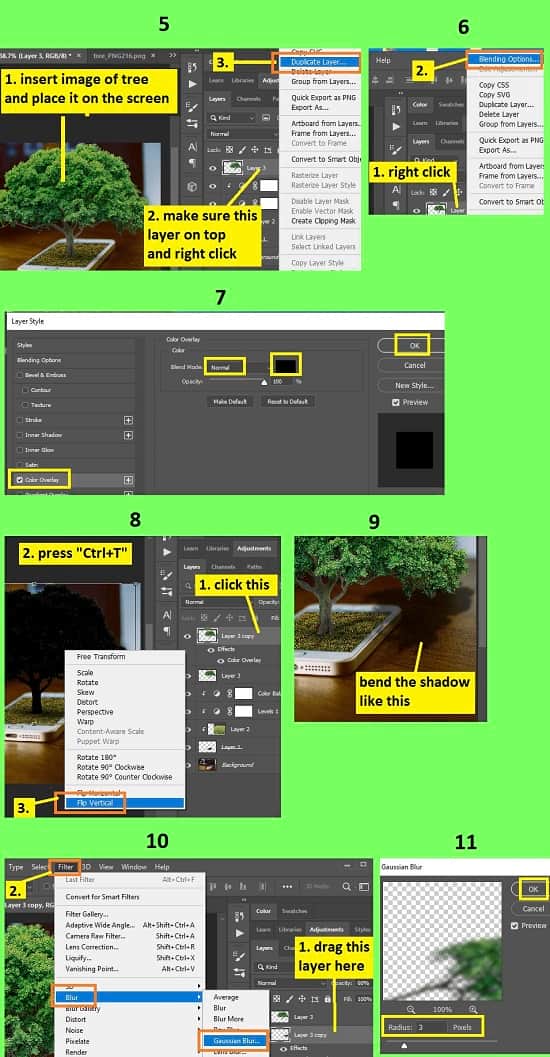
- Now, press “CTRL+A” from the keyboard to select the whole image, then press “CTRL+C” from the keyboard to copy the whole image, then come to the existing image’s tab and press “CTRL+V” to paste the copied image. A new layer “Layer 3” will be added. Make sure that this layer is on top of all the layers.
- Now, place the tree image in the middle of the mobile screen
- Now, we will duplicate the tree image’s layer so that we can make a shadow of the tree. So, go to the layer panel, right click on the tree image layer “Layer 3” and select the “Duplicate layer” option. A dialog box will appear, click on the “OK” button. You will see the image has been duplicated in a new layer “Layer 3 copy”.
- Now, go to the layer panel, right click on the duplicate tree image layer “Layer 3 copy” and select the “Blending options” option. A blending options window will appear. From there, click on the “Color overlay” option from the left side, then set the “Blend mode” as “Normal”, set the color black and then click on the “OK” button. You will see that the tree becomes black altogether.
- Now, go to the layer panel, select the duplicate tree image layer “Layer 3 copy” and press “CTRL+T” to activate the free transform. Now, we have to lay down the black tree in the ground. To do this, right click on the black tree photo and select the “Flip vertical” option, the tree will be flipped. Now, press & hold the “CTRL” button and click & hold the handlers and lay down the tree to the ground. Now, decrease the opacity from the layer panel. The black tree will become a shadow.
- Now, go to the layer panel and drag the black tree layer “Layer 3 copy” below the original tree layer “Layer 3”.
- Now, go to the layer panel, click on the black tree layer “Layer 3 copy”, then go to the “Filter” menu, then go to the “Blur” option and select the “Gaussian blur” option. A window will appear. From there, set the radius between 3 pixels to 5 pixels.
- We need a few more shadows around the tree. So, first, create a new layer. To do this, go to the layer panel, click on the black tree layer “Layer 3 copy”, then click on the “Create a new layer” button from the bottom of the layer panel. A new layer “Layer 4” will be created above the “Layer 3 copy” layer.
- Now, go to the left side’s tools panel, select the “Brush tool” and set the foreground color as black. Then go to the top bar/ option bar, set the opacity between 60% to 70% and set the flow between 30% to 40%. Now, brush near the root of the tree.
- Create a new layer above the “Layer 3” layer. To do this, go to the layer panel, click on the tree image layer “Layer 3”, then click on the “Create a new layer” button from the bottom of the layer panel. A new layer “Layer 5” will be created above the “Layer 3” layer.
- Now, go to the left side’s tools panel, select the “Brush tool” and set the foreground color as black. Then go to the top bar/ option bar, set the opacity between 60% to 70% and set the flow between 30% to 40%. Now, brush on the root, branches of the tree. Now, go to the layer panel, right click on the layer “Layer 5” and select the “Create clipping mask” option.
- Now, merge all the layers in a new layer. To do this, go to the layer panel, click on the layer “Layer 5” and then press “CTRL+ALT+SHIFT+E” from the keyboard. All the layers merged in a new layer “Layer 6”.
- Now, go to the layer panel, click on the merged layer “Layer 6”, then go to the “Filter” menu and select the “Camera raw filter” option. A window with image preview will appear. From there, go to the “Color mixer” option from the right side color adjustment panel, then toggle to “Saturation” option and then increase the “Green” color. After that click on the “OK” button.
- That’s it.
Video Tutorial about “Pop Out Effect Photoshop” who really don’t want to read whole article just follow below video.
That’s how you can make a Pop out effect photoshop. In this tutorial I have shown you the process of making a pop out effect in Photoshop. Above I have described how to make a selection of the mobile screen, how to fill the selected area, how to insert a grass field and tree on the mobile screen, how to make the shadow of the object and many more. For your convenience, I have included some keyboard shortcuts so that you can do your work fast and easily. I hope you have understood how to make a Pop out effect photoshop. This is a very easy way to do this.