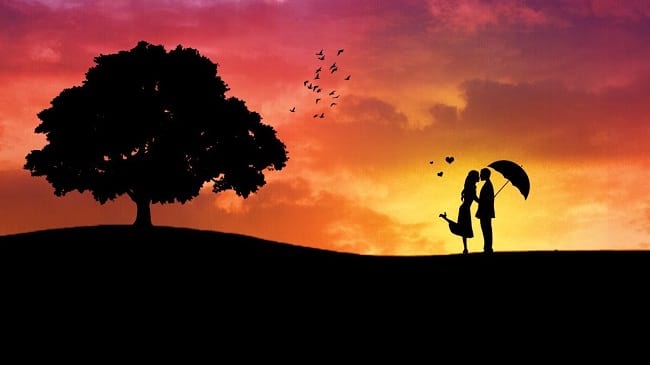
Silhouette is a kind of design or image that is created in a single tone and hue. It is an idea taken from 18th century’s black and white painted portraits. But, nowadays it has become popular again because of its iconic character. Now, how can you make such a photo effect? In this creative photo manipulation photoshop tutorial article, I am going to show you How to make Silhouette effect photoshop. So, read this article till the end and follow the steps with care, you will get easy instructions from this article, and you will be able to do it easily. Let’s see How to make Silhouette effect photoshop:
Photos You will need to make silhouette effect
You have to make sure you have the following images for making silhouette effects:
- A photo of a man. The full body of the man is mandatory.
- A photo of grassland.
- A photo of a tree. Make sure the tree has a transparent background.
- A photo of the sky.
- A photo of a group of birds
Let’s begin the silhouette photo effect making:
Step 1: Create a New Document
First of all, you have to create a new blank document. To do that, go to the “File” menu and then select the “New” option. You will see that a window has appeared where you can choose a preset canvas or create a custom canvas. If you want to create a custom one, give “Width” and “Height” size and click on the “Create” button. A new document will be created afterward. Here, I have made a custom document of 1280 pixels by 720 pixels, this is a random size, choose size as per your choice.
Step 2: Open a photo of grassland and insert it in the blank document
- Go to the “File” menu and select the “Open” option. Then, go to your image location and select the image of grassland and then click on the “Open” button. Your image will be opened in photoshop afterward.
- Now, press “CTRL+A” from the keyboard to select the whole image, then press “CTRL+C” from the keyboard to copy the whole image, then come to your blank document and press “CTRL+V” to paste the copied image. A new layer “Layer 1” will be added. Rename this grassland image “Layer 1” as “Grassland”.
- Increase or decrease the size of the grassland’s photo, press “CTRL+T”, then click & drag the corner’s handler and drag it outward to increase or drag inward to decrease the size. Make sure that the grassland photo fits horizontally with the blank document. Then press “Enter”.
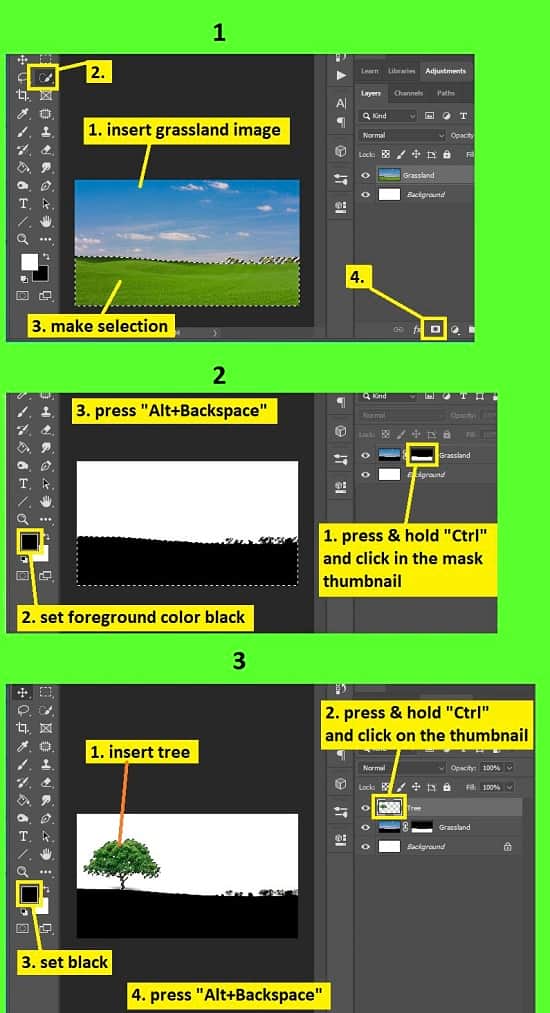
- Now we will remove the sky from the grassland. To do this, go to the layer panel, select the “Grassland” layer, then go to the left side’s tools panel and select the “Quick selection tool”. Now, brush over the sky. You will see that selection is selecting the area automatically. If you see that you have over selected, press & hold the “ALT” button and then brush over the over selected areas.
- Then, go to the “Select” menu and choose the “Inverse” option. Then, go to the layer panel and click on the “Add layer mask” button. Sky will vanish and the grass area will remain. A mask thumbnail will be added on the “Grassland” layer.
- Now, we will fill the grass area with black color. To do this, go to the layer panel, press & hold the “CTRL” button from the keyboard and at the same time click on the mask thumbnail of the grassland layer. You will see that the grass area is selected. Now, go to the left side’s tools panel and set the foreground color as black. Then, press “ALT+Backspace” from the keyboard. You will see that the grass area is filled with black color.
- Then press “CTRL+D” from the keyboard to deselect the selection.
Step 2: Open a photo of tree and insert it in the main image
- Go to the “File” menu and select the “Open” option. Then, go to your image location and select the image of a tree and then click on the “Open” button. Your image will be opened in photoshop afterward. Make sure that the tree has a transparent background.
- Now, press “CTRL+A” from the keyboard to select the whole image, then press “CTRL+C” from the keyboard to copy the whole image, then come to your main image and press “CTRL+V” to paste the copied image. A new layer “Layer 1” will be added. Rename this tree image “Layer 1” layer as “Tree”.
- Increase or decrease the size of the tree’s photo, press “CTRL+T”, then click & drag the corner’s handler and drag it outward to increase or drag inward to decrease the size. Then press “Enter”.
- Now, we will fill the tree’s color with black color. To do this, go to the layer panel, press & hold the “CTRL” button from the keyboard and at the same time click on the thumbnail of the tree layer. You will see that the tree is selected. Now, go to the left side’s tools panel and set the foreground color as black. Then, press “ALT+Backspace” from the keyboard. You will see that the tree is filled with black color.
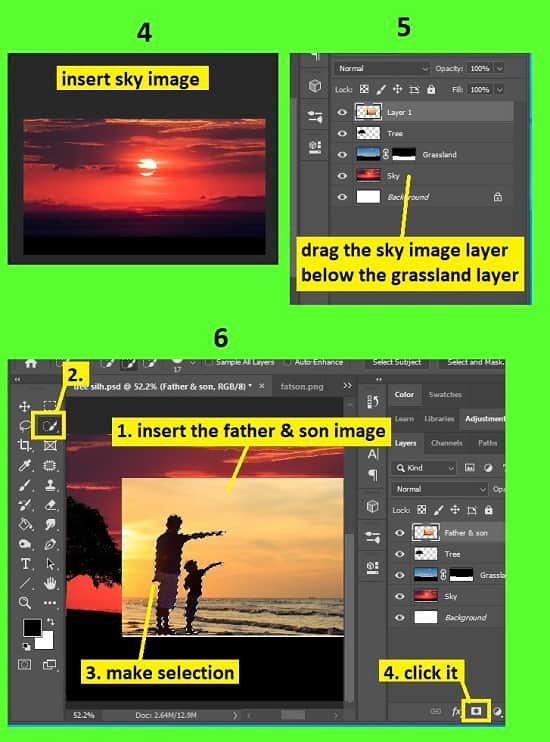
Step 3: Include a sky in the image
We will use a sky image for this.
- So, go to the “File” menu and select the “Open” option. Then, go to your image location and select the image of a sky and then click on the “Open” button. Your image will be opened in photoshop afterward.
- Now, press “CTRL+A” from the keyboard to select the whole image, then press “CTRL+C” from the keyboard to copy the whole image, then come to your main image and press “CTRL+V” to paste the copied image. A new layer “Layer 1” will be added. Rename this sky image “Layer 1” layer as “Sky”.
- Increase or decrease the size of the sky’s photo, press “CTRL+T”, then click & drag the corner’s handler and drag it outward to increase or drag inward to decrease the size. Then press “Enter”.
- Now, go to the layer panel and drag the “Sky” layer below the “Grassland” layer. You will see that the sky goes behind the grassland and the tree.
Step 4: Add a photo of people
We will use an image of a father and son for this.
- So, go to the “File” menu and select the “Open” option. Then, go to your image location and select the image of people and then click on the “Open” button. Your image will be opened in photoshop afterward.
- Now, press “CTRL+A” from the keyboard to select the whole image, then press “CTRL+C” from the keyboard to copy the whole image, then come to your blank document and press “CTRL+V” to paste the copied image. A new layer “Layer 1” will be added. Rename this people image “Layer 1” as “Father & son”. Make sure this layer is on top of all the layers.
- Increase or decrease the size of the people’s photo, press “CTRL+T”, then click & drag the corner’s handler and drag it outward to increase or drag inward to decrease the size.
- Now we will remove the background from the people’s image. To do this, go to the layer panel, select the “Father & son” layer, then go to the left side’s tools panel and select the “Quick selection tool”. Now, brush over the father and the son. You will see that selection is selecting the area automatically. If you see that you have over selected, press & hold the “ALT” button and then brush over the over selected areas.
- Now, go to the layer panel and click on the “Add layer mask” button. The background will vanish and the father and son portion will remain. A mask thumbnail will be added on the “Father & son” layer.
- Now, we will fill the people’s area with black color. To do this, go to the layer panel, press & hold the “CTRL” button from the keyboard and at the same time click on the mask thumbnail of the “Father & son” layer. You will see that the father and son area is selected. Now, go to the left side’s tools panel and set the foreground color as black. Then, press “ALT+Backspace” from the keyboard. You will see that the father and son area is filled with black color.
- Then press “CTRL+D” from the keyboard to deselect the selection.
Step 5: Include birds in the sky of the image
We will use an image of birds for this.
- Go to the “File” menu and select the “Open” option. Then, go to your image location and select the image of birds and then click on the “Open” button. Your image will be opened in photoshop afterward. Make sure that the bird’s image has a transparent background.
- Now, press “CTRL+A” from the keyboard to select the whole image, then press “CTRL+C” from the keyboard to copy the whole image, then come to your main image and press “CTRL+V” to paste the copied image. A new layer “Layer 1” will be added. Rename this bird image “Layer 1” layer as “Bird”.
- Increase or decrease the size of the bird’s photo, press “CTRL+T”, then click & drag the corner’s handler and drag it outward to increase or drag inward to decrease the size. Then press “Enter”.
- If the bird’s color is already in black color, there is no need to fill it with black color. If not, fill the bird’s color with black color. To do this, go to the layer panel, press & hold the “CTRL” button from the keyboard and at the same time click on the thumbnail of the “Bird” layer. You will see that the birds are selected. Now, go to the left side’s tools panel and set the foreground color as black. Then, press “ALT+Backspace” from the keyboard. You will see that the birds are filled with black color.
- That’s it.
Video Tutorial about “Silhouette Effect Photoshop” who really don’t want to read whole article just follow below video.
That’s how you can make Silhouette effect photoshop. In this tutorial I have shown you the process of making a silhouette photo effect in Photoshop. For your convenience, above I have described how you can insert various photos in your photo, how you can remove unwanted areas from the photo, how to make selection, how to turn the object into a completely black object, make selection, how to give a shadow and many more. You may find various photo manipulation techniques for making silhouette effects in the digital world, this is one of them and I hope you will find it easy. I have included some useful keyboard shortcuts for your convenience so that you can do your work fast and easily. I hope you have understood How to make Silhouette effect photoshop.