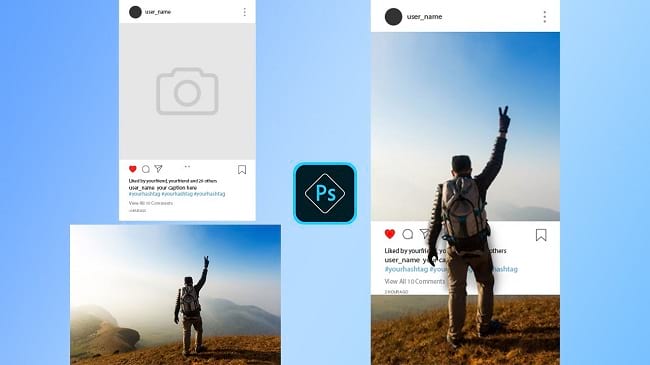
Instagram is another very popular social media after facebook. But, it is quite different from facebook. One of the unique features of Instagram is you will be able to do photo editing with this. If you are a big fan of Instagram and want to surprise your friends with your photo editing creativity, Instagram 3D pop out pictures can be a great idea. In this photo manipulation photoshop tutorial article, I am going to show you How to make Instagram 3D pop out pictures. So, read this article till the end and follow the steps with care, instructions are very easy, and you will be able to do it easily. Let’s see How to make Instagram 3D pop out pictures:
Photos you will need to make Instagram 3D pop out pictures
You have to make sure you have the following images for making Instagram 3D pop out pictures:
- A photo of a man. The full body of the man is mandatory.
- A photo or screenshot of an instagram post.
Let’s begin the Instagram 3D pop out pictures making:
Step 1: Create a New Document
First of all, you have to create a new blank document. To do that, go to the “File” menu and then select the “New” option. You will see that a window has appeared where you can choose a preset canvas or create a custom canvas. If you want to create a custom one, give “Width” and “Height” size and click on the “Create” button. A new document will be created afterward. Here, I have made a custom document of 700 pixels by 900 pixels, this is a random size, I may need to crop it later if required.
Step 2: Open a photo of instagram post and insert it in the blank document
- Go to the “File” menu and select the “Open” option. Then, go to your image location and select the image of an instagram post and then click on the “Open” button. Your image will be opened in photoshop afterward.
- Now, press “CTRL+A” from the keyboard to select the whole image, then press “CTRL+C” from the keyboard to copy the whole image, then come to your blank document and press “CTRL+V” to paste the copied image. A new layer “Layer 1” will be added. Rename this instagram post image “Layer 1” as “Instagram”.
- Increase or decrease the size of the instagram’s photo, press “CTRL+T”, then click & drag the corner’s handler and drag it outward to increase or drag inward to decrease the size. Make sure that the instagram post photo fits vertically with the blank document. Then press “Enter”.
- You may see extra blank areas in the left side and in the right side from the blank document, you need to crop the entire image. So, crop the whole image to match with the size of the instagram post image. To do this, go to the left side’s tools panel, and select the “Crop tool”. Now, click & drag from the top left corner of the instagram post image and drag towards the bottom right corner of the instagram post image. After that, press the “Enter” button. The image will be cropped.
- Now, we will need an extra blank area in the bottom side of the blank document. To get this, go to the left side’s tools panel, and select the “Crop tool”, you will see that the crop tool is activated with the cropping border automatically. Now, click & hold the bottom middle handler the cropping boundary and drag it to the bottom more. The bottom side will be extended. Extend approximately 20% to 25% in the bottom. After that press “Enter”.
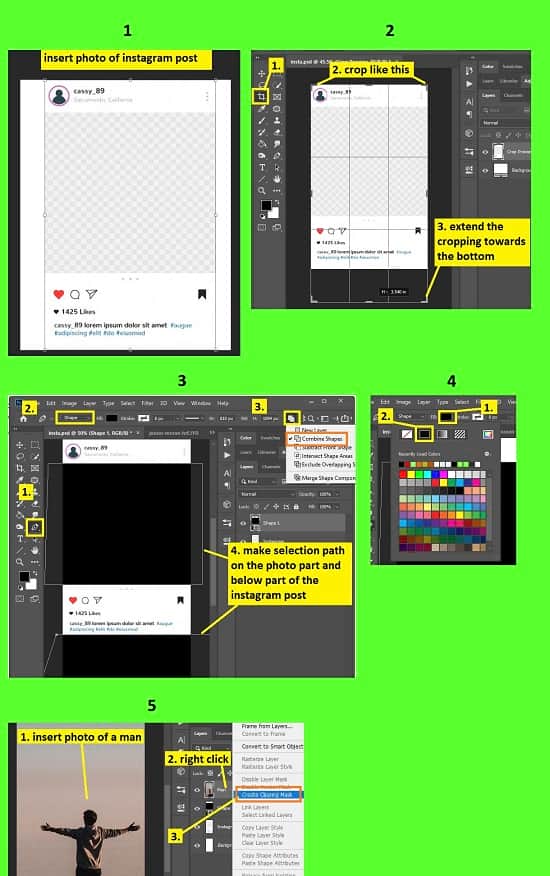
Step 3: Open a picture of man and insert it in the main file
- Before inserting a photo of a man, we will eliminate the photo part of the instagram post image. To do this, go to the layer panel, select the “Instagram” layer, then go to the left side’s tools panel and select the “Pen tool”. Then go to the top bar/ option bar, set the tool mode from “Path” to “Shape”, and click on the path operation option & select “Combine shape” option.
- Now, we will make the selection path on the photo part of the instagram post image and also make the selection path below the caption part of the instagram towards the end of the bottom side. After making the selection path, go to the top bar/option bar, click on the “Fill” option and select the “Solid color” option. You will see the selected part filled with solid color. A new layer “Shape 1” will be added.
- Go to the “File” menu and select the “Open” option. Then, go to your image location and select the man’s image and then click on the “Open” button. Your image will be opened in photoshop afterward.
- Now, press “CTRL+A” from the keyboard to select the whole image, then press “CTRL+C” from the keyboard to copy the whole image, then come to your blank document and press “CTRL+V” to paste the copied image. A new layer “Layer 1” will be added. Rename this instagram post image “Layer 1” as “Man”.
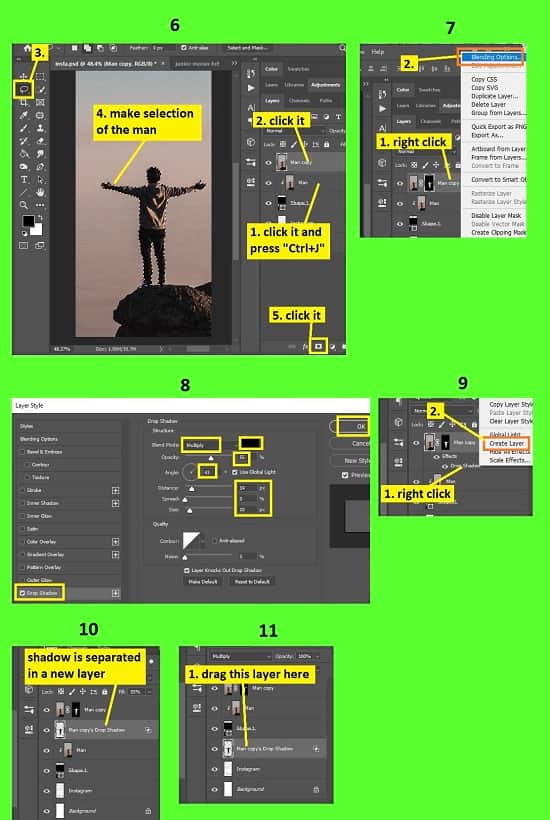
- Increase or decrease the size of the instagram’s photo, press “CTRL+T”, then click & drag the corner’s handler and drag it outward to increase or drag inward to decrease the size. Now, place the man’s photo in a way that the caption part of the instagram post image is on the waist of the man. If you are not able to figure out where you are putting the man’s image, decrease the opacity from the layer panel for a few moments, place the man and after the placement has done increase the opacity again. Then press “Enter”.
- Now, go to the layer panel, right click on the “Man” layer and select the “Create clipping mask” option.
- Now, duplicate the man layer. To do this, go to the layer panel, click on the “Man” layer and press “CTRL+J” from the keyboard. A new layer “Man copy” will be created.
- Now, we will remove the background of the “Man copy” layer and only the man portion will remain. To do this, go to the layer panel, click on the “Man copy” layer, then go to the left side’s tools panel and select the “Quick selection tool”. Now, brush over the man. You will see that selection is selecting the area automatically. If you see that you have over selected, press & hold the “ALT” button and then brush over the over selected areas.
- After making the selection, go to the layer panel and click on the “Add layer mask” button from the bottom of the layer panel. You will see the man’s portion is cropped.
- Now we will put a drop shadow of the man on the caption portion of the instagram post. To do this, go to the layer panel, right click on the “Man copy” layer and select the “Blending options”. A window will appear. From there, go to the “Drop shadow” option from the left side. Now, set the “Blend mode” as “Multiply”, set the the “Opacity” between 40% to 75%, set the “Angle” as “43 degree”, set the “Distance” between 10 to 40, set the “Spread” as “0”, set the “Size” between 10 to 50. And then click on the “OK” button. You will see two sub-layer have been added. Choose the adjustment amount as per your preference, picture quality and resolution.
- Now, go to the layer panel, right click on the “Drop shadow” sub-layer and select the “Create layer” option. A dialog box will appear, click “OK”. A new layer “Man copy’s drop shadow” is created.
- Now, from the layer panel, click & drag the “Man copy’s drop shadow” layer between the “Shape 1” layer and the “Instagram” layer. You will see the shadow has been cropped.
- That’s it.
Video Tutorial about “Photo Manipulation Photoshop” who really don’t want to read whole article just follow below video.
That’s how you can make Instagram 3D pop out pictures. In this tutorial I have shown you the process of making an Instagram 3D pop out picture in Photoshop. Above I have described how you can insert various photos in your photo, how you can crop the photo, how to make selection, how to give a shadow and many more. There are various photo manipulation techniques available in the digital world, and this is one of them. I have included some useful keyboard shortcuts for your convenience so that you can do your work fast and easily. I hope you have understood How to make Instagram 3D pop out pictures. This is another convenient way to make a 3D pop out effect.