When you capture a photo of your own or capture a landscape nature image, you will not get a perfect sky every time. Now, if you are looking for a way to change the sky, you can do it easily with photoshop.
In this tutorial article, I am going to show you How to replace sky in photoshop. So, read this article till the end and follow the steps with care, you will get easy instructions from this article, you will be able to do it. So, let’s see how to replace sky:
Sky replacement images in photoshop
Step 1: Insert an Image in Photoshop
First of all, insert a photo in photoshop. To do this, go to the “File” menu and select the “Open” option. Then, go to your image location and select your image and then click on the “Open” button.
Step 2: Make Selection of the Sky
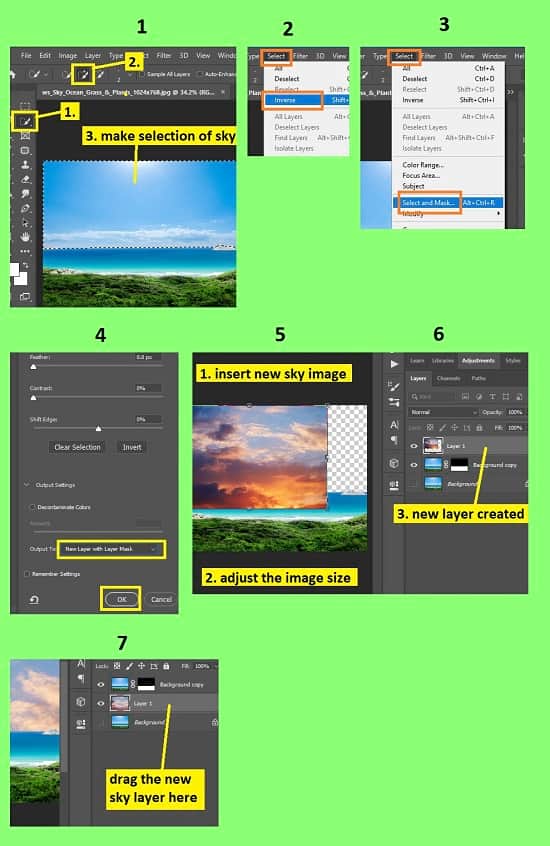
- To make a selection around the sky, using “Quick selection tool” is the easiest way to do it. But, if the sky has complicated edges, you should use “Lasso tool” or “Polygon lasso tool” or “Magnetic lasso tool”.
- How these Selection Tools Works:
- Lasso tool: With the Lasso tool, you will be able to draw the selection border around the object freely like a pencil.
- Polygonal Lasso tool: With the Polygonal Lasso tool, you will be able to draw the straight-edge selection border around the object.
- Magnetic Lasso tool: When you use the Magnetic Lasso tool, it will automatically define the border of the object.
- Quick Selection tool: With the Quick Selection tool, you have to brush over the object with a round brush tip. The brush tip is adjustable.When you drag this tool, the selection expands outward and the selection automatically finds and follows defined edges of the object.
Step 3: Masking and Removing the Sky
Method 1:
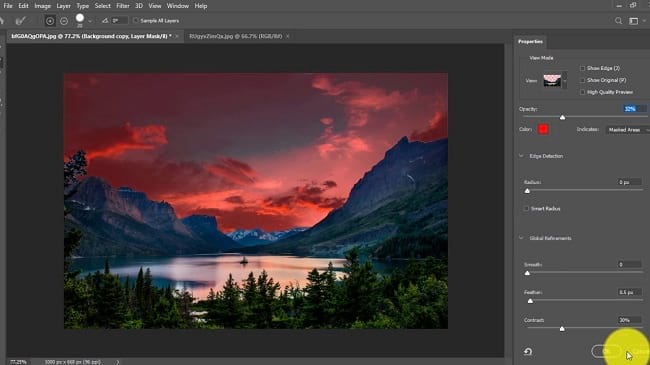
- After making the selection, we will do the masking now to fine tune the sky edges. To do that, go to the “Select” menu and choose the “Select and mask” option. This option is creating the mask upon selection. So, if you see that any part of the image is not selected or over selected, adjust the selection. If some parts are not selected, brush with the mouse on those parts. If some parts are over selected, press & hold the “ALT” button from your keyboard and brush with the mouse on those parts. After selection is done, scroll down the right side’s panel, go to the “Output settings” section, and set the “Output to” option as “New layer with layer mask” option. After that, click on the “OK” button. A new layer with a mask will be added afterward.
- Now, go to the layer panel and look at the new masked layer, you will see the image thumbnail along with the mask thumbnail there. So, press & hold the “CTRL” button from the keyboard and click on the masked thumbnail. Sky selection will appear.
- Now, press “CTRL+I” from the keyboard. Selected sky will vanish and selection will remain there.
- Then press “CTRL+SHIFT+I” from the keyboard. Selection will be reversed.
- After that, press “CTRL+I” from the keyboard again. Rest of the part will be visible afterward.
- Now, press “CTRL+D” from the keyboard to deselect the selection.
Method 2:
- After making the selection, go to the “Select” menu and select the “Inverse” option.
- Now, we will do the masking now to fine tune the sky edges. To do that, go to the “Select” menu and choose the “Select and mask” option. This option is creating the mask upon selection. So, if you see that any part of the image is not selected or over selected, adjust the selection. If some parts are not selected, brush with the mouse on those parts. If some parts are over selected, press & hold the “ALT” button from your keyboard and brush with the mouse on those parts. After selection is done, scroll down the right side’s panel, go to the “Output settings” section, and set the “Output to” option as “New layer with layer mask” option. After that, click on the “OK” button. A new layer with a mask will be added afterward.
- Now, press “CTRL+D” from the keyboard to deselect the selection.
Step 4: Change the Sky
- Now you have to insert a new sky image. You can insert image in two ways:
- Go to the “File” menu, select the “Open” option, select your desired sky image, and click on the “Open” button. The sky image will be opened in a new tab. So, go to that tab, press “CTRL+A” from the keyboard to select the whole image, then press “CTRL+C” from the keyboard to copy the image, then go to the image where you want to put a new sky and press “CTRL+V” to paste the copied image. A new layer will be added.
- Or, simply drag & drop the image from your computer drive into your image. A new layer will be added.
- Now, go to the layer panel, click & drag the newly added layer below the masked layer.
- If you want to increase or decrease the size of the newly inserted image, go to the layer panel, select the newly added image layer, then press “CTRL+T” from the keyboard to activate the free transform for the image. Or, alternatively, go to the “Edit” menu and select the “Free transform” option to activate the free transform for the image. Now click & hold the corner of the photo and then drag the mouse to increase or decrease the size of the photo as per your choice. After resizing the picture, press “Enter” from the keyboard or press “v” from the keyboard to stop the free transformation. “V” in photoshop is selecting the “Move tool”.
- After that, save your image. That’s it.
Video Tutorial about “How To Replace Sky In Photoshop” who really don’t want to read whole article just follow below video.
That’s how you can replace a sky in photoshop. In this tutorial I have shown you the process of making selection of the sky area, masking and removing the sky and finally the process of replacing the sky. For your convenience, I have included various keyboard shortcuts so that you can do your work fast. I hope you have understood How to replace the sky in photoshop. This is a very easy way to replace the sky of a photo.