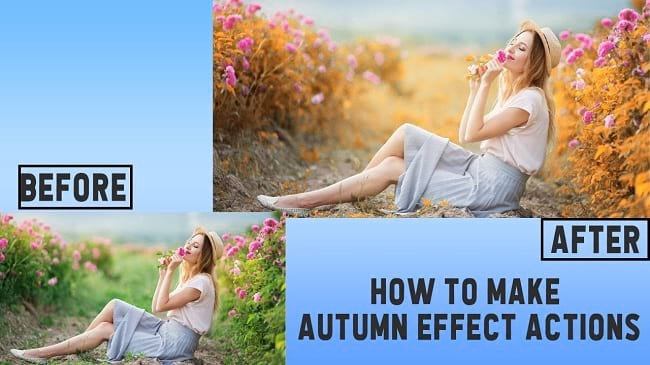
Autumn is a fascinating season for most people. The color appearance of that season and the environment people love the most. People also go one step ahead to give their normal image an autumn effect. If you have such images and want to give your images the summer effect, this article will help you. In this tutorial article, I am going to show you how to make autumn effect actions. So, read this article till the end and follow the steps with care, you will get easy instructions from this article, you will be able to do it easily. Let’s see how to make autumn effect actions:
Warm autumn color effect in photoshop
Step 1: Open Your Photo in Photoshop
To do that, go to the “File” menu and select the “Open” option. Then, go to your image location and select your image and then click on the “Open” button. Your image will be opened in photoshop afterward.
Step 2: Create an Action
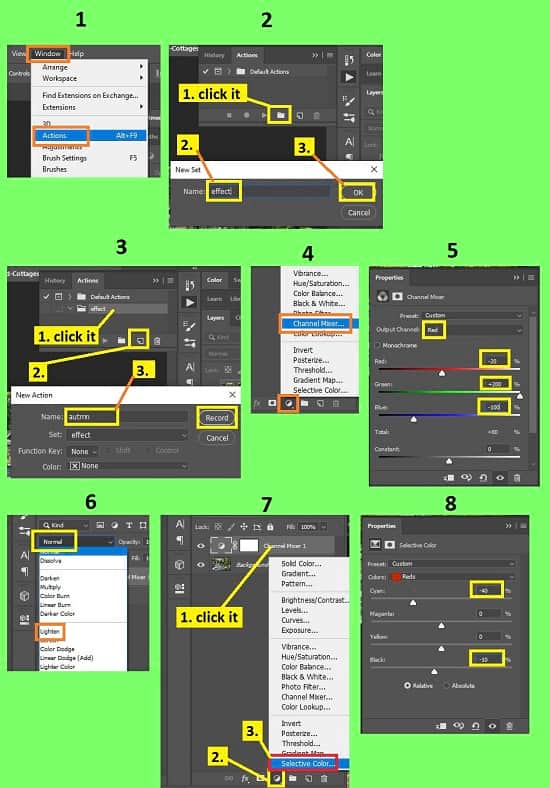
- We will activate the action panel first. To do this, go to the “Window” menu and then select the “Action option. The Action panel will appear afterward.
- Now, in the action panel, click on the “Create new set” button from the bottom of the action panel. A window will appear. From there, rename the name as “Effect” and click on the “OK” button. A set will be added in the action panel.
- Now, in the action panel, click on the “effect” and then click on the “Create new action” button from the bottom of the action panel. A window will appear. From there, rename the name as “Autumn” and click on the “OK” button.
- Now, go to the layer panel, then click on the “Create new fill or adjustment layer” button from the bottom of the layer panel and then select the “Channel mixer” option. Channel mixer panel will appear. From there, set the “Output channel” as “Red”, then set the “Red” as “- 20%”, set the “Green” as “+200%”, and set the “Blue” as “- 100%”. A “Channel mixer 1” layer will be created afterward.
- Now, go to the layer panel again, then set the blend mode from “Normal” to “Lighten”. You will find the blend mode beside the “Opacity” option.
- Now, go to the layer panel again, click on the “Channel mixer 1” layer, then click on the “Create new fill or adjustment layer” button from the bottom of the layer panel and then select the “Selective color” option. Selective color panel will appear. From there, set the “Cyan” as “- 40%”, and set the “Black” as “- 10%”. A “Selective color 1” layer will be created above the “Channel mixer 1” layer afterward.
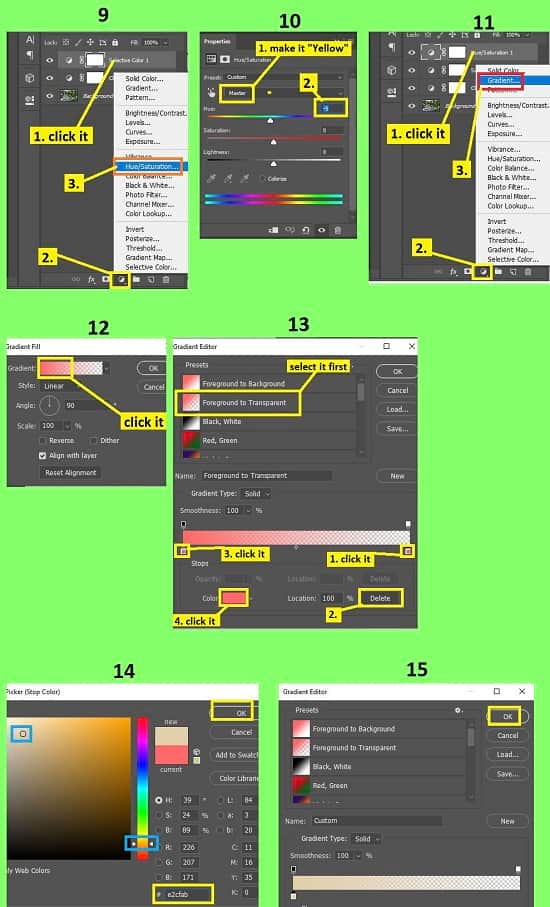
- Now, go to the layer panel again, click on the “Selective color 1” layer, then click on the “Create new fill or adjustment layer” button from the bottom of the layer panel and then select the “Hue/Saturation” option. Hue/Saturation panel will appear. From there, set the color from “Master” to “Yellow”, then set the “Hue” as “- 5%”. A “Hue/Saturation 1” layer will be created above the “Selective color 1” layer afterward.
- Now, go to the layer panel again, click on the “Hue/Saturation 1” layer, then click on the “Create new fill or adjustment layer” button from the bottom of the layer panel and then select the “Gradient” option. Gradient window will appear. From there, click on the “Gradient” option. Another window “Gradient editor” will appear. From there, select the “Preset” as “Foreground to transparent”. Then, Below you will see a color slider. From that color slider, from the right side’s slider switch, click on the down side switch, then click on the “Delete” option. Now, in the color slider, from the left side’s slider switch, click on the down side switch, then click on the “Color” option, a color picker window will appear and select the faded red color or type the color code “e2cfab” in the “#” field and click on the “OK” button.
- Then click on the “OK” button of the “Gradient editor” window.
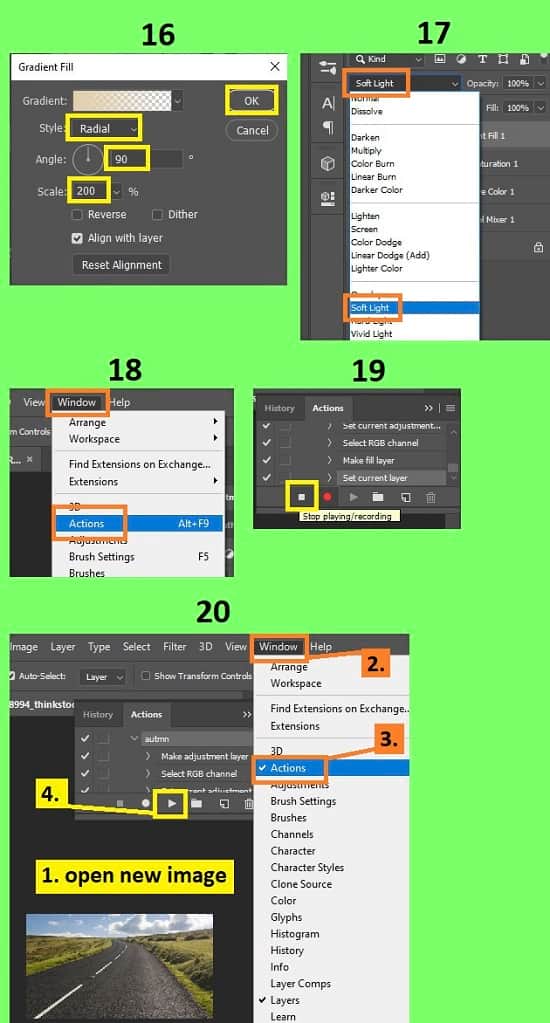
- Now, in the gradient window, set the “Style” as “Radial”, set the “Angle” as “90 degree”, then set the “Scale” as “200%” and then click on the “OK” button. A gradient layer “Gradient fill 1” will be added above the “Hue/Saturation 1” layer.
- Now, go to the layer panel, and click on the “Gradient fill 1” layer. Then, in the layer panel, click on the blend mode drop down menu and select the “Soft light” option. You will find the blend mode option beside the “Opacity” option.
Step 3: Stop the Action
- Now, we will activate the action panel again. To do this, go to the “Window” menu and then select the “Action option. The Action panel will appear afterward.
- Now, in the action panel, click on the “Stop playing/recording” button from the bottom of the action panel. Action will stop the recording.
Step 4: How to Use the Action
- Open another image in the new tab of photoshop. To do this, go to the “File” menu and select the “Open” option. Then, go to the image location and select your other image and then click on the “Open” button. Your other image will be opened in the new tab of photoshop afterward.
- Now, open the action panel again. To do this, go to the “Window” menu and then select the “Action” option. The Action panel will appear afterward.
- Now, in the action panel, click on the “Autmn”, then click on the “Play” button from the bottom of the action panel. You will see that all the actions you did in the previous image have been applied in your new image.
- If you want to make any change in the adjustment layers, just double click on the adjustment thumbnail of the adjustment layer and do your desired editing.
- Now, if you want to use curves to adjust the color. Then go to the layer panel, then click on the “Gradient fill 1” layer, then click on the “Create new fill or adjustment layer” button from the bottom of the layer panel and then select the “Curves” option. Curves panel will appear. From there, set the “Output channel” as “Red”, then click & hold the left bottom side’s curves point and drag it above as per your preference. A “Curves 1” layer will be created afterward. Like this, If you want to add new adjustments, you can do that as well.
- That’s it.
Video Tutorial about “How to Make Autumn Effect Actions” who really don’t want to read whole article just follow below video.
That’s how you can make autumn effect actions in photoshop. In this tutorial, I have made an effort to show you the easiest way of making autumn effect actions. Here I have described the way of recording the actions, adding adjustment layers of Channel mixer, selective color, Hue/Saturation and gradient, editing the adjustment layers, usage of actions and many more. Here I have tried to show you the steps in deep detail. I hope you have understood how to make autumn effect actions in photoshop.