If you use a DSLR camera, you can capture blurred background photos easily. Not only that, blurred background photos give the whole image a professional look. What if you have photos without the blurred background and you want to blur the background now? In this tutorial article, I am going to show you How to blur a background in photoshop. So, read this article till the end and follow the steps with care, you will get easy instructions from this article, you will be able to do it easily. Let’s see How to blur a background in photoshop:
3 simple steps to blur background in photoshop
Step 1: Open Your Photo in Photoshop
To open your photo in photoshop, go to the “File” menu and select the “Open” option. Then, go to your image location and select your image and then click on the “Open” button. Your image will be opened in photoshop afterward.
Step 2: Duplicate the Layer
Method 1:
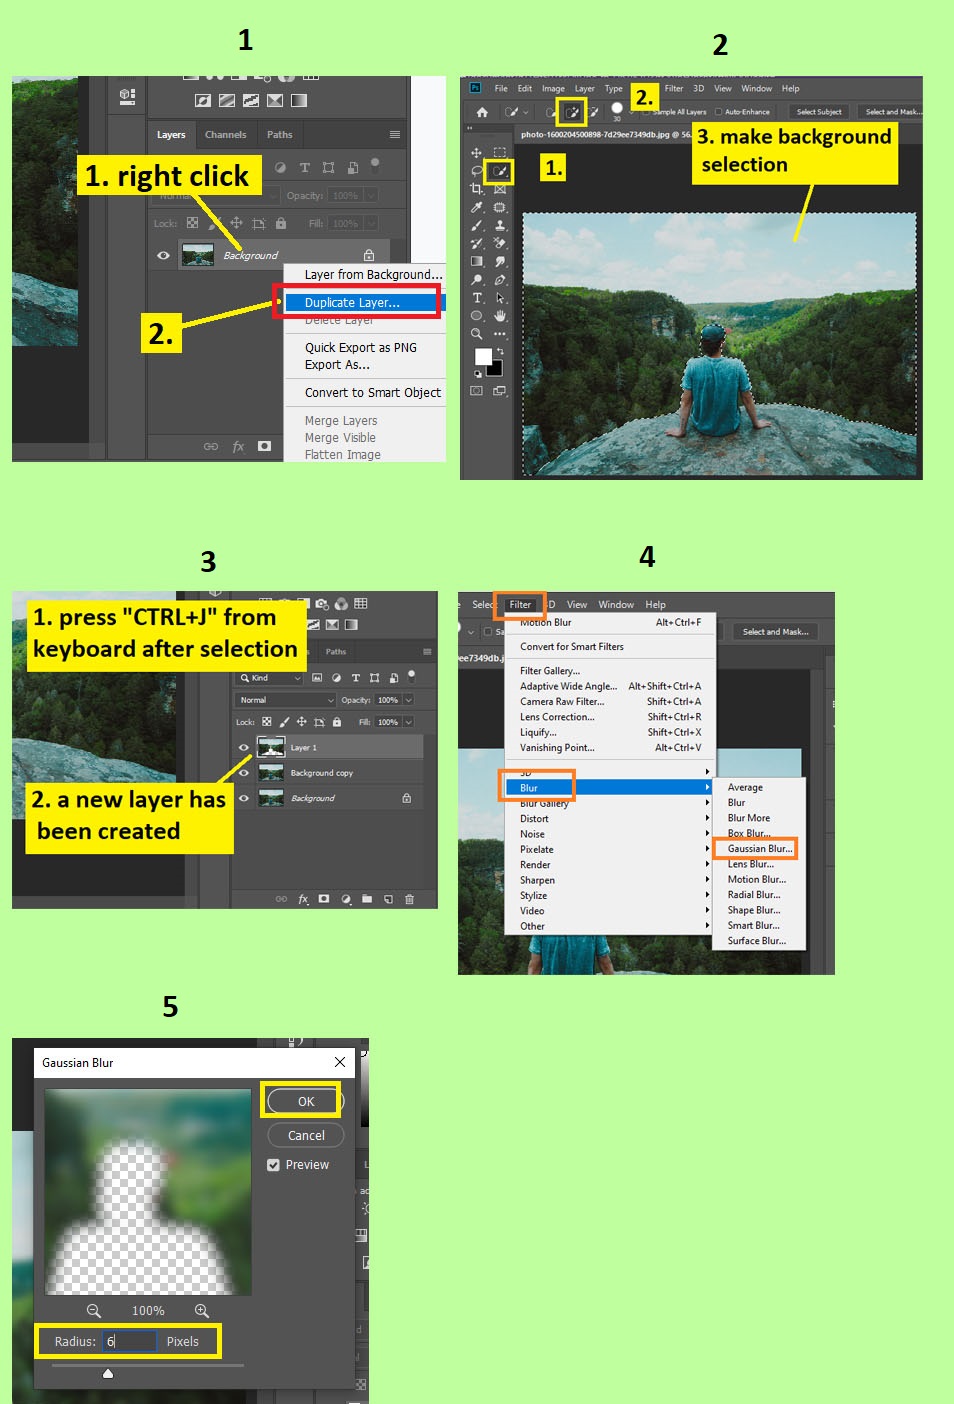
To duplicate the layer, go to the layer panel, right click on the background layer, select the “Duplicate layer” and click on the “OK” button.
Method 2:
Or, select the background layer, then go to the “Layer” menu, select the “Duplicate layer” option and then click on the “OK” button.
Method 3:
Or, click & hold the background layer and drag it towards the “Create a new layer” button from the bottom. Your background layer will be duplicated.
Step 3: Blur The Background
Method 1:
- First of all, you have to select the background. To do this, go to the left side’s tools panel and select the “Quick selection tool”.
- Now, brush over the background. You will see that selection is selecting the area automatically.
- If you see that you have over selected, press & hold the “ALT” button and then brush over the over selected areas.
- After selecting the background, copy it to the new layer. To do that, simply press the “CTRL+J” from the keyboard. A new layer will be created.
- Now, go to the layer panel, then click on the newly created layer, then go to the “Filter” menu, then go to the “Blur” option, then you will see various blur options and you can choose any one of them.
- For example, let’s choose the “Gaussian blur”. Now, suppose, set the radius “4” and then click on the “OK” button. Background will be blurred.
- That’s it.
Method 2:
- First of all, go to the layer panel, right click on the duplicate layer and select the “Convert to smart object” option.
- Now, select the subject using the pen tool. To do that, draw a line around the subject. Now make it a selection. To do that, just press “CTRL+Enter” from the keyboard.
- A selection line will appear around the subject.
- Now, go to the “Select” menu again and then choose the “Select and mask” option. This option is creating the mask upon selection. So, if you see that any part of the image is not selected or over selected, adjust the selection. If some parts are not selected, brush with the mouse on those parts. If some parts are over selected, press & hold the “ALT” button from your keyboard and brush with the mouse on those parts. After selection is done, scroll down the right side’s panel, go to the “Output settings” section, and set the “Output to” option as “New layer with layer mask” option. After that, click on the “OK” button. A new layer with a mask will be added afterward. Background copy layer will be hidden automatically.
- Now, go to the layer panel, in the masked layer, you will see the image thumbnail along with the mask thumbnail. So, press & hold the “CTRL” button from the keyboard and click on the mask thumbnail, the subject selection line will appear.
- After selecting the subject, inverse the selection. To do that, go to the “Select” menu and then choose the “Inverse” option.
- Now, deselect the selection. To do that, press “CTRL+D” from the keyboard.
- Now, go to the layer panel, right click on the masked layer and select the “Convert to smart object” option.
- Now, make visible the duplicate layer. To do that, click on the eye icon of the duplicate layer.
- After that, in the layer panel, click the duplicate layer, then go to the “Filter” menu, then go to the “Blur” option, then you will see various blur options and you can choose any one of them.
- For example, let’s choose the “Gaussian blur”. Now, suppose, set the radius “4” and then click on the “OK” button. Background will be blurred.
- That’s it.
Video Tutorial about “How To Blur A Background In Photoshop” who really don’t want to read whole article just follow below video.
That’s how you can blur the image background in photoshop. In this article I have tried to show you the way of blurring the background of an image in Photoshop. Here I have tried to show the way of selecting the background, selecting the subject, masking, blurring the background and many more. Here I also include various important keyboard shortcuts to make it easy for you. I hope you have understood How to blur a background in photoshop.